The Quote Wizard Lightning Web Component (LWC) is used to create and configure Loads, retrieve and filter Carrier Quotes, and tender Loads. There are two detail LWCs on the Quote Wizard: the Stop Configuration Portal LWC and the Location Account Name Lookup LWC.
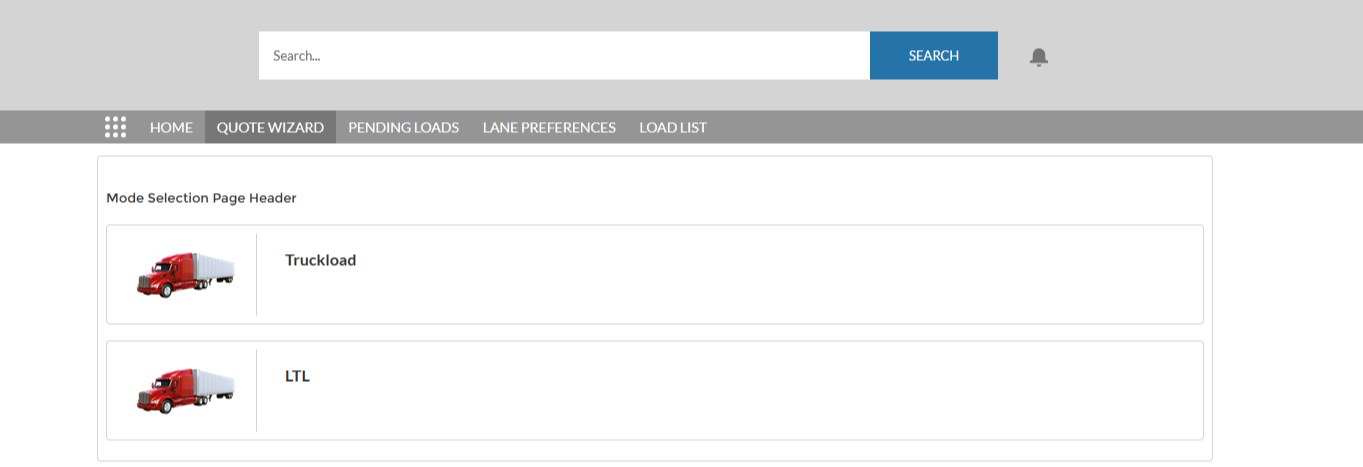
Mode Selection Page
LTL and non-LTL Load creation follow the same flow in the Quote Wizard LWC.
Configure the Load.
Retrieve a list of quotes.
Select a quote from the list.
Complete the Load configuration.
Tender the Load.
For more information on Load statuses and accepting Customer and Carrier Quotes, see the Quote Wizard Setup article.
LTL API-quoted Loads can be tendered in two ways:
Via an API
Via an email
On the Mode Selection Page, select a Mode for the new Load.
Load Entry Page
In the Load Entry Page, enter Load, Stop, and Line Item details to get quotes and save the Load. Additionally, if an insurance API integration is enabled, select Show Cargo Insurance Options to view the insurance options on Carrier Quotes.
.png)
Use the .png) (clear) button to remove field values as necessary.
(clear) button to remove field values as necessary.
Once the Load details are entered, select Save to create the Load record and view the Load details. Select the Get Quotes button to generate a list of quotes to select in the Quote Selection Page.
Stop Configuration
Use the Stop Configuration LWC to view Pickup and Delivery Stop locations that contain information such as hours and appointments and a list of accessorial charges for each Stop location. The Expected Date field automatically populates with the current date based on the time zone when creating a Load.
.jpg)
Create Stop Location Accounts
Create new location Accounts for Stops on the Load Entry Page while configuring Loads. Click the + button in the Stops section to add a new location Account, and click Save once all fields are entered.
Click Cancel to return to the Load Entry Page.
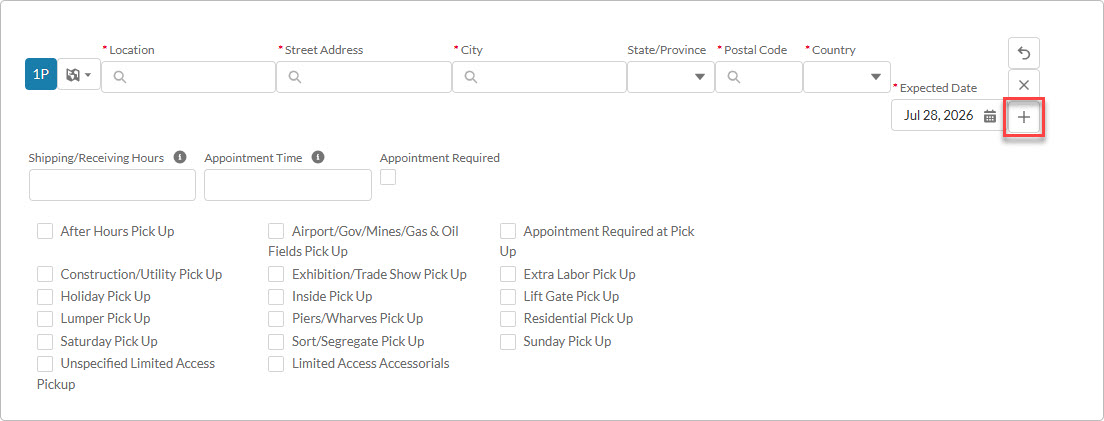
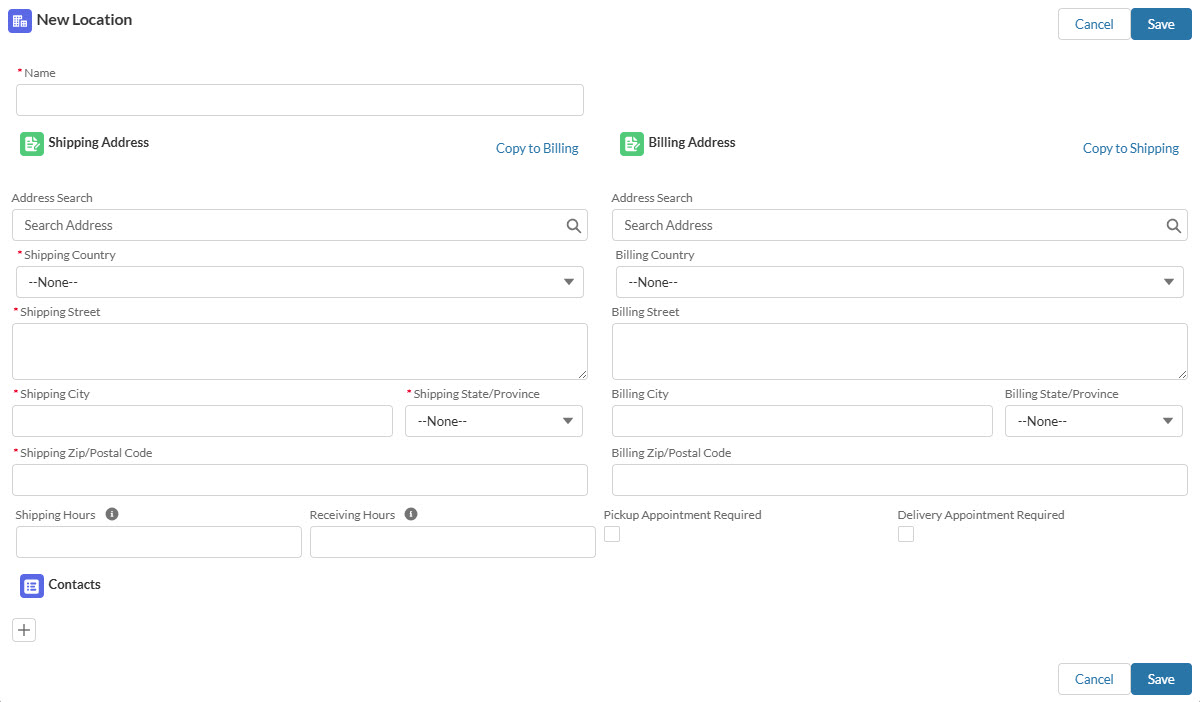
Creating a new Stop location Account record adds the location to the Stop section as either a pickup or a drop-off location. Add Contacts to the location Account as needed.
Search and Enter Stop Locations
The Address Search field searches and validates addresses using Google Maps.
When completing a shipping address search, the following fields are populated based on the search results:
Shipping Street
Shipping City
Shipping Postal Code
Shipping State
Shipping Country
When completing a billing address search, the following fields are populated based on the search results:
Billing Street
Billing City
Billing Postal Code
Billing State
Billing Country
Add, Move, and Delete Stops
Select the  button below a Stop location, and select either the Add Pickup or Add Delivery option to include additional Stop locations in the route. The Quote Wizard LWC supports creating a Load with the same Account location for multiple Stops.
Note: LTL Modes can’t add more than one Stop location per Pickup and Delivery Stop in the Quote Wizard.
Select the Move Stops  button below any Stop to open the Move Stops modal.

Select the Move Down  and Move Up
  buttons to reorder the Stops in the route. Select Done when finished.
Warning: Delivery stops can’t be the first Stop location in a route and Pickup stops can’t be the last Stop location in a route. Warnings appear requesting adjustment of the Stop location order.
Select the Delete Stop  button to remove a Stop from the route.
Warning: At least one Pickup Stop and Delivery Stop must exist. A warning message appears if there’s an attempt to delete the only Pickup Stop or Delivery Stop.
Stop Type
Select the Stop Type button next to a Stop to choose what type of Stop location should be entered. The icon in the button changes depending on the type selected.
.jpg)
Four search options may be selected from the picklist:
 Same as Customer
 Account Address
 City/State/Postal Code
 Geolocation
Same as Customer auto-populates the customer information entered in the Load Configuration LWC. The address fields populate the Shipping Address and don’t populate if the Billing Address fields are only entered in the customer’s Account.
The Shipping/Receiving Hours and Appointment Required Stop fields, as well as the Internal Notes, are populated in the Stop Configuration Detailed LWC based on the Customer Transportation Profile.
.jpg)
Account Address renders search fields for Location, Street Address, City, and Postal Code. Entering values in any of the fields displays a list of matching Accounts. Select the Account, and the remaining fields will populate with the information from that Stop location.
The Shipping/Receiving Hours and Appointment Required Stop fields, as well as the Internal Notes, are populated in the Stop Configuration Detailed LWC based on the Customer Transportation Profile related to the Account.
.jpg)
City/State/Postal Code displays search fields for City and Postal Code. The Country field must be selected first to search for values in City and Postal Code. Entering values in these fields displays a list of matching location information and populates the remaining fields with the corresponding data.
Note: This option doesn’t relate the Stop to an Account location.
.jpg)
Geolocation allows searching for locations using the location’s latitude and longitude coordinates. Enter these two fields to enter a Stop location.
Note: This option doesn’t relate the Stop to an Account location.
.jpg)
Each Stop location is displayed on the map to the left of the search fields.
All non-LTL Modes require a value in the Expected Date field for Pickup and Delivery Stops. LTL Modes only require a value in the Expected Date field for Pickup Stops.
Country Filtering
For more refined Account search filtering, check the Country Picklist Location box to place the Country field first in the list. If applicable, select a default country from the Default Country for Load Creation picklist.
For more information on configuring these two fields, see the Quote Wizard Setup article.
.jpg)
Select a country from the picklist to limit the account search results to the selected country. For example, selecting US will only return Customer Accounts with a United States billing address.
Hours and Appointments
By default, the following fields are included in the Stop Configuration:
Shipping/Receiving Hours
Appointment Time
Appointments Required
The Same as Customer and Account Address Stop Types populate the Shipping/Receiving Hours and Appointment Required field based on the Customer Transportation Profile related to the Account for the Stop location.
Add an Appointment Time for a Stop location by entering the time in a 24-hour format (for example, 15:30) or as a time interval (for example, 15:30-18:00). The colon is optional in both formats. Edit these fields as necessary for each Stop location.
Warning: If the appointment time doesn’t use the correct format, the Quote Wizard LWC displays an error message and doesn’t save.
Line Items Considerations
There are a few exceptions when configuring a Load in the Customer Portal. The following Line Item fields are required on the Load Configuration LWC:
Item Number
Item Description
Weight
Pickup Stop
Delivery Stop
For LTL Loads, it’s recommended to enter the following fields, even if they aren’t required:
Length (calculates Linear Feet)
Width (calculates Linear Feet)
Height (calculates Linear Feet)
HU Count
Handling Units
NMFC Class fields (can be automatically calculated using the
 button to the right of the field)
If the HU Count, Handling Units, and NMFC Class fields aren’t entered for LTL Loads, the two toast messages below appear with a message in the Quote Wizard LWC that no Carrier Quotes returned.
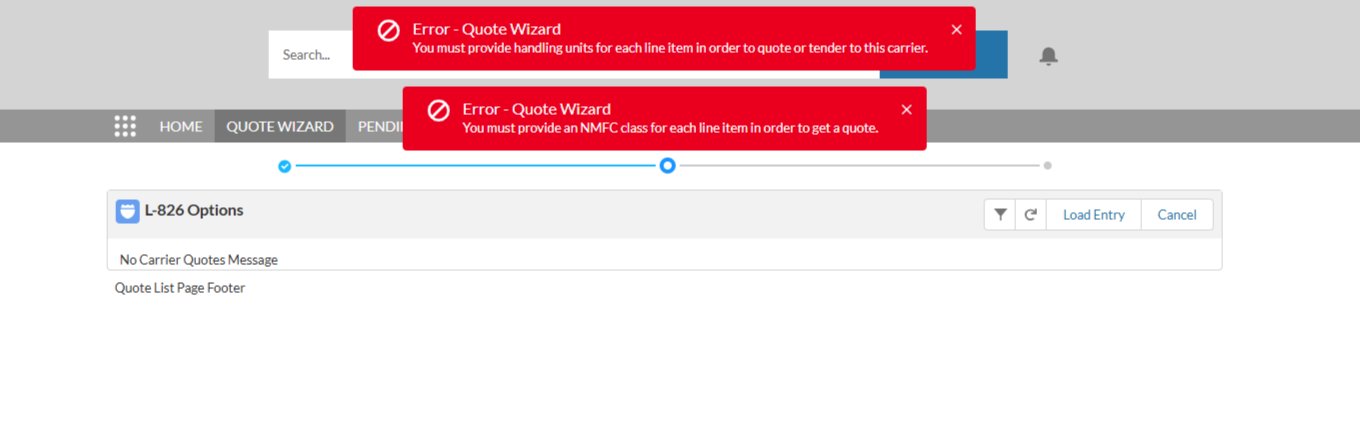
Additionally, to return quotes for the Load Mode Volume LTL, the Linear Feet field must populate a value. This field is calculated automatically using the Length, Width, and Height Line Item fields. The Linear Feet field can’t be entered manually unless the field is entered in the Load Detail. If these fields aren’t populated, the following Toast Message appears:
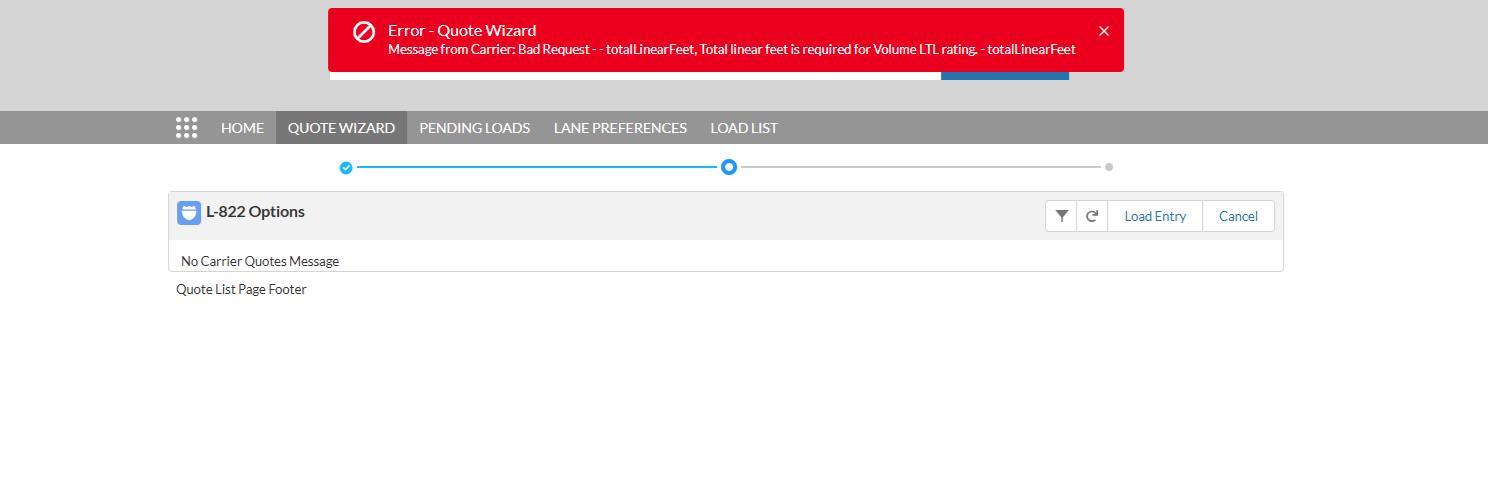
In the above example, no Carrier Quotes returned; however, keep in mind that without a calculated value in the Linear Feet field, Carrier Quotes for LTL Loads may still appear. The only Load Mode that is suppressed is Volume LTL.
For non-LTL Loads, HU Count, Handling Units, NMFC Class, Length, Width, and Height don’t need to be included to retrieve quotes or to tender the Load.
Quote Selection Page
Use the Quote Selection Page to perform the following actions:
Select an LTL or non-LTL quote
Refresh quotes
Return to the Load Entry Page
Filter LTL quotes
Additionally, cargo insurance requested via API allows the insurance to be included or excluded as well as view the insurance price difference.
By default, quotes appear with the overall marked-up total. LTL Loads display a list of marked-up Carrier Quotes from stored rate entries and API carriers.
.png)
If no Carrier Quotes are available for the LTL Load, the Load Tender Page is rendered. Additionally, the Threshold Surpassed Message appears with the opportunity to provide additional Load information.
Non-LTL Loads display a single Customer Quote from a stored rate entry:
.png)
Note: For Non-LTL Loads, the Quote Selection Page appears if the customer has rate entries that matches the Load details entered. If no rate entries match, the Load Tender Page is rendered. See the Rate Entry Detail article for more information about stored rate entries.
Quote Filter
Use the quote filtering options to further refine Carrier Quote results.
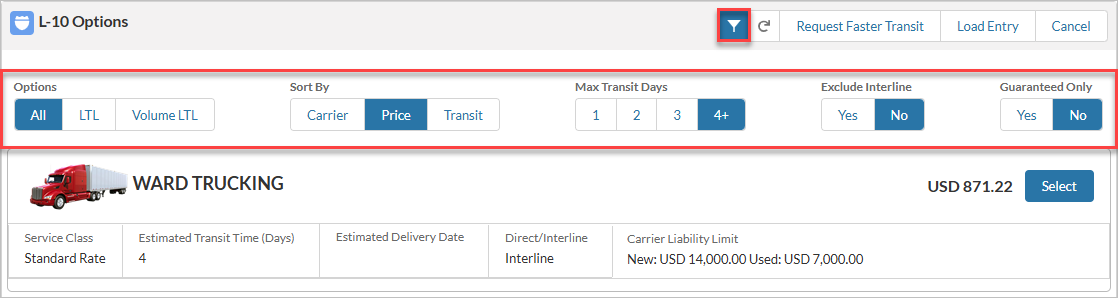
Quotes may be sorted based on the following criteria:
Load Mode: All, LTL, or Volume LTL
Sort By: Carrier, Price, or Transit
Max Transit Days: 1, 2, 3, or 4+
Exclude Interline: Yes or No
Guarantee Required: Yes or No
Selecting a filter automatically updates the list of quotes.
Request Faster Transit
Note: The Request Faster Transit feature is only available for LTL Modes. See the Quote Wizard Setup article for more information on configuring this field.
The Request Faster Transit feature allows requests for expedited shipment transit time when the Carrier's proposed delivery timeline doesn’t align with preferred shipping requirements. This eliminates the need to rely on email communication with a customer support representative.
After clicking the Request Faster Transit button, a modal appears to enter the Requested Delivery Date, Requested Delivery Time, and Comments fields.
.png)
Load Tender Page
Warning: Attempting to save or tender a Load with an Expected Ship Date in the past produces an error. Adjust this date to tender the Load.
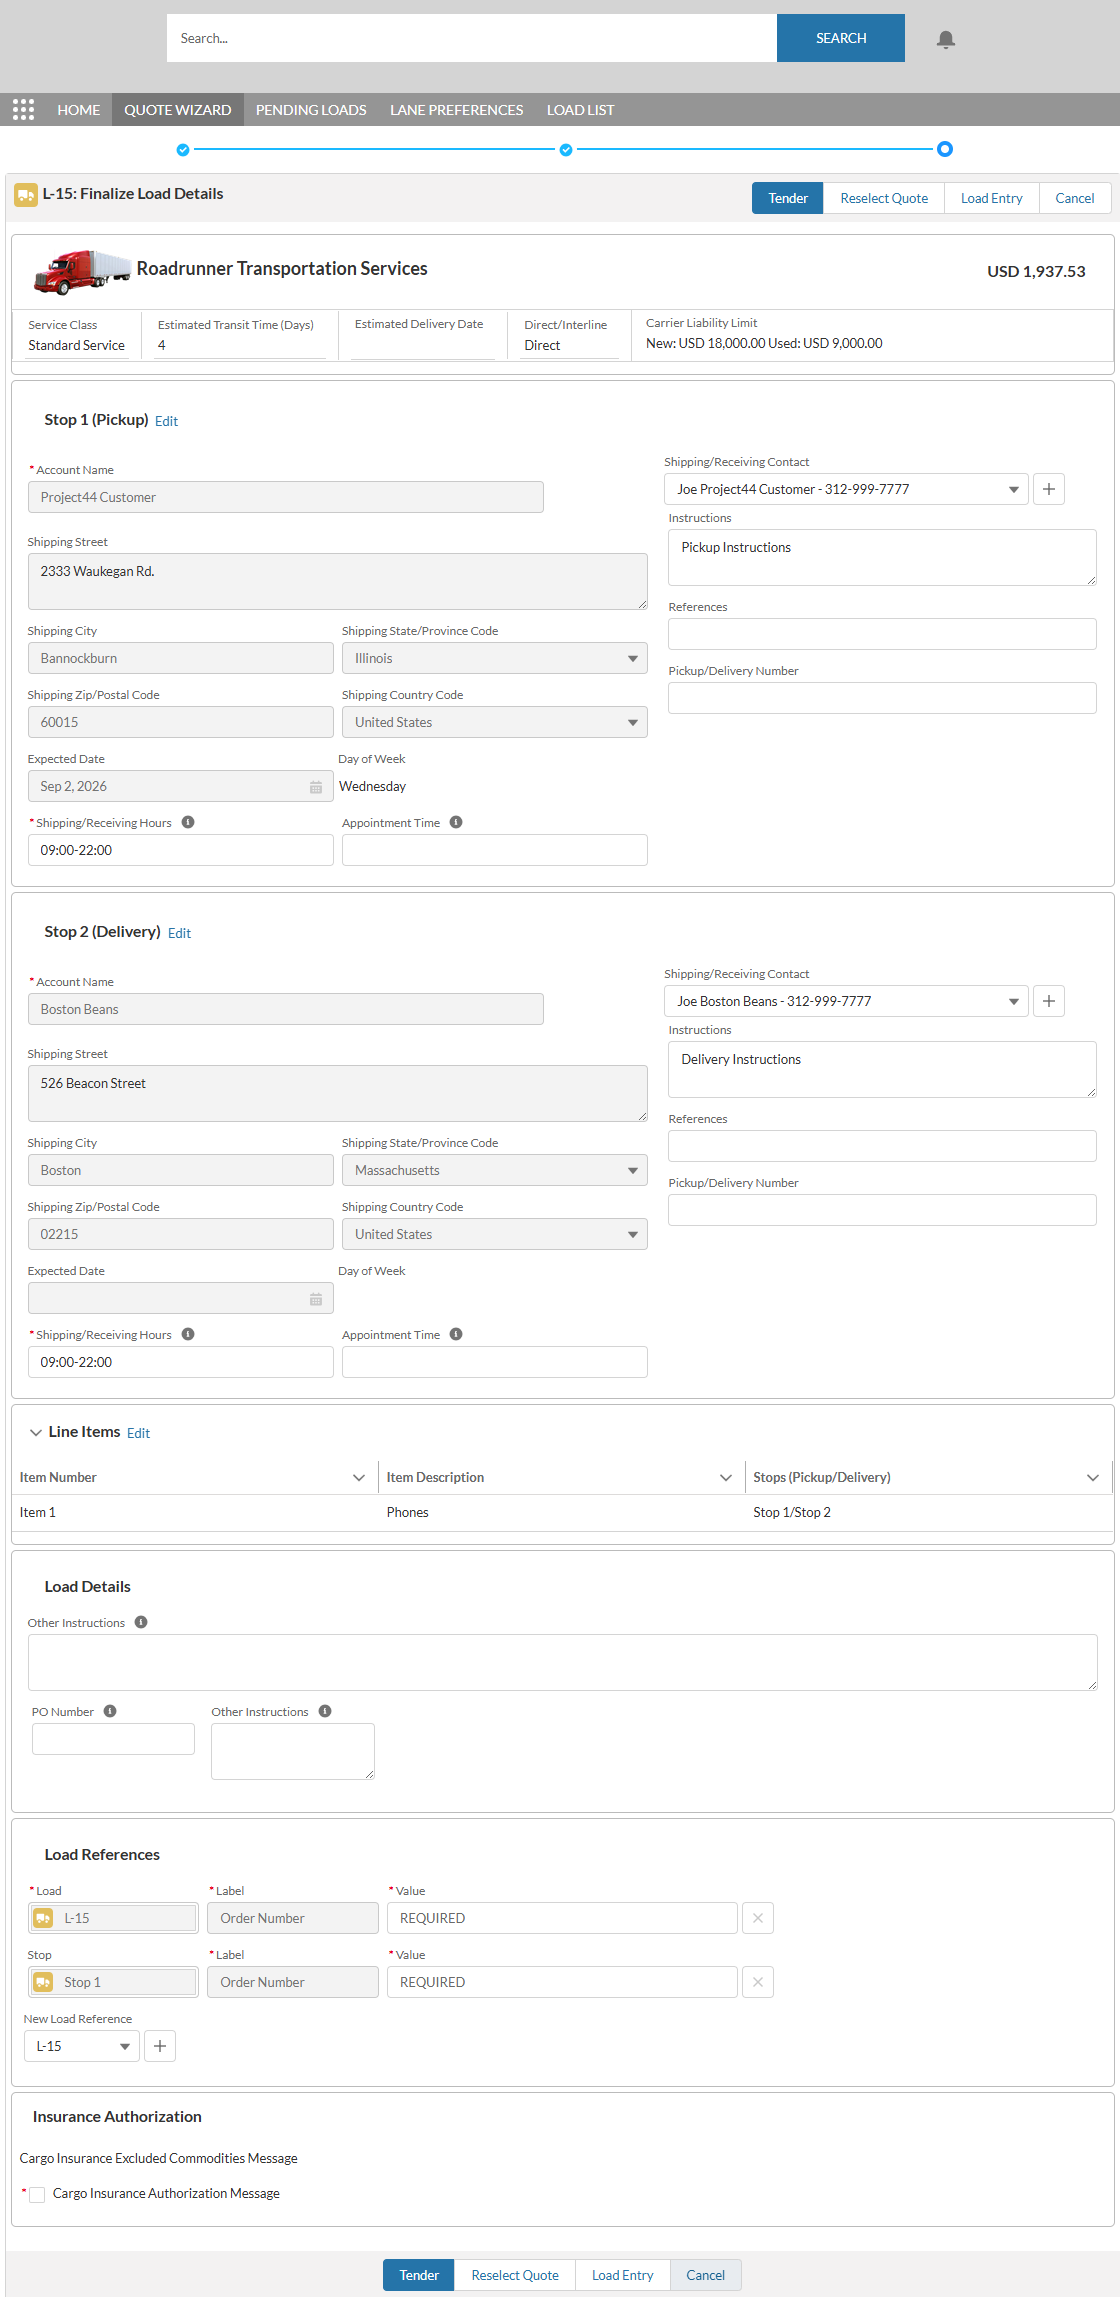
Use the Load Tender Page to:
Finalize Stop details (Locations and Contacts)
Enter additional Load details
Enter additional Load Entry References
Perform the final authorization for API insurance
This action is available only when the Includes Cargo Insurance Fee field is checked for the selected quote.
Tender the Load or submit for review
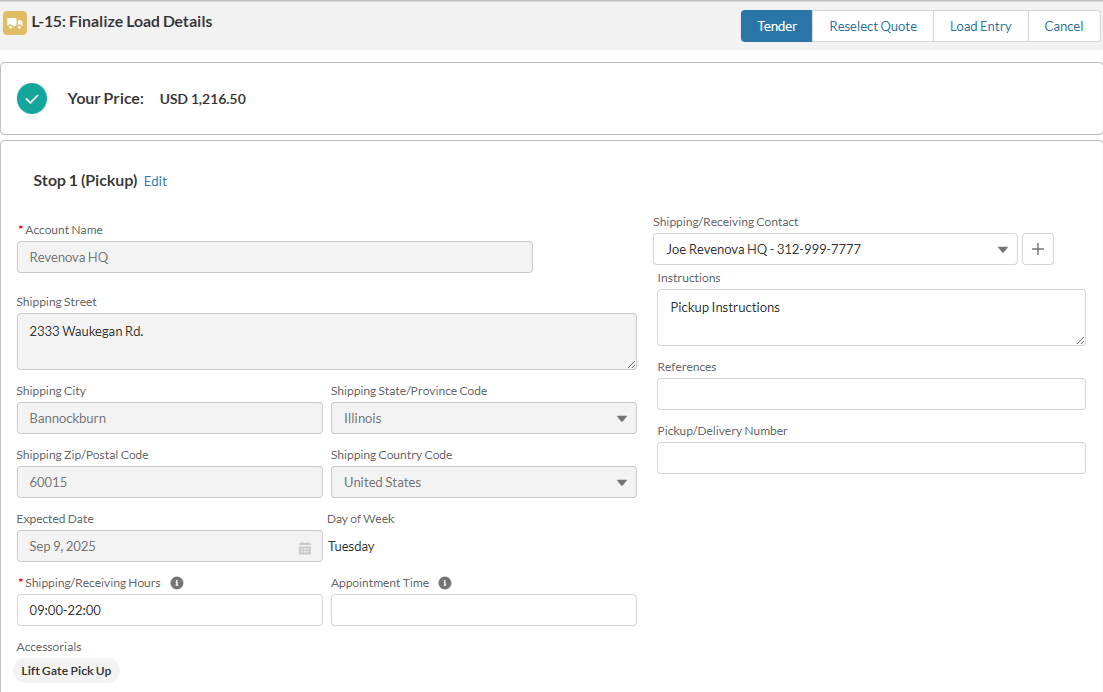
Navigate back to the Load Entry Page by clicking the Load Entry button, or select a different quote by clicking the Reselect Quote button.
Line items, accessorial charges, and the selected quote are displayed on the page for review.
API Insurance
If an API Insurance integration is enabled, additional cargo insurance can be requested and authorized in the Quote Wizard LWC. Currently, only Falvey Insurance is supported. For more information, see the Insurance article.
When a Load is created and the Show Cargo Insurance Options field is checked, the Cargo Value field is required before retrieving quotes or saving the Load. The Cargo Insurance Offered field on the Load is checked, and (if getting quotes) the price of the insurance is listed.
The Insurance Provider Fee and Insurance Service Fee fields don’t display in any view in the Customer Portal.
.png)
If insurance is included, an additional panel is displayed on the Quote Wizard Tender Page with a box that must be checked before tendering the Load.
The Cargo Insurance Certificate URL may be added to the Load Options LWC in the Customer Portal. For setup and other information, see the Load Options LWC documentation.
Restricted Cargo
Some insurance APIs have restricted cargo which isn’t covered; this is NOT enforced by Revenova. While not an exhaustive list, find commonly excluded commodities in the Cargo Insurance Excluded Commodities article.


