Overview
Revenova TMS™ (TMS) is the leading multi-modal Transportation Management System on the Salesforce AppExchange. As a fully-native force.com managed package, it seamlessly connects to your CRM environment and takes advantage of all the capabilities inherent in the Salesforce platform. These include mobile support, point-and-click reports and dashboards, anytime/anywhere access, and industry-leading reliability, scalability, and security.
Document Purpose
The purpose of this document is threefold:
- To assist everyday TMS users in the performance of their tasks.
- To assist managers/team leaders in optimally configuring TMS.
- To assist Salesforce administrators in understanding and supporting TMS.
Managed Package Installation
Please see the Revenova TMS Installation Guide for basic instructions on how to install Revenova TMS into an existing Salesforce environment. You will also need to read this document to complete all but the simplest installations.
Salesforce CRM and Platform Online Help
Salesforce provides an extensive library of online text and video describing the capabilities of the Force.com platform and the CRM (and other) products it provides. Please click on the Help links and icons present on every page of the application to access these resources.
Critical Customer Responsibilities
- Make sure you maintain your security profiles and sharing settings so that the appropriate capabilities and data are exposed to your various user groups.
- If you are using the Customer Portal or Carrier Portal, you must make sure that all data that should be inaccessible is properly secured with security profiles and sharing settings.
- If you are using the Sales Tax table, ensure that the rates defined there are current and correct.
- Make sure the TMS Auto-Reject Carrier Transportation Profile workflow rule is active or an equivalent method to invalidate unacceptable carriers.
- Enter the Inbound Packet IP Ranges for all credentials records for APIs that provide “push” updates to limit inbound transactions to those IP addresses.
Salesforce Environment Configuration
As a native Salesforce application, TMS is completely seamless within your Salesforce environment. This means that most configuration activities that are Salesforce platform-related are exhaustively described via online help and training videos. Please access this help via the links on every page for the following platform-related activities:
- Adding or modifying a user.
- Deactivating a user.
- Adding, modifying, or deleting a security profile.
- Changing a page layout for a specific records type or table.
- Adding, modifying, or deleting a tab-based list view.
- Creating dashboards and reports.
Application Preferences
Most TMS configuration occurs from the TMS Admin tab:

Global Settings
Click on the TMS Admin🡪Configuration link to access global settings:
- Product Configuration
- Shipper or Broker/3PL.
- This setting determines the global default tender document – BOL for shipper and Carrier Rate and Load Confirmation for Broker/3PL and default load payment terms.
- This setting also determines whether customer-related information (in addition to carrier-related information) is displayed in the Freight Quote page.
- Default Transportation Profile
- If set, controls global defaults for:
- Tender document type(s).
- Customer and Carrier assignments to lanes.
- Customer and Carrier rates, if stored locally.
- Relevant for both Shipper/Consignee and Carrier (“Sell” and “Buy” side).
- If set, controls global defaults for:
- Customer Invoice Creation Trigger
- If set, represents the Load Status value that will trigger the auto-creation of a Customer Invoice (assuming the presence of an accepted Customer Quote off of which to model the invoice).
- Carrier Invoice Creation Trigger
- If set, represents the Load Status value that will trigger the auto-creation of a Carrier Invoice (assuming the presence of an accepted Carrier Quote off of which to model the invoice).
- In Transit Load Trigger
- Determines which first stop date, when populated, auto-sets a Load to “In Transit” status.
- Delivered Load Trigger
- Determines which last stop date, when populated, auto-sets a Load to “Delivered” status.
- Email Communications Site URL
- Set to external, secure URL for the site you set up for the “email loop” smart email link process.
- Default Weight Search Bracket
- When viewing the Quick Quote pages’ load history, what plus or minus should we use when filtering on load weight.
- Stop Charge Accessorial
- The accessorial record (usually “Stop Off”) that is used for stop charges (which can be automatically added via customer and carrier stored rates).
- HazMat Accessorial
- The accessorial to automatically add to any hazmat loads (as defined on the line items).
- Carrier Removal Accessorial
- The accessorial to automatically add to any carrier quote if the carrier is removed from a load.
- Cargo Insurance Accessorial
- The accessorial to automatically add to any customer quote if insurance was requested via API.
- Invoice Management
- Which product is being used for invoice and payment management.
- Truck Posting Retention Period (Days)
- How many days to retain one-time and load board truck postings.
- Load Posting Refresh Interval (Minutes)
- How often should active load board postings be refreshed.
- Tracking Update Frequency (Minutes)
- How often to process MacroPoint inbound API location update.
- Default Carrier Mode
- The mode to use when auto-creating carriers from SaferWatch, RMIS or MyCarrierPackets when mode information is not available in the packet.
- Pricing Workbench Batch Size
- Batch process batch size for pricing workbench.
- Customer Invoice File Prefix
- Prefix customer invoices with Load Number or Invoice Number.
- Queued Transaction Retention Period
- Delete Queued Transaction records older than the retention period.
- Queued Transaction Maximum Process Count
- The maximum number of parallel queue transaction job processes. Default is “3”.
- Override AR Calculator Class
- Custom Apex Class for overriding the packaged Revenova calculation of Unbilled, Current, and Past Due AR and Unapplied Cash/Credit Memos.
- HubTran Credentials Selector
- The picklist field on the Load table (if any) that determines which credentials to use.
- Public Customer Community URL
- URL to the email loop customer guest community page.
- Public Carrier Community URL
- URL to the email loop carrier guest community page.
- Inbound API Community URL:
- URL to guest community REST service for push API data capture.
- Freeze Load Number
- Check this box to prevent users from changing the Load Number field on loads.
- Freight Plans Enabled
- Check this box to allow for complex, multi-stop, cross-dock, multi-carrier loads.
- Disable Customer Creation
- Check this box to disallow new customer creation when creating a load.
- Calculate and Display Taxes
- Check this box to enable the display and calculation of (Canadian) sales taxes for Customer Quotes and Invoices.
- Calculate Negative Taxes
- Check this box to calculate negative taxes on customer credit memos.
- Enforce Customer Credit Limits
- Enable if you want to enforce customer credit limits.
- Enable Commodity Lookup
- If checked, commodities can be searched on during line item and rate entry creation.
- Enable Community Commodity Lookup
- If checked, commodities can be searched on during customer community line item entry.
- Used Default Pickup/Delivery Status
- If checked, the default logic to populate the stop- and load-level Pickup/Delivery Status fields will be employed.
- Display Shipping/Receiving Hours (on Carrier Documents)
- If checked, Shipping/Receiving Hours are displayed on carrier documents.
- Calculate Linear Feet
- If checked, linear feet will be auto-calculated for each line item if (1) dimensional fields are populated and (2) the mode or equipment type is set on the load. The cube information comes from either the mode’s default equipment type or the provided equipment type.
- Enabled GPS-Only Loads
- If checked, loads with non-street-address stops (latitude/longitude only) are supported.
- Use Default Cargo Summary
- If checked default calculation will be used for Line Item Cargo Summary field.
- Allow Carrier Address Updates
- If checked RMIS and MyCarrierPackets can update carrier billing and shipping addresses.
- RMIS Carrier Remit To Sync
- If checked the Carrier Remit To information from RMIS or MyCarrierPackets will automatically update the Carrier Remit To field on the Transportation Profile.
- Customer Optional on Load Creation
- If “true” customer entry is optional when creating loads.
- Mode Optional on Load Creation
- If “true” mode entry is optional when creating loads.
- Assign Default Equipment Type
- If “true” upon mode selection the default equipment type will be set on the new load being created.
- State Country Picklists Enabled
- Read-only field that indicates if State and Country Picklists are enabled.
- Allow Carrier Document Upload
- If checked allow carriers to upload documents via the email loop process.
- Customer Rebates Enabled
- If checked calculate customer rebates on Customer Quotes.
- Show Freight Class Calculator
- Enabled if you want to use the NMFC Class calculator when configuring line items for a load.
- Access Historical Attachments
- If checked retrieves files from BOTH the Attachment and Content Version tables. Release 7.7 and later customers with no historical attachments should leave this UNCHECKED.
- Use Platform Events
- If checked offload certain Queued Transaction Job traffic to Queued Transaction Events (Platform Event) to improve performance.
- Disable Fuel Card Auto-Naming
- If checked the automatic fuel card naming convention will not be used.
Freight Plan
- Freight Plans Enabled
- If checked and the Freight Plan Management batch job is not running or scheduled, the Job Monitor LWC will show the Status as with a red icon.
- Monochrome Freight Planner
- If checked, use gray for all covered loads on Freight Planner display.
- Freight Plan Cost Allocation Method
- Determines how carrier load costs are allocated to customer loads in a freight plan. Choices:
- Weight
- Linear Feet
- Handling Unit Count
- Packaging Unit Count
- Distance-Weighted Handling Unit Count
- Distance-Weighted Packaging Unit Count
- Determines how carrier load costs are allocated to customer loads in a freight plan. Choices:
- Freight Plan Stops – TMS Type
- Determines what TMS Types are included in the lookup on Freight Plan Stops.
Carrier Engagement Automation
- Auto-Tender Frequency (min)
- Number of minutes to wait between tendering to carriers based on carrier quotes queued for the auto-tender process.
- Auto-Tender Book It Responses
- When yes, the auto-tender process will tender to the first "Book It" request received after dedicated carriers are engaged.
- Auto-Tender Max Pay Amount
- The maximum amount of a Carrier Quote that can be auto-tendered.
- Skip Quotes in On Hold Tender Status
- If checked, quotes in the queue that are On Hold status are skipped.
- Auto-Tender Carrier Sales Rep Assignment
- Determines what user will be assigned as the Carrier Sales Rep on a load when the load is auto-tendered:
- Carrier Account Owner
- Carrier Service Owner
- Determines what user will be assigned as the Carrier Sales Rep on a load when the load is auto-tendered:
- Auto-Tender Max Pay Amount Currency
- The currency of the amount entered in the Auto-Tender Max Pay Amount (multi-currency orgs only).
Debugging
- Logging Enabled
- Enable if working with Revenova on a technical issue. Displays extra information on the user interface and in the logs for debugging purposes.
- Logging User
- The user for which logging is enabled.
- Enable Packet Replay
- If checked you can inject test API XML/JSON responses into the application by saving them as Files named after the APIOperation class you are debugging. The Logging User – if set – is the recipient of the test response.
- Retain API Response Packets
- Enable if working with Revenova on a technical issue. Attaches XML responses to load or quote records as they are retrieved.
- Block API Inbound Packets
- Enabled if no inbound traffic is desired.
Fleet Management
- Fleet Management Enabled
- If checked run all 15 passes of Fleet Management Job and enable other Fleet Management features.
- Fleet Management Email
- Errors from Fleet Management Job will be sent to this email address.
- Fleet Management Default Carrier
- The internal carrier that handles all Fleet loads.
- Timezone Update Disabled
- The Fleet Management Job sets this field to “true” if it is prevented from updating accounts with the appropriate Timezone field value.
- Driver Log Grace Period (Days)
- This setting determines how far back driver HOS logs are retrieved, allowing for adjustment of past logs for a few days.
- Fleet Management Job Last Run
- Set by the Fleet Management Job during each successful run.
- Fleet Management Pass Counter
- Set this value (0-15) to run one pass of the Fleet Management Job. Use for debugging only.
Document Production Settings
Most document-specific settings are contained in Document Options (see below). Two global settings are here:
- Include Master BOL
- If checked, include a Master BOL document and number when multi-stop load BOL documents are created.
- BOL Number Auto-Generation
- The logic (If any) when a BOL document and number is generated for a load. Options include:
- None – Use when creating your own BOL Number generation logic.
- Unique Numeric – Default behavior; unique integer generated for BOL Number.
- [Load Table Field] – Choose from any other load table fields, such as PO Number or Load Number.
- The logic (If any) when a BOL document and number is generated for a load. Options include:
EDI Settings
- EDI Enabled
- Turns on support for Load Tender (204), Load Tender Response (990), Shipment Status (214), and Load Detail and Invoice (210).
- EDI Run Frequency (Minutes)
- Determines how often Load Tenders are requested from the EDI VAN via the EDIJob process.
- Enable EDI Overrides
- Check if you want to redirect 214 and 210 transactions to a different EDI Provider or Trading Partner – overriding default behavior – for certain accounts.
- EDI Administrator
- Set to the person who should receive emails in case of EDI issues and errors.
- EDI Shipment Id Field
- The field from the Load table that is used to uniquely identify Shipments/Loads in EDI transactions. Usually the PO Number field as designated by the EDI trading partner(s) sending Load Tenders.
- Display EDI References on Carrier Docs
- Check if you want to display EDI reference numbers on the carrier and driver tender documents.
- Enable EDI Transaction Logging
- Check if you want a record of each EDI XML packet stored with the load in the EDI Transaction table.
- EDI Freight Charges Code
- Passed in outbound EDI 210 transactions, if set.
- EDI Fuel Surcharge Code
- Passed in outbound EDI 210 transactions, if set.
- EDI Transaction Logging Types
- List of transactions that will be logged to EDI Transaction table.
Carrier Management/Load Status
- Expiration Check Policy Types
- Which insurance policies should be checked for expiration before tendering a load to a carrier.
- Policy Expiration Lead Time (Days)
- How many days before policy expiration is a carrier ineligible for tendering.
- Carrier Status Reply To User
- Defines which user’s email is the reply to email for load status emails to carriers.
- Carrier Status Reply To Email
- If a carrier simply replies to a carrier status email (instead of clicking on the embedded link) the reply will be sent to this email address (If Carrier Status Reply To User is set to Email).
- Carrier Status BCC User
- If checked, the user is BCCed on individually-sent carrier status emails.
- Carrier Monitor Email
- The email address that receives status messages at the completion of the Carrier Monitor Job (SaferWatch).
- Carrier Monitor Last Run Date
- Last time carrier FMCSA monitoring job was successfully run.
- Carrier Monitor Run Frequency (Mins)
- RMIS and MyCarrierPackets only: how often the “net change” job runs to get new onboarding carriers or carriers that have updates.
- Load Status Start Time, Load Status Email Frequency (Hrs), and Load Status API Frequency (Hrs).
- Determines how often the Load Status job runs by email and API update type.
- This job requests status of assigned, dispatched, and in-transit loads based on the preferred communication method with the carrier (service).
- API status loads are pinged for 5 days after delivery to capture any available POD images.
Multi-Currency Settings
- Default Load Currency
- The currency code to use for new load records.
- Use Dated Exchange Rates
- Check if you have a multi-currency instance and are using Dated Exchange Rates for conversion of load-level currency rollup fields.
Load Name Setup
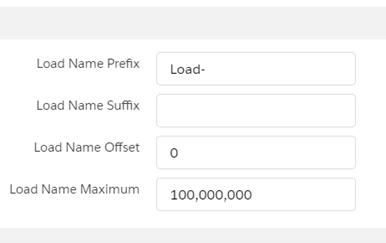
These fields define the format and start number for the load name field (Load Number).
Load Locking
- Enabled Operations Load Locking
- Check if you want to use load locking to prevent certain simultaneous operations on loads.
- Load Locking Hold Time
- The number of minutes a load lock is active.
If load locking is used, make sure internal profiles have View All Custom Settings checked.
Document Options
Document Options represent a group of logos, email templates, instruction text, terms and conditions, and footer text specific to a division, mode, or user. The following major processes and documents are tailored based on the selected Document Options record:
- “Email Loop” Process with Customers and Carriers
- Online Carrier Application
- Customer Quote Confirmation Email and PDF Document
- Carrier RFQ Email and PDF Document
- Carrier Rate and Load Confirmation Email and PDF Document
- Bill of Lading Email and PDF Document
- Driver Load Confirmation Email and PDF Document
- Customer Invoice Email and PDF Document
- Customer Invoice Batch Email and PDF Document
- Shipping Label format
Document Options Selection Criteria records allow you to designate when to use which Document Options record. These criteria are based on:
- Mode
- (Any) User Field
Common TMS customer scenarios include:
- One global Document Options record that serves for the entire company.
- Division/Office-specific logos and legal text requiring distinct Document Options records.
- Mode-specific logos and legal text for different groups (LTL versus Truckload) within a brokerage.
Document Options “Cascade”
Document Options work in “cascade” fashion. If a field for a particular Document Option is missing, the global record’s value is used. This allows you to create “sparse” document options records without having to re-key all the global defaults values that are still relevant.
For example, if the only difference between the global record and a mode-specific record is the BOL Legal Text, you would only have to enter that one different field on the mode-specific record.
Document Options Load Field
The Document Options Load field is auto-populated during the email or fax tender process. This can be manually overridden later to, for example, send out a customer invoice with a different logo. Before tendering, the Document Options record is dynamically selected based on the Document Options Selection Criteria, if any.
Document Options Override/Additions
You may add any Load, Stop, and Line Item fields to many of the documents. You may add any Customer Quote fields to the Customer Quote document only, and Carrier Quote fields to the BOL document only.
You may also suppress the HazMat and NMFC sections of documents (if these fields are not relevant to your loads).
You may also suppress or change the logo image on a per-document basis.
Note that if you add “flex fields” to documents that appear on the Customer Portal or Email Loop site (such as Customer Invoice and BOL) you must make those fields accessible to the related external security profile.
Document Options Maintenance
Access Document Options from the TMS Admin🡪 Document Options link:
You are presented with the list of Document Options and Document Options Selection Criterion records:

In this case there are two Document Options records and one criterion for selecting the non-global default record. This criterion indicates that the “Truckload Options” record should be used IF:
Mode = “Truckload” AND User Division = “Tractor”
If this criterion evaluates to “false”, the global Document Options record is used to tailor documents and emails.
Make sure you have exactly one Document Options record with Global Defaults set to “true”.
Make sure to enter relevant values for all the fields on (at least) the global Document Options record.
Selecting a Document Options record from the list allows the user to edit the record details.
General Info / Email Templates
- Name: Uniquely identifies the record.
- Global Defaults: Make sure exactly one record has this checked.
- Mask Shipper/Consignee on Carrier RFQ: Check if you want to hide shipper/consignee identity from carriers on the Quotation Request and quote entry form.
- Mask Shipper/Consignee on Carrier Tender: Check if you want to hide shipper/consignee identity from carriers on the Carrier Rate and Load Confirmation document until after a load tender Is accepted. Note that the BOL is also not sent until a tender is accepted if this field is checked.
- No Documents Until Tender Accepted: Check if you do not want the carrier to receive RFQ or tender documents via email until the tender is accepted.
- Enabled Assign Carrier On Tender Option: Check if you want to be able to assign a carrier on (email) tender and not require an Accept link to be clicked by the carrier.
- Request Tender Decline Reason: Check if you want to require the carrier to specify a reason for declining a tender.
- Itemize Carrier Quote Accessorials: Check if you want carriers to enter itemized accessorial charges on email RFQ links.
- Document Account: Populates certain documents with name and address when TMS user company referenced.
- Default Carrier Bill To: Populates the Load’s Carrier Bill To field automatically upon tendering.
- Suppress HazMat Column: Suppress HazMat column on all documents if not a HazMat load.
- Suppress NMFC Columns: Suppress NMFC columns on all documents is not populated.
- Quote Reply To Email: The reply to email for quote emails to customers/carriers based on the Quote Reply To Email Option.
- Quote Reply To Email Option: Determines the reply to email for system quote emails to customers/carriers (Quote Reply To Email or user’s email).
- Tender Reply To Email: The reply to email for tender emails to carriers based on the Tender Reply To Email Option.
- Tender Reply To Email Option: Determines the reply to email for system tender emails to carriers (Tender Reply To Email or user’s email).
- Document Logo: Select a logo that will appear on all documents.
- Email templates: Select 11 email templates for all email communications with customers and carriers. The simplest approach is to use the default settings and modify the templates to taste.
Document Settings
You may partially or completely override the appearance of TMS documents produced by the system. The documents you can tailor here are:
- Bill of Lading
- Carrier Application
- Carrier Quotation Request
- Carrier Rate and Load Confirmation
- Customer Invoice
- Customer Invoice Batch
- Customer Rate and Load Confirmation
- Driver Load Confirmation
- Ocean Bill of Lading (Ocean FCL mode loads)
- Shipping Label
- Warehouse Lading Form
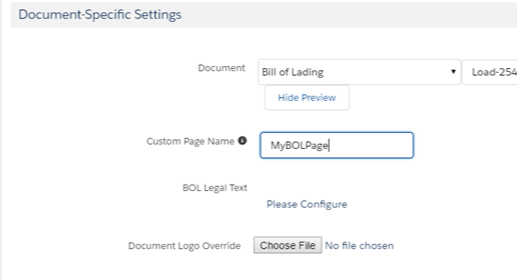
Select the document you want to configure:
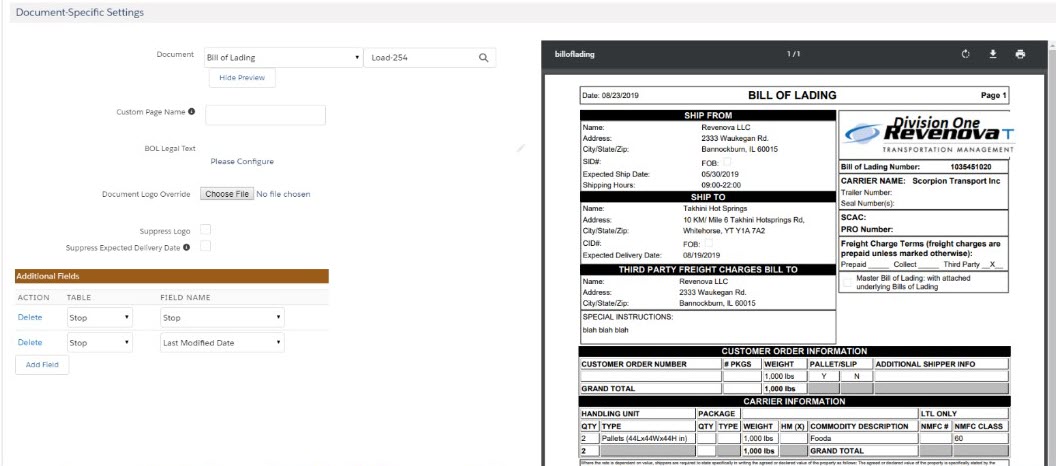
Click the Show Preview button to obtain immediate visual feedback on the changes you are making. Click on the text that you want to change to enter edit mode.
Click the Add Field button to add Customer Quote, Carrier Quote, Load, Stop, and Line Item fields to those documents that support field additions.
Choose a Document Logo Override if you want a document-specific logo image different from the default logo. Click the Suppress Logo checkbox to suppress the logo image on a given document. Click Suppress Expected Delivery Date to suppress this field on the BOL document for LTL loads only.
Make sure to click the save button after changes to any document before going to the next document.
The language a PDF document is rendered in is based on the Language field setting on the customer/carrier Transportation Profile record. You must translate all labels found in the documents using the Translation Workbench to generate non-English versions of the documents.
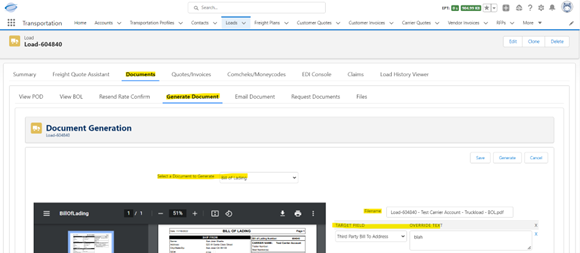
Load-Specific Bill of Lading PDF Filename and Field Overrides
On a load-by-load basis, you may enter override values for the Filename and certain fields on the Bill of Lading PDF. These overrides can be used to produce Blind or Double-Blind BOL documents from the TMS. They also enable you to hide extra accessorial information from uninterested parties on the BOL for the Load. Lastly, the ‘Third Party Freight Charges Bill To’ section of the BOL can be overridden to make it appear to the carrier as if they are working exclusively with the customer for which they have specific pricing. The fields that can overridden are as follows:
- Ship From Name
- Ship From Address
- Ship From City/State/Zip
- Ship To Name
- Ship To Address
- Ship To City/State/Zip
- Third Party Bill To Name
- Third Party Bill To Address
- Third Party Bill To City/State/Zip
- Special Instructions
- Carrier Name
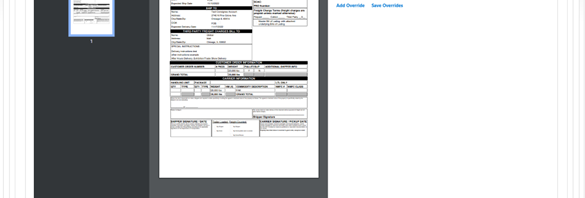
User can add/remove/edit override values by navigating on the Load record to the Documents tab 🡪 Generate Document tab 🡪 select ‘Bill of Lading’ in the Select a Document to Generate picklist as show below:
Custom Document Formats
You may replace the (already highly-configurable) TMS document formats with your own custom Visualforce pages as desired, at the Document Options/Document Type level:
Note that your extension controller must be present, and different than the extension controller used by the out-of-the-box Visualforce page.
Reference Data Setup
Mode Setup
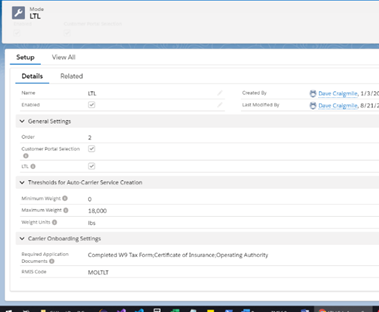
Access the list of supported modes from the TMS Admin🡪Modes link. TMS currently supports ten modes. You may disable those modes that are not relevant to your business.
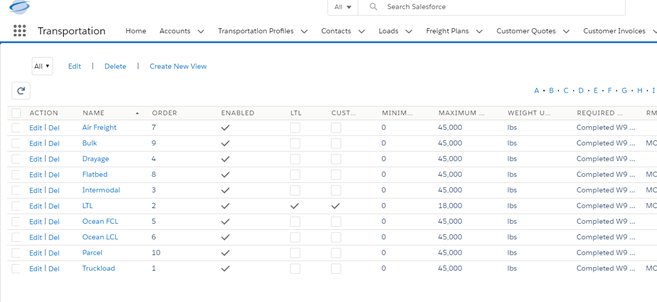
The Customer Portal Selection field indicates if the mode is available on the self-serve Customer Portal.
Mode-specific online carrier application documents for upload are set up from each Mode detail page. Make sure this is filled out for each enabled mode if you use the online carrier application. Adding values to this picklist allows you to add values to the required documents uploading with an online carrier application.
Equipment Type Setup
Access the list of Equipment Types from the TMS Admin🡪Equipment Types link. Each load can have an associated Equipment Type, which allows for cube/weight calculations and optimizations. Equipment Type is also important as an informational element on quote and tender documents, and for Ocean FCL loads.
Payment Terms Setup
Set up Payment Terms from TMS Admin🡪Payment Terms. These can be applied to Carrier Quotes to determine (quick pay) Payment Discount and Invoice Due Date when Vendor Invoices/Payables are auto-generated.
Fuel Index Setup
Access the list of Fuel Indexes from the TMS Admin🡪Fuel Indexes link. These indexes are an input into Fuel Surcharge schedule setups.
Each index has one or more Fuel Index History records which can be automatically retrieved from the Energy Information Administration (EIA) via the FuelIndexUpdateJob batch process. Be sure to set each Data Series Id to a weekly index value as provided by the EIA in order to enable automatic updates.
TMS supports the weekly EIA indexes which have an effective date of Monday.
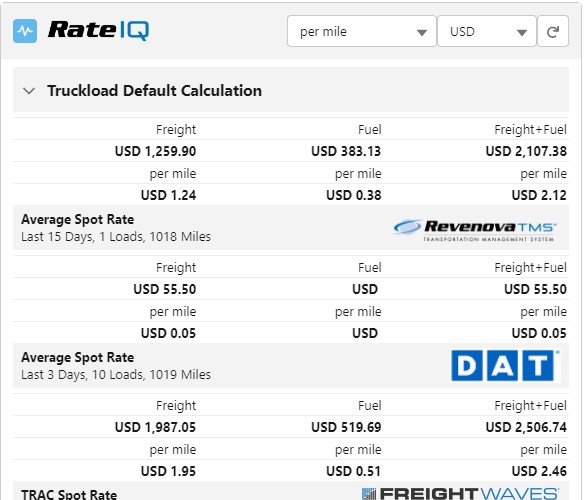
RateIQ
RateIQ allows you to set up blended carrier rate estimates using internal load history and Truckstop/DAT/FreightWaves API rates. Set up your calculation weighting factors from TMS Admin🡪Rate Calculations.
Supported Data Sources:
- TMS (internal data)
- DAT
- FreightWaves
- Truckstop – Posted
- Truckstop – Paid
- Custom Source(s)
Set up RateIQ from TMS Admin🡪Rate Calculations.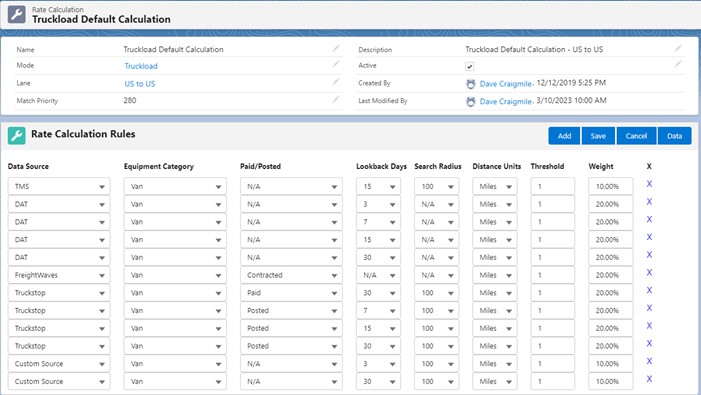
Note that RateIQ is mode-specific and does Lane-matching to select the best-matched rate calculation based on Match Priority.
Import/Delete Custom Source data by clicking on the Data button above or using the TMSRateIQSourceService web service: Custom Data uploaded is located at TMS Admin🡪RateIQ Rate Sources.
Fuel Surcharge Setup
Fuel surcharges can be automatically applied to Customer Quotes, Customer Invoices, Carrier Quotes, and Carrier Invoices. They can be applied via Rate Entries when setting up stored rates for customer and global transportation profiles. To create a Fuel Surcharge schedule, go to TMS Admin🡪Fuel Surcharges.
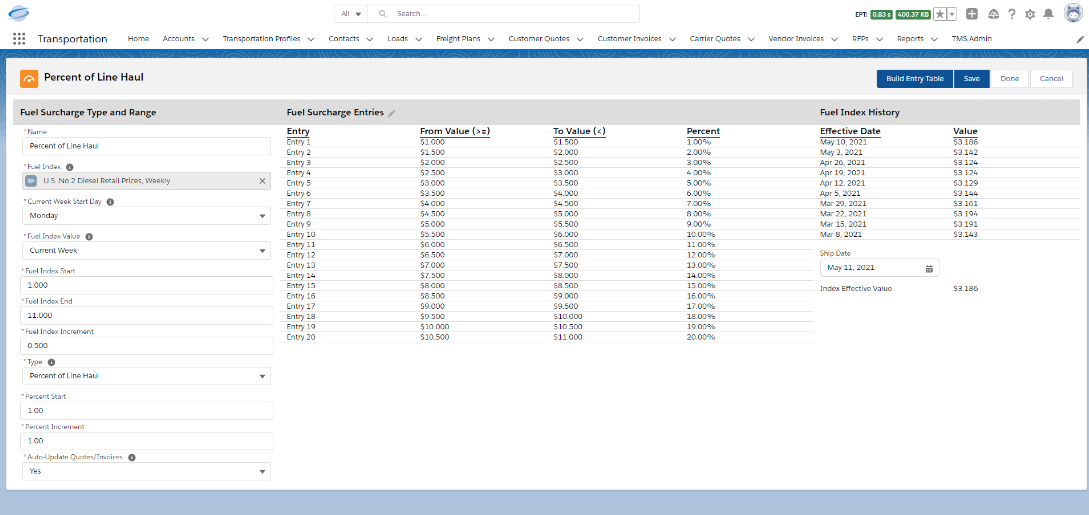
Select the Fuel Index the surcharge should be based on. The Fuel Index Value field determines which value of the index is used in the calculation:
- Current Week
- Prior Week
- Two-Week Average
- Three-Week Average
- Four-Week Average
- Prior Calendar Month
The Current Week Start Day determines how a week is defined for purposes of selecting the “current” index. For example, a Current Week Start Day of Tuesday means that the index available next Monday is considered current for Tuesday through Monday. This value is typically Sunday or Monday.
You must schedule the FuelIndexUpdateJob daily to enable automatic index and fuel surcharge refreshes.
Note that the load’s Expected Ship Date determines the starting date for fuel surcharge calculations.
Fuel Surcharge Calculation
The following records are automatically updated based on changes in the relevant fuel index if they were created via stored rates:
- Customer Quote: Updated until load ship date.
- Carrier Quote: Updated until load ship date.
- Customer Invoice: Updated until invoice is no longer Pending status.
- Carrier Invoice: Updated when customer invoice is no longer Pending status.
The purpose of this recalculation is to deal with the fact that the contracted fuel index value may not be available at the time of record creation. Therefore, quotes and invoices may need to be adjusted as indexes are updates.
Note that you can freeze the fuel surcharge calculation (so subsequent index updates have no effect) by setting the Auto-Update Quotes/Invoices field to No.
For the following types of Rate Entries, the fuel surcharge is automatically calculated along with a complete Customer or Carrier Quote:
- Fixed Cost
- Distance-Based
- Weight-Based
- Billable Weight-Based
- Handling Unit-Based
- Linear Feet-Based
- Equipment-Based
Breakthrough Fuel Support
Breakthrough Fuel-based fuel surcharges are supported for stored rate customer quotes. Populate the Breakthrough Fuel Shipper Id on the Transportation Profile for any customers using Breakthrough Fuel. Populate the Customer Load Id on any load where a surcharge is calculated. This ID must be provided to Breakthrough Fuel by the customer.
Note that the Fuel Surcharge Update Job repopulates the Fuel Surcharge in the same way for both index-based and Breakthrough Fuel-based customer quotes.
Fuel-Only Rate Entries
Rate Entries of type Fuel Only are applied when clicking the Save button in the Freight Quote Assistant, when creating a “spot” quote with a pre-negotiated fuel surcharge:
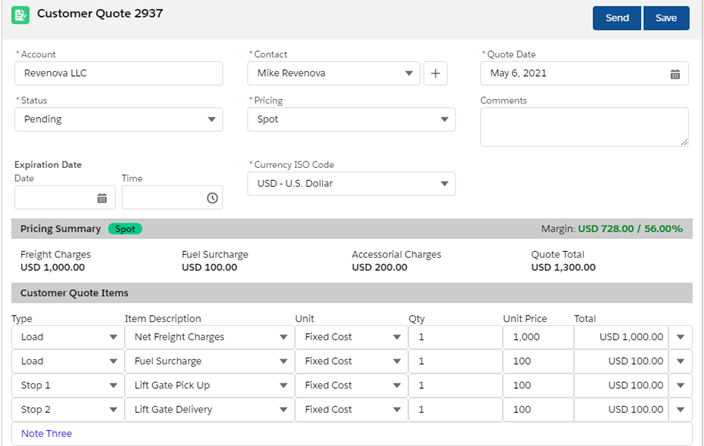
- Customer Quotes are associated with a Fuel Surcharge via the Rate Entry lookup field that is populated on stored rate quote creation.
- Carrier Quotes are associated with a Fuel Surcharge via the Rate Entry lookup field that is populated on stored rate quote creation.
- Customer Invoices are associated with a Fuel Surcharge via the Customer Quote lookup field that is populated when an invoice is auto-generated.
- Vendor Invoices are associated with a Fuel Surcharge via the Carrier Quote lookup field that is populated when an invoice is auto-generated.
Freight Class Calculation Rules
To employ the NMFC Freight Class Calculator when creating loads internally or via the Customer Portal, review the density/class rules from the TMS Admin🡪Freight Class Calculation Rules link:
Carrier Liability Limits
Define Carrier Liability Limits to calculate and display load-specific limits on internal and customer portal carrier quote list.
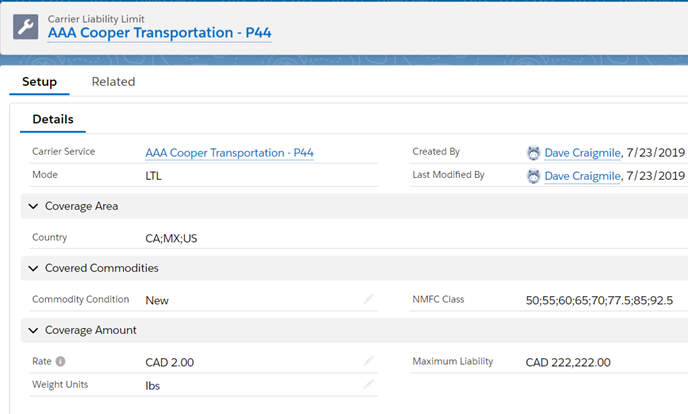
For stored rates, the Carrier Quote Liability Coverage and Liability Coverage Exceeded By fields are auto-calculated if the Load Commodity Condition field is populated and a Carrier Liability Limit is defined for the Carrier Service on the quote.
Liability Coverage Exceeded By = Math.max(0, Cargo Value – Liability Coverage)
Customer-Specific Commodity Lookup
From TMS Admin🡪Commodity Catalogues enter any recurring commodities that are often used when creating loads and rate entries. These Catalogues are used by customers by setting the Commodity Catalogue field on the customer Transportation Profile record.
During load and rate entry creation, these commodities can be searched on and accessed.
Commodity lookup can also be enabled for the customer portal.
You may define a Commodity Catalogue at the global Transportation Profile level to serve as a “backstop” catalogue. It will be used for all customers that do not have a catalogue defined at the Transportation Profile level.
Batch Processes
Access the status of key TMS batch processes from the Job Monitor Lightning Web Component, which is generally located on the Home Page Layout, but it can also be placed on your own custom Lightning App Page. This same information can also be accessed from TMS Admin🡪Batch Processes.

A description of each job and the corresponding actions available are given in the table below. Please note that if a particular job is shown as ‘Not Applicable’ in the Status column, this means that either the Credentials for the corresponding API are not enabled or the TMS Configuration setting that controls the job is not enabled. A definition for each ‘Not Applicable’ Status is given in the second table below.
| Name | Purpose | ‘Run Now’ Action | ‘Schedule’ Action |
|---|---|---|---|
ARCalculationJob | Calculates A/R balances and credit limits | Active – runs job immediately | Active – schedules job for 5 am |
BanyanJob | Retrieves load status and documents for Banyan loads | Inactive - Invoked by LoadStatusUpdateJob | Inactive – Invoked by LoadStatusUpdateJob |
CarrierEngagementAutomation | Processes auto-tender loads | Active – runs job immediately |
|
CarrierMonitorJob | 1. Appends/Refreshes the Carrier Watch List and 2. Downloads SaferWatch FMCSA scoring changes for monitored carriers. | Active – runs job immediately | Active – schedules job for 6 am |
CarrierMonitorMCPJob | See details of the MyCarrierPackets batch job in the “MyCarrierPackets” section of the “API-SpecificI nformation section further down this document. | Active – runs job immediately | Inactive – Schedules itself upon completion |
CarrierMonitorRMISJob | RMIS download of new carriers and changed carriers. | Active – runs job immediately | Inactive – Invoked by itself upon completion |
EDIWatcherJob | Monitors the EDIJob and restarts it if it fails | Active – runs job immediately | Inactive – invoked by itself upon completion |
EDIJob | Receives EDI 204 Load Tender, EDI 990 Load Tender Response, and EDI 214 Load Status transactions. | Inactive - initiated by EDIWatcherJob | Inactive – invoked by itself upon completion |
FleetManagementJob | Manages all Fleet Management functions. | Active – runs job immediately | Inactive – Invoked by itself upon completion |
FreightPlanManagementJob | Calculates Freight Plan cost allocations and status | Active – runs job immediately | Active – schedules job for 5 pm |
FuelCardTransactionsJob | Retrieves and creates fuel card transaction. | Active – see Fuel Card Management section | Active – runs job (self scheduling) |
FuelIndexUpdateJob | Downloads fuel index updates from the EIA and then invokes the FuelSurchargeUpdateJob | Active – runs job immediately | Active – schedules job for 6 pm |
FuelSurchargeUpdateJob | Updates fuel surcharges on quotes and invoices based on changes to fuel indexes and Breakthrough Fuel API calls. | Inactive - invoked by FuelIndexUpdateJob | Inactive – invoked by FuelIndexUpdateJob |
LoadAndTruckPostingManagementJob | Creates, updates, and deletes load and truck postings and uploads Book It Now carriers to Truckstop | Active – runs job immediately | Inactive – invoked by itself upon completion |
LoadDexDataUploadJob | Uploads load lane/revenue/cost information to LoadDex | Active – runs job immediately | Active – schedules job for 7pm |
LoadStatusUpdateJob | Requests load status updates from API and email carriers | Active – runs job immediately | Inactive – invoked by itself upon completion |
QueuedTransactionJob | Processes queued inbound and outbound transactions. Note that up to n jobs will be running in parallel with volume. | Active – runs job immediately | Inactive – invoked by itself upon completion |
RecurringLoadScheduleJob | Clones recurring loads and freight plans based on creation schedules | Active – runs job immediately | Active – schedules job for 4am |
There are some batch processes not included in the monitor list that are run automatically by the TMS or with manual button pushes. Those jobs are listed below.
| Name | Purpose | How to Run | Suggested Run Time |
|---|---|---|---|
CarrierBulkRFQEmailJob | Bulk emails carrier RFQ email requests | Automatically by TMS | N/A |
CustomerInvoiceBulkGenerationJob | Creates PDF files for each customer invoice during bulk printing | Automatically by TMS | N/A |
CustomerInvoiceBulkMailerJob | Bulk emails customer invoices and updates status | Automatically by TMS | N/A |
HubTranDataLoadJob | Loads 60 days of carrier and load data to “seed” HubTran | HubTran Data Load Button | N/A |
LoadImportUploadJob | Uploads Load file and creates loads for LTL Workbench. | Automatically by TMS | N/A |
LoadPricingWorkbenchJob | Gets carrier quotes for loads related to an RPF for the LTL Workbench and calculates margins/markups and customer totals. | Automatically by TMS | N/A |
PaymentProcessorBatchJob | Submits quick pay payables to TriumphPay and retrieves status | TMS Accounting Admin | Runs continuously |
RateEntryUploadJob | Uploads .csv field of Rate Entries for RFP Support | Automatically by TMS | N/A |
ReleaseUpdateJob | Updates data as needed during release upgrades | Automatically by TMS | N/A |
NACHAFileGeneratorBatchJob | Generates a NACHA file for vendor ACH payment | "Generate NACHA File" button | N/A |
ACHEmailRemittanceBatchJob | Sends ACH remittances to factoring companies and vendors | "Send ACH Remittance" button | N/A |
EPayment Setup
If you are using EFS, then each EFS credential you want to use for EPayments must have the Money Codes option selected (and be Active) in the Credentials page in the TMS Admin tab:
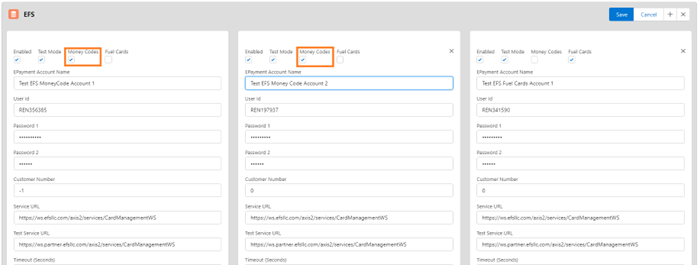
You need to have at least one active EFS credentials with the Money Codes option selected, or an active Comdata credentials before you can configure any users for EPayments.
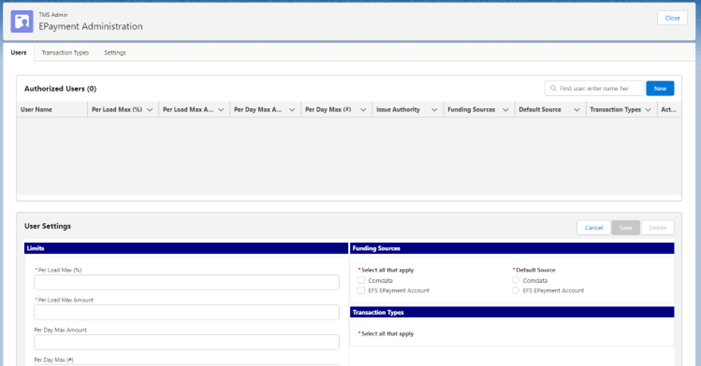
To configure EPayments, go to the EPayment Administration page in the TMS Admin tab. The EPayment Administration page has 3 subtabs: Users, Transaction Types and Settings.
The first time you access this page the Users and Transaction Types tabs will have no data in them:
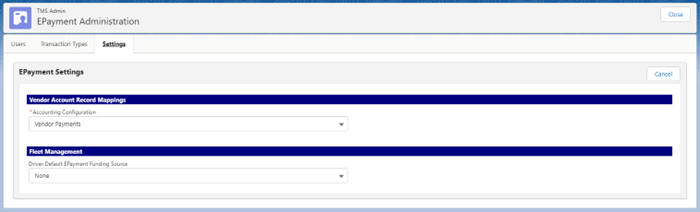
The Settings tab will default the Accounting Configuration to “Vendor Payments” for the TMS Accounting configuration:
First time configuration for EPayments should be done in the following order:
- Settings
- Transaction Types
- Users
Configuration Steps:
- Settings:
- Accounting Configuration: options are Vendor Payments and Vendor Invoices/Credit Memos.
- Choose Vendor Payments to create a Vendor Payment record when an EPayment is issued.
- Choose Vendor Invoices/Credit Memos to create Vendor Invoices and Credit Memos when an EPayment is issued. If you choose this option, you will need to map either an EFS or Comdata vendor account for the vendor invoices that will be created. You will also need to map the appropriate Amount, Charge and Fee to the appropriate accessorial records (TMS Accounting) or product records (Accounting Seed) that will be created for the vendor invoices (TMS Accounting) or payables ( Accounting Seed), and map them in this page:
.png?sv=2026-02-06&spr=https&st=2026-07-04T23%3A38%3A45Z&se=2026-07-05T03%3A22%3A45Z&sr=c&sp=r&sig=rES11nFGXeAMxZFmN8b6eVx7wLYA2L%2F2seEkbaOBcO4%3D)
Click Save to save the Settings configuration.
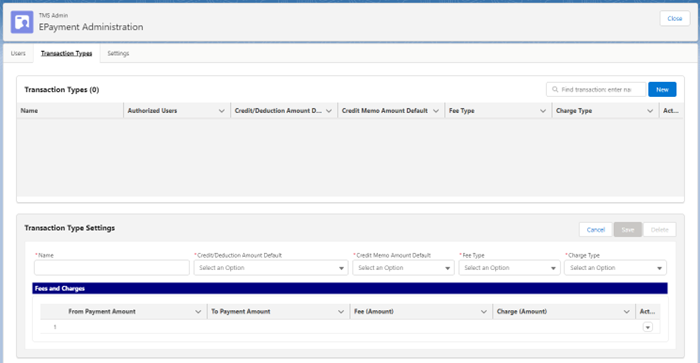
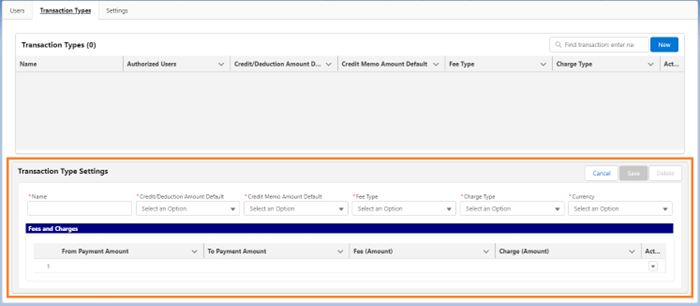
- Transaction Types:
The Transaction Types you create here will be available to your users when creating an EPayment based on the user’s setup (Users tab – next step).
Enter the Transaction Type information in the bottom section of the page: Name, Credit/Deduction Amount Default, Credit Memo Amount Default, Fee Type and Charge Type. If you have a multi-currency org, the Currency will available to select. The currency selected applies to the Charges and Fees associated with the transaction type:
The Credit/Deduction Amount Default picklist defines which credit memos are created for the vendor invoices or payable records when an EPayment is issued.
The Credit Memo Amount Default picklist are Read-Only and Edit. These values dictate whether the user can change the Credit/Deduction Amount setting above when issuing an EPayment.
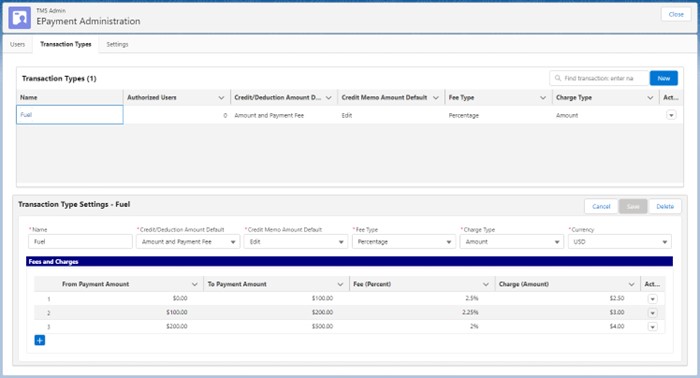
The Fee Type and Charge Type picklist values are Amount and Percent. Your choices here what data you enter in the Fees and Charges table underneath for each transaction type.
The Fees and Charges table allow to define the From and To Amount ranges to apply the appropriate Fee and Charge values to the amount of the EPayment. The To Amount of a record should match the From Amount of the following record so there are no gaps when calculating fees and charges when an EPayment is issued. The range is defined as greater or equal (>=) of the From Amount to less (<) than the To Amount in order for the EPayment page to calculate the right fee and charge for a transaction type based on the amount of the EPayment.
A sample transaction type looks like this once entered and saved:
Click the New button to create a new transaction type. You can also click on the action menu button on the right hand of the Transaction Types table (top table) on a specific transaction type to either Edit, Clone or Delete that transaction type.
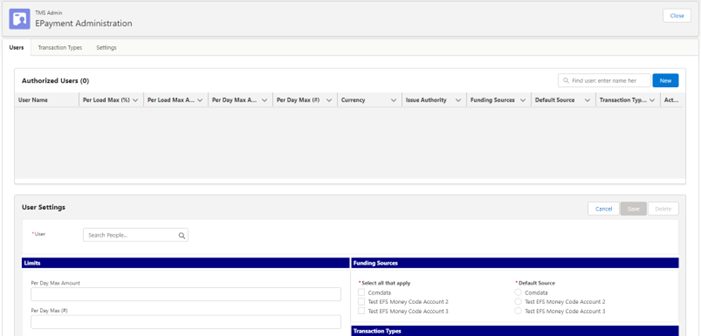
3. Users:
Set up all the users in this tab that will be able to issue EPayments. Type the user’s name in the User field and select it from the list.
Enter the Per Load Max (%) and Per Load Max Amount limits. Optionally, enter the Per Day Max Amount and Per Day Max (#) of limits.
For multi-currency orgs, enter the currency of the amount fields in the user’s limits.
The Issue Authority values are: Assigned Carrier Only, Any Authorized Vendor and Assigned Driver Only. The value selected here will be validated when the user issues an EPayment.
User limits are validated in the following cascading order:
- Check the Per Day Max Amount
- Check the Per Day (#)
- Check the minimum of the Per Load Max % and Per Load Max Amount
A null value on a. and b. means that those limits are not checked.
Click the Save button to save your changes.

If you have many users, you can type their name on the search box next to the left of the “New” button.
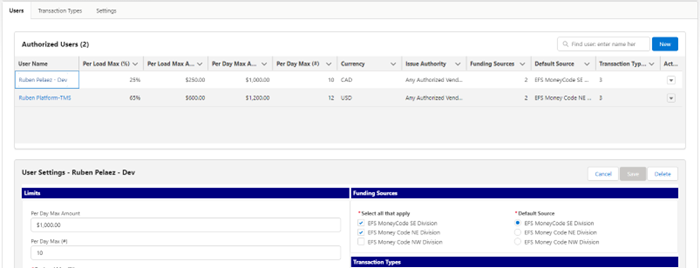
Each record on the “Authorized Users” list has an Action menu button on the last column. You can click on the Edit, Clone or Delete for each record. You can also click on the “User Name” column to select that user’s data for editing purposes.
A sample user setup may look like this:

4. Issuing an EPayment:
Once you are done with the configuration, users can start issuing EPayments from the load record. Your configuration may look different, but there will be tab or section in your load page where you can access the EPayments:
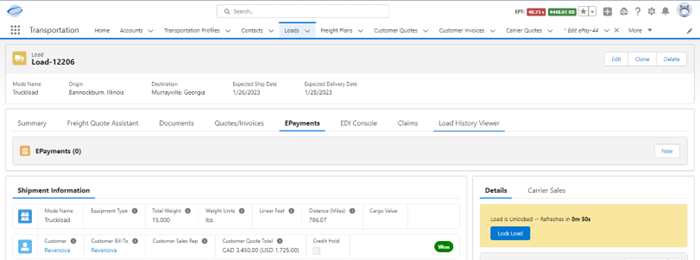
Click on the New button on the EPayments header section to create a new EPayment:
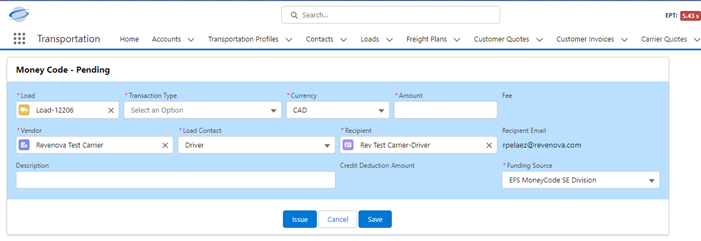
The following values from the load are defaulted:
- Load
- Currency (in multi-currency orgs)
- Vendor (Carrier on the load)
- Recipient (Driver on the load)
- Funding Source (the Default Funding Source from the user’s authority record)
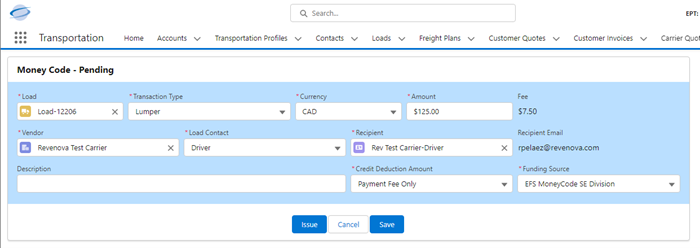
The user will need to select the Transaction Type and enter Amount. All fields are editable while the EPayment is in Pending status.
After selecting the Transaction Type and entering the Amount, the user can Issue the EPayment:
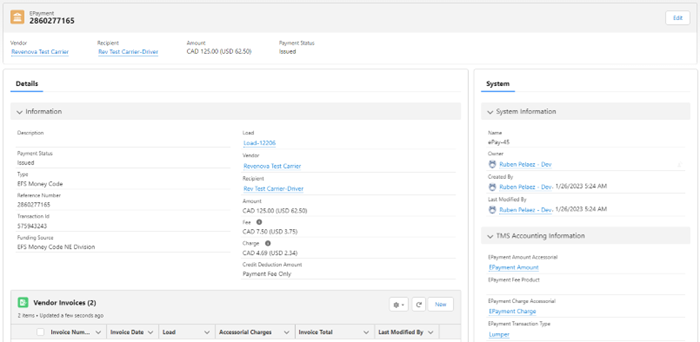
The EPayment will be available to view from the load record:
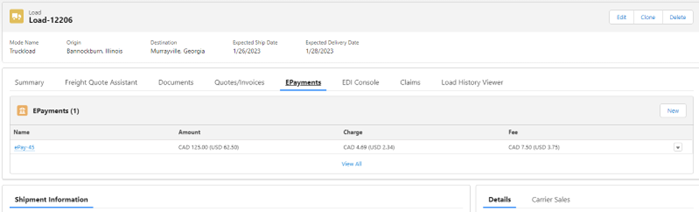
Clicking on the EPayment will allow you to view the details of the EPayment:
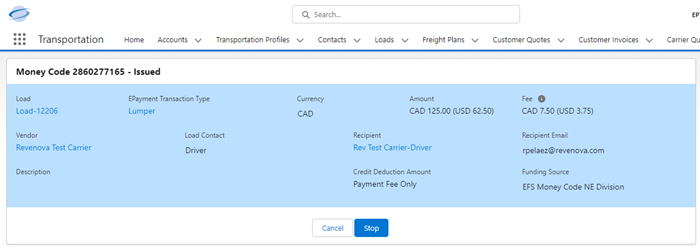
Other actions available to perform on an Issued EPayment, such as Stop (Canceling) the EPayment for EFS and Comdata, or Freezing the EPayment (Comdata), can be performed by clicking on the Edit button on the top right hand corner of the page. Clicking on the Edit button will open the EPayment form again with all fields in read-only mode and with the appropriate buttons available:
EDI Locations
From TMS Admin🡪EDI Locations, enter the EDI identifiers for each EDI trading partner.
There are two types of records in this table:
- Trading Partner EDI Identifier records, where the Trading Partner and Location fields are identical, and the Trading Partner Id flag is true.
- Trading Partner location records, where codes for specific locations, by trading partner, are identified.
Note that this table “fills” automatically as EDI Load Tenders (204) are processed (if they contain location codes).
Trading partners for inbound EDI 204 tenders are the customers or customer bill to. Trading partners for outbound EDI 204 tenders are the carriers.
Several account records can be associated with the same customer trading partner by populating the SCAC field. [Location Code + SCAC] must be unique. This allows for “division-specific” treatment of trading partners.
EDI Transaction Routing Overrides
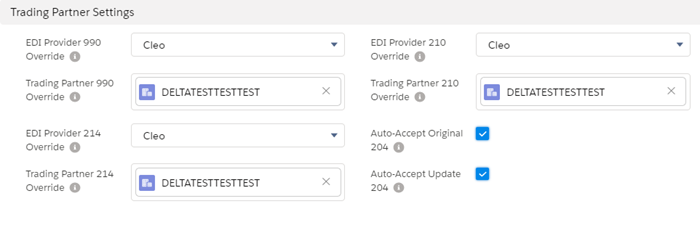
You can override the EDI Provider and the Trading Partner for 990, 214, and 210 transactions on an account-specific basis from a trading partner EDI Location record:
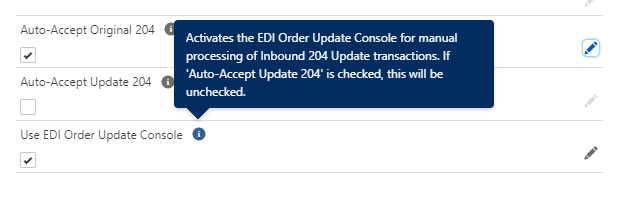
Auto-Accept and EDI Order Update Console (990)
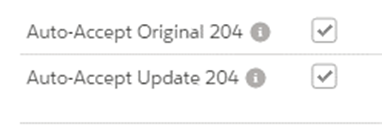
You can automatically send back 990 Load Tender Accept transactions for both Original 204s and Update 204s on a trading partner-specific basis:
Alternatively, for inbound Update 204s, you can activate the EDI Order Update Console, which requires manual processing of all inbound Update 204s on a trading partner-specific basis. See the section of the User Guide related to the EDI Order Update Console for a description of how to use the console.
EDI Location Child Tables
The following tables provide additional EDI functionality and should be set up for trading partner records (only) in the EDI Location table.
EDI Update Settings
These records control what updates can occur on a load if a 204 update is received(these settings only apply if the trading partner is not using the EDI Order Update Console):
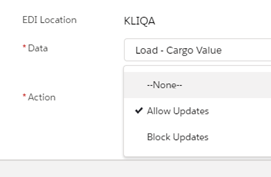
You can also direct the TMS to use stored rates instead of the customer quote information in the 204:
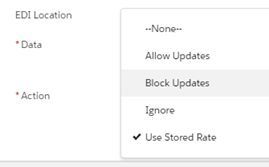
In the absence of EDI Update Setting records, the default behavior is to allow updates.
EDI Load References
These records allow you to dynamically create Load References that are then sent with all outbound EDI transactions:

You may add to the TMS Field picklist if you have custom fields you wish to send as Load Reference elements.
EDI Bulk 214 Send
If EDI 214 status transactions need to be (re-)sent in bulk, select the loads in question from the list view, and click the EDI Status button. You can then (re-)send all the relevant EDI 214 transactions with one click.
EDI Record Validation
You can validate that your EDI Location table is properly set up by clicking on the Validate button from the list view:
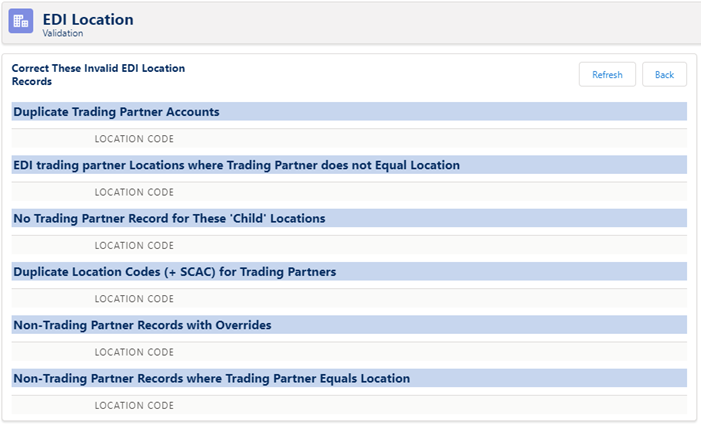
All lists on this page should be empty.
“Divisional” EDI Tendering
By setting the SCAC field on a trading partner EDI Location record, you can set up “divisional” EDI tendering. This allows you to use the same Location Code for multiple accounts and differentiate them by also setting the SCAC field uniquely. Location Code + SCAC must be unique for each trading partner.
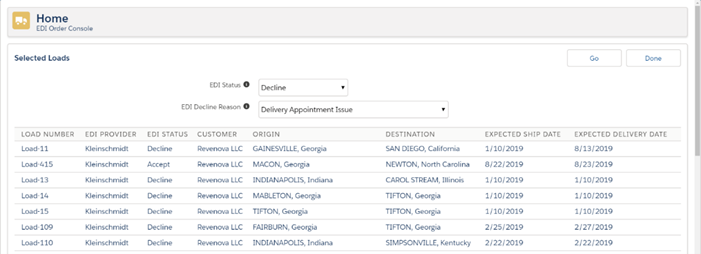
EDI Bulk Accept/Decline
The EDI Order Console allows for bulk 990 Accept/Decline transactions from the load list view:
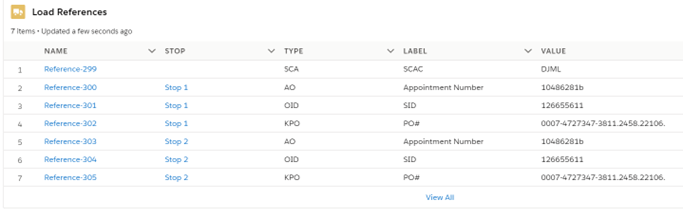
EDI Load References
EDI Load- and Stop-level reference numbers are passed in the 204 tender transaction. They must be passed back to the trading partner via the outbound 990, 214, and 210 EDI transactions. They are stored in the Load References table, and accessible (read-only) via a related list on the Load Detail page:
EDI Setup and Processing Summary
- Set up EDI global parameters from TMS Admin🡪Configuration.
- If desired, set the Customer Charge Code on each Accessorial record.
- Enter Kleinschmidt, Cleo, and/or Custom EDI credentials from TMS Admin🡪Credentials.
- Set up each Trading Partner from TMS Admin🡪EDI Locations. You may also bulk load this information if you have it. This will avoid the creation of duplicate accounts and contacts when EDI Load Tender (204) transactions are processed. Enter values for the six override fields as needed.
- Set up each EDI Bill To from TMS Admin🡪EDI Locations.
- Start the EDIWatcherJob (which starts the EDIJob) batch job which does the following:
- Receives inbound Load Tender (204) transactions from customers.
- Receives inbound Load Tender Response (990) transactions from carriers.
- Receives inbound Load Status (214) transactions from intermodal carriers.
- Sends outbound Load Status (214) location updates to customers for moving loads.
- Sends outbound Load Tender Response (990) transactions to “auto-accept” customers.
- Receives inbound Load Invoice (210) transactions from carriers.
- This job also sends EDI 214 status transactions for in-transit EDI loads for those customers requesting them.
- Load Tenders are represented as Loads with an EDIStatus field value of Pending.
- Load Tenders can be updated or cancelled by the client. For trading partners that are not using the EDI Order Update Console, the EDI Status field in these cases changes to Updated by Customer and Cancelled by Customer, respectively. You must re-accept updated load tenders. For trading partners that are using the EDI Order Update Console, the EDI Status field will change to Update Pending from Customer when update 204s are received, which requires a user to process the update 204 from the EDI Order Update Console. See the section below for details on how to use the console.
- For trading partners that are not using the EDI Order Update Console, Initiate Load Tender Response (990) transactions merely by changing the EDI Status field to Accept or Decline. You can also pass the EDI Decline Reason field by setting it on the Load.
- You must respond to an EDI Tender before the EDI Response Deadline if this field is populated.
- Shipment Status (214)transactions are sent when:
- Appointment Time is populated on a Stop.
- Arrival Date is populated on a Stop.
- Departure Date is populated on a Stop.
- Once a day location updates when a load is in-transit.
- EDI 214 transactions can also be sent manually from the Load Detail page for completed/delivered loads.
- Outbound Invoice (210) transactions are initiated by selecting Customer Invoices and clicking on the Generate & Send button from the Customer Invoice tab or individually by clicking the Send Via EDI button from the page layout.
- Add the EDI Accept/Decline button to the load list view if bulk EDI 990 Accepts/Declines are desired.
- Add the EDI Status button to the load list view if bulk EDI 214 send transactions are desired.
- Note that the Stop table Carrier Status Reason picklist is used for EDI 214 status transactions. You may delete entries from this list, but do not add to or modify existing entries if you are using EDI.
- The EDI Provider field on the Load table indicates which EDI Provider sent the Tender (204) Transaction.
- For carriers that will receive EDI 204 tenders and send EDI 990 Accepts/Declines make sure the Carrier Service Tender Method field is set to EDI and that the EDI Provider field is also set.
- A Quote/Contract Id is typically required for carrier quotes that are going to be tendered via EDI.
- For each EDI Location that is a trading partner, add or configure EDI Update Setting and EDI Load Reference records as needed. Make sure these are related lists on the page layout.
- Make sure the EDI Transaction table is on the Load page layout as a related list.
- Note that the Load Container/Trailer Number field may be populated by an inbound EDI 214 transaction.
- Set the Transportation Profile table Location Update Send Frequency field for those customers who require frequent EDI 214 X6 location updates for moving loads.
- If Appointment Times are populated on an inbound EDI 204 tender, the corresponding EDI 214 Appointment Time status updates will automatically be sent on tender acceptance.
- If you are using Orderful you must populate the Trading Partner ID from TMS Admin🡪Configuration.
- You may use a custom EDI implementation by exactly implementing the web service methods in the EDI Specification. You then enter your URL and credential information from TMS Admin🡪Credentials, using the Custom EDI record. Note that the Custom EDI connector supports Basic Authentication.
- For Inbound EDI 210s, the system will attempt to create a new or update an existing Vendor Invoice/Payable based on the following logic:
- If the PRO Number is provided in the 210, a search for the Load by this PRO Number is performed.
- If that search results in zero matches, a search for the Load by the Shipment Id (Load Number) is performed.
- If that search results in zero matches, the EDI Admin is notified by the EDI batch job error email.
- Else If that search results in multiple matches, a search by the PRO Number AND the Shipment Id is performed.
- If that search results in zero matches, the EDI Admin is notified by the EDI batch job error email.
- If that search results in zero matches, a search for the Load by the Shipment Id (Load Number) is performed.
- Else, a search for the Load by the Shipment Id (Load Number) is performed.
- If that search results in zero matches, the EDI Admin is notified by the EDI batch job error email.
- Assuming a matching load is found in steps a. or b. above, all Vendor Invoices(non-Accounting Seed)/Payables(Accounting Seed) for that Load are cycled through to determine if the EDI 210 matches one of them, and if so, it is determined if the invoice is in ‘Pending’ status and can still be updated. The following logic describes this flow:
- If the Vendor Invoice/Payable “Payee Reference” field matches the <InvoiceNum> from the EDI 210 AND the Vendor Invoice/Payable “Vendor” field matches the Id of the Vendor Account associated with the Trading Partner Id who sent the EDI 210 transaction, this constitutes a match.
- If a match is found and the “Invoice Status”(non-AS)/”Posting Status”(AS) is ‘Pending’ (non-AS)/’In Process’ or ‘Waiting for Approval’(AS), the invoice is updated with the data from the 210.
- Else If a match is found and the “Invoice Status”/”Posting Status” is NOT ‘Pending’/’In Process’ or ‘Waiting for Approval,’ the invoice is NOT updated with the data from the 210, and a failed EDI 210 transaction is logged.
- Else if no Vendor Invoice match is found, a new Vendor Invoice/Payable is created.
- If the Vendor Invoice/Payable “Payee Reference” field matches the <InvoiceNum> from the EDI 210 AND the Vendor Invoice/Payable “Vendor” field matches the Id of the Vendor Account associated with the Trading Partner Id who sent the EDI 210 transaction, this constitutes a match.
- If the PRO Number is provided in the 210, a search for the Load by this PRO Number is performed.
EDI Order Update Console
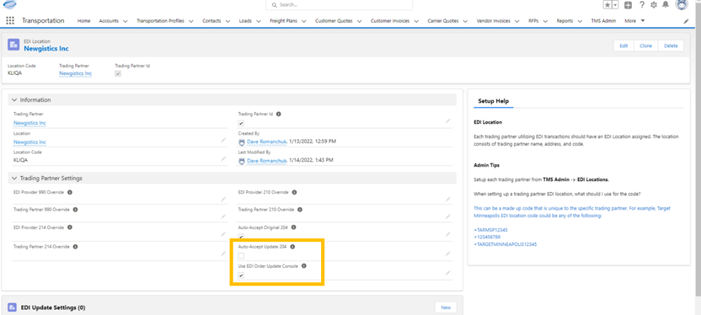
To activate the EDI Order Update Console for a trading partner, go to their EDI Location record and check the ‘Use EDI Order Update Console’ checkbox. Note that you cannot have both ‘Auto-Accept Update 204’ checked and the ‘Use EDI Order Update Console.’
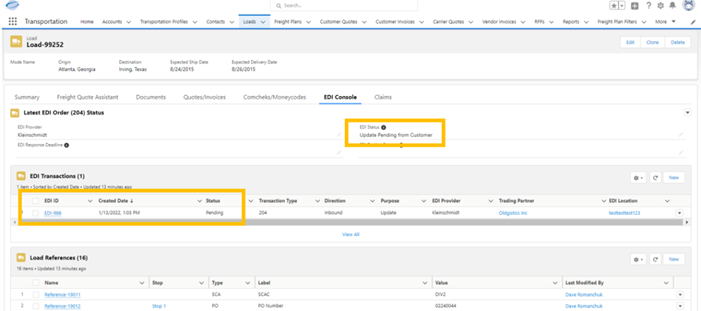
With that checkbox checked, any inbound update 204s that are received for this trading partner will be saved as new EDI Transaction records to the corresponding Load record they are associated with. The loads receiving those updates will have their “EDI Status” field flipped to ‘Update Pending from Customer’. The EDI Transaction saved to the Load will be in a ‘Pending’ status, indicating that it needs to be processed with the EDI Order Update Console.
Access the console by clicking the hyperlink to the EDI Transaction record itself from the EDI Transactions related list on the Load page:
Upon clicking the link to the EDI Transaction detail record, the console should render on the second tab of the page:
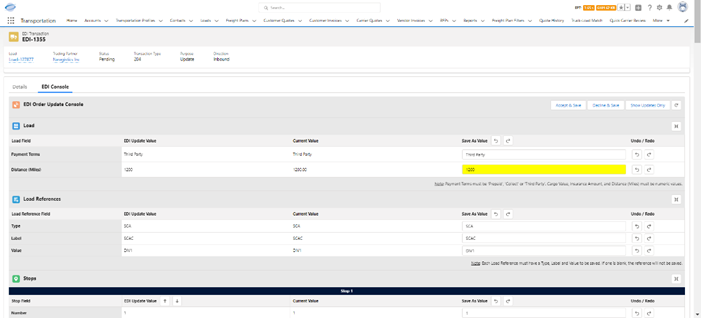
The console will attempt to match-up the Stops and Line Items between the inbound update 204 and the existing Revenova Load for comparison purposes according to a “fingerprint” as defined below. There are five columns for each section:
- Field Name: This is the name of the field on the object being updated.
- EDI Update Value: This is the value of the field that is present on the inbound 204 update.
- Current Value: This is the value of the field that is present on the existing Revenova Load.
- Save As Value: This is the value that will be saved as an update to the Load, Stop, Line Item, etc. when one of the Save buttons is clicked.
- Undo/Redo: This is a column of undo and redo buttons, which allows for quick accept/decline of a specific field in the console.
By default, the ‘Save As Value’ is populated with the same value as the ‘EDI Update Value.’ If that value is different from the ‘Current Value,’ it is highlighted in yellow, indicating a difference between the inbound 204 update and the actual value on the Load in Revenova. Clicking the Undo button sets the ‘Save As Value’ back to the ‘Current Value,’ removing the highlight. Clicking the Redo button sets the ‘Save As Value’ to the ‘EDI Update Value,’ which again will be highlighted if there is a difference. Users may also type directly into the ‘Save As Value’ field as needed.
Each section representing the different objects that make up the load has an expand/collapse button on the right-hand side for ease of navigation.
There are four buttons across the top right and bottom of the console, which perform the following actions:
- Accept & Save: Click this button to save all updates to the Load, Stops, Line Items and Customer Quote as indicated in the ‘Save As Value’ column. An EDI 990 Acceptance is sent, and the user is brought to the updated Load. The “EDI Status” field on the Load is flipped to ‘Accept.’
- Decline & Save: Click this button to save all update to the Load, Stops, Line Items and Customer Quote as indicated in the ‘Save As Value’ column. An EDI 990 Rejection is sent, and the user is brought to the updated Load. The “EDI Status” field on the Load is flipped to ‘Decline.’
- Show Updates Only/Show All Values: Click this button to show only the updates where the ‘Current Value’ is different than the ‘Save As Value’. Click the same button again to show all fields.
- Reload Console Data: If during processing, the user wants to refresh the data and start the processing over, clicking this button will re-load the console back to its original state.
Each section of fields has an Undo and Redo button at the top of the ‘Save As Value’ column, which will Undo or Redo the updates of all fields in the section for faster processing.
When processing the Stops, there are Up and Down arrows in the ‘EDI Update Value’ column, which allow you to quickly shift the Stops on the inbound update 204 for ease of ordering stops and processing.
Note that the Stop-matching logic attempts to align the stops according to a “fingerprint,” which is defined as:
Location Name + Location Shipping Street + Location Shipping City + Location State + Location Postal Code
The Line Item-matching logic attempts to align the line items according to a “fingerprint” defined as:
Name + Description + Handling Units + Pickup Stop Number + Delivery Stop Number
There are several validations built into the console for when the user attempts to Accept or Decline and Save to prevent users from mistakenly editing 204s with invalid data. Four important items to be aware of are:
- Each saved stop must have a Number, Location Name, Shipping Street, Shipping City, Shipping State/Province, Shipping Zip/Postal Code, Shipping Country, Appointment Required, and Expected Date.
- To have a stop removed, each of the fields in #4 should be blank.
- Each saved line item must have an Item Number, Item Description, Weight, Weight Units, Pickup Stop Number, and Delivery Stop Number.
- To have a line item removed, each of the fields in #6 should be blank.
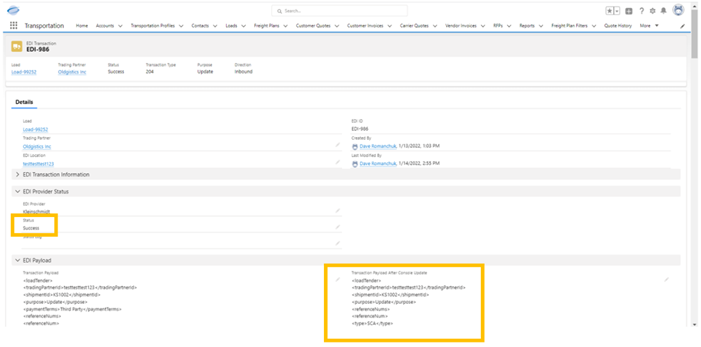
After making the appropriate edits and either accepting or declining the load tender using the buttons at the top or bottom of the console, the user will be brought back to the Load detail page. The EDI Transaction that was just processed will now be in a ‘Success’ status, and the “Transaction Payload After Console Update” field on the EDI Transaction will be populated with the XML as updated by the user with the console.
API Integration Setup
TMS supports direct, API-based integration to the following carriers, load boards, FMCSA, advance payment, load tracking, EDI transaction processors, and map/miles data providers:
Carrier APIs
1. Project44 (LTL Carrier Aggregator)
2. Banyan (LTL Carrier Aggregator)
3. AccuFrate (LTL Carrier Aggregator)
4. Worldwide Express (LTL Carrier Aggregator)
5. SMC3 RateWare/CarrierConnect
Carrier Monitoring/FMCSA APIs
6. SaferWatch
7. RMIS
8. MyCarrierPackets
Route Map/Distance APIs
9. PC Miler
10. Rand McNally (Mileage only)
Load Tracking APIs
11. FourKites
12. Trucker Tools
13. MacroPoint
14. Project44
Rate/Load Board APIs
15. Internet Truckstop (Load Board, Truck Postings, and Market Rates)
16. DAT (Load Board, Truck Postings, and Market Rates)
17. LoadBoard Network
18. TransCore (Load Board, Truck Postings)
19. FreightWaves
20. Trucker Tools (Load Board, Truck Postings)
EDI (via web service)
21. Kleinschmidt (Customer and Carrier Tenders)
22. Cleo (Customer Tenders)
23. Custom EDI Connector
Address Lookup APIs
24. Addrexx (US and International)
Advance Carrier Payment APIs
25. Comdata Comcheks
26. EFS MoneyCodes
27. TriumphPay
Rate History Upload
28. LoadDex
Fuel Indexes/Surcharges
29. Energy Information Administration (EIA)
30. Breakthrough Fuel
Invoice Processors
31. HubTran
ELD/Asset-Driver Tracking
32. Samsara
Cargo Insurance
33. Falvey
API-to-Email
34. Twilio
API Types
The carrier APIs provide capabilities for quoting, tendering, BOL creation, and receiving status updates for loads.
The load board APIs allow for posting of loads, truck posting retrieval, and for access to market and historical spot customer and carrier rates.
The PC Miler API provides accurate route mileage and maps, and current driver location. Rand McNally supplements PC Miler by also providing route mileage (but not maps). Which product to use for mileage is a customer transportation profile setting.
SaferWatch, RMIS and MyCarrierPackets provide FMCSA data and insurance certificates on carriers.
Comdata and EFS provide issuing, blocking, unblocking, and cancelling ePayments to carriers and vendors. TriumphPay provides carrier quick pay capabilities.
FourKites, Trucker Tools, Project44, Truckstop, and MacroPoint provide GPS/Cell-based tracking of loads via the driver’s (smart) phone or in-cab ELD.
FourKites, Trucker Tools, and MacroPoint provide “push” status updates to the TMS via a page GET (MacroPoint) or a sites-based web service (FourKites and Trucker Tools).
MacroPoint supports status updates from the TMS to (ultimate) customer tracking sessions not initiated by the TMS.
Banyan, AccuFrate, Worldwide Express (WWEX) and Project44 provide APIs for LTL quote, tender, track, and document retrieval.
EDI support is for the following transactions:
| API Provider | EDI 204 Support | EDI 990 Support | EDI 214 Support | EDI 210 Support |
|---|---|---|---|---|
Kleinschmidt | Inbound/Outbound | Inbound/Outbound | Inbound/Outbound | Outbound |
Cleo | Inbound/Outbound | Inbound/Outbound | Inbound/Outbound | Outbound |
Custom EDI | Inbound/Outbound | Inbound/Outbound | Inbound/Outbound | Outbound |
The Addrexx API provides address lookup/completion:
- Get city and state given zip code
- Get zip code given city and state
The EIA provides weekly fuel indexes needed for fuel surcharge calculations.
SMC3 RateWare provides tariff-based LTL quoting capabilities, with transit times and terminal information provided by SMC3 CarrierConnect.
HubTran provides an AI-based vendor invoice parsing/reading capability that helps automate the quote/invoice reconciliation process.
Samsara provides direct integration to drivers and the assets they are driving via an ELD device and a phone application.
Falvey provides internal users and customer portal users the ability to directly purchase cargo insurance on loads.
Blue Yonder provides Blue Yonder customers with the ability to create loads, retrieve rates, and tenders loads within the TMS.
You must enable the APIs you are using and enter the appropriate credentials from the TMS Admin🡪Credentials page.
- Set the Enabled flag appropriately for each record. (Disable APIs you are not using.)
- Set the Test Mode flag to unchecked when you are finished testing.
- Set the Options field for load boards and PC Miler.
- Enter the credentials you were provided. Note that the default, dummy values indicate which fields are required for each API. Leave the dummy values for APIs you are not using.
- Click the Save button in the section you are working on.
- Note that DAT, Transcore, and Truckstop credentials are user-specific. Clone the original record and select new users, as needed, to enter additional DAT and Truckstop credentials.
- Verify that Remote Site Settings are present for each API you are using from Setup🡪Security Controls🡪Remote Site Settings.
- Comdata credentials are the most complex, requiring two user ids, two password 1s, a password 2, and two customer numbers. See the instructions below.
- From TMS Admin🡪Credentials, populate the Vendor field for use Blue Grace, Worldwide Express, or any of the direct LTL API connections.
Queued Transactions and “Push” APIs
The following “push” APIs require a partner community to be set up to handle them. All inbound packets are inserted into the Queued Transaction table and processed by the QueuedTransactionJob.
- Project44
- Project44 Tracking
- MacroPoint
- FourKites
- Trucker Tools
- Trucker Tools Load Board (Book It Now only)
- HubTran
- Truckstop (Book It Now only)
- Samsara
- Create a new (“Build Your Own”) Partner Community named API that will receive all inbound (push) API data packets.
- From the Builder on the home page click the left side Settings snowflake🡪General tab :
- Check the Public can access the community checkbox.
- Click the Guest User Profilelink at the bottom of the tab:
- Click on View Users and click on the user:
- Assign a TMS license to the guest community user.
- Assign the TMS API Community permission set.
- Click on View Users and click on the user:
- Publish and activate the community.
- Do NOT include ‘/s/’ in the URLs below.
- From TMS Admin🡪Configuration set the Inbound API Community URL(without the ‘/s/’).
- Update the post-back URLs of “push” APIs to use the community URL as the root:
- Project44: [Community URL]/services/apexrest/rtms/tmslistener?org=[18-character org id]&source=Project44&pwd=[credentials code field]
- MacroPoint: [Community URL]/services/apexrest/rtms/tmslistener
- FourKites: [Community URL]/services/apexrest/rtms/tmslistener?org=[18-character org id]&source=FourKites&pwd=[credentials code field]
- Trucker Tools: [Community URL]/services/apexrest/rtms/tmslistener?org=[18-character org id]&source=TruckerTools&pwd=[credentials code field]
- Trucker Tools Load Board: [Community URL]/services/apexrest/rtms/tmslistener?org=[18-character org id]&source=TruckerToolsLoadBoard&pwd=[credentials code field]
- HubTran: [Community URL]/services/apexrest/rtms/tmslistener?org=[18-character org id]&source=HubTran&pwd=[credentials code field]
- Truckstop: [Community URL]/services/apexrest/rtms/tmslistener?org=[18-character org id]&source=Truckstop2&pwd=[credentials code field]
- Samsara: [Community URL]/services/apexrest/rtms/tmslistener?org=[18-character org id]&source=Samsara&pwd=[credentials code field]
- From TMS Admin🡪Configuration set the Queued Transaction Retention Period field to 1 day (or as desired). Records falling outside of the retention period are deleted.
- From TMS Admin🡪Configuration set the Queued Transaction Maximum Process Count to “3” unless you have more available. Leave at least two for other batch processes.
- From TMS Admin🡪Batch Processes start the QueuedTransactionJob. The job runs every minute and processes Queued Transaction records from the push APIs.
- TEST ALL PUSH APIs.
API-Specific Information
Credential Requirements
This table summarizes which credential fields are required by API:
| API | User Id | Password 1 | Password 2 | Customer Number |
|---|---|---|---|---|
SaferWatch | Required | Required | Required | Required |
Truckstop | Required | Required | Required | N/A |
Truckstop 2 | Client ID | Client Secret | Redirect URL | N/A |
Truckstop Rates | Required | Required | Required | N/A |
Truckstop Tracking | Required | Required | Required | Required |
PC Miler | “Revenova” | API Key | N/A | N/A |
DAT | Required | Required | N/A | N/A |
DAT Rates | Required | Required | N/A | N/A |
Blue Grace | Required | Required | N/A | N/A |
Worldwide Express | Required | Required | Authentication Key | Account Number |
Project44 | Required | Required | N/A | N/A |
Project44Tracking | Required | Required | N/A | N/A |
Comdata | Sign on Name; NT Logon | Sign on Password; NT Password | Security Info | Account Code; Customer Id |
Trucker Tools | “101” | Encrypted Customer Account Number | N/A | N/A |
Trucker Tools Load Board | Account Id | API Key | Secret Key | Integration Id |
MacroPoint | Our “Venue ID” | API Password | N/A | MP Customer ID |
Kleinschmidt | Required | Required | N/A | N/A |
LoadBoard Network | ServiceKey | CustomerKey | N/A | N/A |
Addrexx | “Revenova” | API Key | N/A | N/A |
LoadDex | Required | Required | N/A | N/A |
FourKites | Required | Required | N/A | N/A |
EIA | “Revenova” | API Key | N/A | N/A |
SMC3 CarrierConnect | Required | Required | Required | N/A |
SMC3 RateWare | Required | Required | Required | N/A |
HubTran | “Revenova” | “Revenova” | API Token | N/A |
EFS | Required | Required | Contract Id | -1 |
Cleo | Required | Required | N/A | N/A |
Custom EDI | Required | Required | N/A | N/A |
AccuFrate | Required | Required | N/A | N/A |
RMIS | Required | Required | N/A | N/A |
TriumphPay | Required | Required | API Key | N/A |
Rand McNally | Required | Required | N/A | N/A |
TransCore | “Integration Token” | N/A | “CustCD” | |
Banyan | Required | Required | N/A | N/A |
Orderful | “Revenova” | Required | N/A | N/A |
Samsara | “Revenova” | Required API Key | N/A | N/A |
Falvey | Required | Required | API Key | N/A |
Breakthrough Fuel | Required | Required | N/A | N/A |
Twilio | “Revenova” or {Email] | Required API Key | N/A | N/A |
FreightWaves | Required | Required | N/A | N/A |
MyCarrierPackets | Required | Required | N/A | N/A |
| TEC-IT | "Revenova" | Required | N/A | N/A |
| Blue Yonder | Client ID | Client Secret | N/A | N/A |
API-Specific Notes
- SaferWatch
- Go to saferwatch.com to view your watch list or change your risk model settings.
- Use the same User Id and Password 1 as the TMS credentials to log into this site.
- The third credential (Service Key) is the same for all customers.
- The first, second, and fourth credentials are customer-specific.
- RMIS
- The TMS online carrier application is never used with RMIS as onboarding of carriers occurs there.
- If you enable RMIS credentials the system ignores the SaferWatch credentials and settings.
- Unlike SaferWatch (where the CarrierMonitorJob is manually scheduled once per day) the CarrierMonitorRMISJob runs continuously.
- The batch job brings down new carriers who have just applied and any old carriers that have FMCSA data changes.
- The config setting "Carrier Monitor Run Frequency (Mins)" determines how often the batch job runs.
- If the customer is already using RMIS, they need to populate the "Net Change Queue" with ALL carriers prior to you turning on the batch job. This will bring down all the carriers (once).
- If the customer is new to RMIS, you need to provide RMIS with a spreadsheet of all loaded carriers that includes carrier name, MC Number, DOT Number, Address, and Transportation Profile Id. Then RMIS will add the RMIS Id to the spreadsheet and send it back. You must then data load this data to populate the RMIS Id on all carrier TPs. This step is very important or you will get duplicates when you turn on the job. (The job matches on RMIS Id, then DOT Number, then MC Number, then Provincial Permit Number/Province. If no ID is present a duplicate carrier may be created.)
- Note that the Quick Carrier Review can only be used by carriers that RMIS has set up for you. You do not have access to all carriers when using RMIS. Only those who are set up in RMIS for your account.
- Verify the Minimum Weight, Maximum Weight, and Weight Units fields are populated correctly for each Mode record.
- Populate the RMIS Code field (left-side all caps values below) on Modes that match the definitions (the right-side mode names are not literal, but the codes are):
- MOTLDR - TL Dry
- MOTLRE - TL Reefer
- MOTLFL - TL Flatbed
- MOLTLT -- LTL
- MOIMDL - Intermodal
- MOTANK - Tanker
- MOBULK - Bulk
- MOOTHE – Other
- Initiate the CarrierMonitorRMISJob from TMS Admin🡪Batch Processes.
- MyCarrierPackets
- The TMS online carrier application is never used with MyCarrierPackets as onboarding of carriers occurs there.
- The Saferwatch and RMIS credentials must be disabled and the MyCarrierPackets credentials enabled in order for the TMS to use the MyCarrierPackets API.
- The CarrierMonitorMCPJob runs continuously. The config setting "Carrier Monitor Run Frequency (Mins)" determines how often the batch job runs.
- Verify the Minimum Weight, Maximum Weight, and Weight Units fields are populated correctly for each Mode record.
- Initiate the CarrierMonitorMCPJob from the Job Monitor LWC.
- Preferences used by the MCP API:
- Allow Carrier Address Updates: when checked, the Shipping Address of the carrier will be updated to the information coming from MCP.
- Carrier Remit To Sync: when checked, the Carrier Remit To field of the carrier’s TP will be updated to Carrier Remit To information coming from MCP.
- Carrier Monitor Last Run: Date/time when the job last run. This value is used in several API calls to MCP.
- Carrier Monitor Run Frequency (Mins): how often the job run. The lowest setting is 15 minutes.
- The batch job runs in 3 different modes:
- First time run (Carrier Monitor Last Run preference is set to null/blank):
- Gets the list of monitored carriers from MCP and creates/updates those carriers in the TMS. The Carrier Monitor checkbox on the Transportation Profile of the carriers is set to true (e.g. carrier is monitored at MCP).
- Gets the list of carriers in the TMS where Carrier Monitor checkbox on the Transportation Profile of the carrier is set to false and registers that carrier as unmonitored at MCP.
- Get the completed packets from MCP and creates/updates those carriers in the TMS.
- Update the carriers in the TMS with the latest set of changes from MCP for monitored carriers only.
- Daily run Monday through Saturday (Carrier Monitor Last Run preference has a date/time in the past):
- Get the completed packets from MCP and creates/updates those carriers in the TMS.
- Update the carriers in the TMS with the latest set of changes from MCP for monitored carriers only.
- Sunday run:
- Gets the list of carriers in the TMS where Carrier Monitor checkbox on the Transportation Profile of the carrier is set to false and registers that carrier as unmonitored at MCP.
- Gets the list of monitored carriers from MCP and creates/updates those carriers in the TMS. The Carrier Monitor checkbox on the Transportation Profile of the carriers is set to true (e.g. carrier is monitored at MCP).
- Get the completed packets from MCP and creates/updates those carriers in the TMS.
- Update the carriers in the TMS with the latest set of changes from MCP for monitored carriers only.
- First time run (Carrier Monitor Last Run preference is set to null/blank):
- Internet Truckstop (Load/Truck Board and Rates)
- Go to Truckstop.com to view loads you have posted via TMS, if desired.
- Your “handle” on this site must be identical to your TMS user name (as seen in the upper right corner of TMS) in order for the API integration to function.
- Your login credentials for this site are not the same as the TMS credentials.
- Use the Revenova-provided User Id and Password 1 for your TMS credentials.
- Use a customer-specific numeric identifier for Password 2.
- Internet Truckstop 2 (New API Family)
- You must use OAuth to retrieve access and refresh tokens for each user.
- Complete Login Process:
- Navigate to TMS Admin🡪Credentials and select Truckstop 2 from the dropdown.
- Enter the Client ID in the User Id field.
- Enter the Client Secret in the Password 1 field.
- Enter the Redirect URL in the Password 2 field.
- https://login.salesforce.com/apex/rtms__oauthcode for production
- (You may also use <mydomain>/apex/rtms__oauthcode)
- https://test.salesforce.com/apex/rtms__oauthcode for sandbox
- Note that you must provide these URLs to Truckstop.
- https://login.salesforce.com/apex/rtms__oauthcode for production
- Click the Save button.
- Click the Auth button and enter your Truckstop account credentials on their login page.
- Click the Get Tokens button on the OAuth page.
- If using Truckstop Book It Now functionality:
- A Terms and Conditions must be created within the Truckstop environment.
- You must set up the “Post-back” URL with Truckstop support for the inbound Book It request:
{API COM URL}/services/apexrest/rtms/tmslistener?org=00D180000008oA9EAI&source=Truckstop2&pwd=4wGFDgnT950Ovg1 - Truckstop support must enable the LOADBOOKED and optionally enable LOADDROPPED webhook events and disable all other webhook events.
6. Truckstop Tracking
- You need four credentials for Truckstop Tracking:
- Used Id: “Account Id” (email address)
- Password1: “Password”
- Password2: “Secret”
- Customer Number: “client_Id”
7. Blue Grace
- You must inform Blue Grace that the “Load Book Number” (our load number) is the primary reference for tendering and tracking.
8. DAT
- DAT credentials are user-specific.
- DAT current and historical rate web service calls are cached to reduce usage charges.
9. Comdata
- Seven credential fields are required.
- For the User Id, Password 1, and Customer Number, enter the two credentials items with a semi-colon separating them.
10. EFS
- The Master Contract Id is usually “0.”
11. Project44
- Provides a direct pass-through to the carrier APIs. You must set up an account on the Project44 web site and enter the carrier credentials you have for each carrier you want to employ.
- If you want to use customer-specific pricing you must:
- Create a Login Group for each customer on the Project44 web site.
- Populate the customer-specific credentials for each Login Group.
- Populate the Carrier API Login Group field on the customer Transportation Profile with the Login Group Key.
- There are TWO remote site settings required. One for the API and one for the BOL document URL.
- A BOL # is NOT generated by Project44, but is generated and passed from the TMS during the tender operation.
- Load status API calls may return signed BOL and POD images.
- You must properly-configure carrier pickup notes on the Project44 web site to prevent tenders from failing (if the note is too long).
- A Bill of Lading Number must be present to use the Truckload load tracking API.
- You may set up multiple contracts for a given capacity provider by naming them uniquely on the Project44 portal:
.png?sv=2026-02-06&spr=https&st=2026-07-04T23%3A38%3A45Z&se=2026-07-05T03%3A22%3A45Z&sr=c&sp=r&sig=rES11nFGXeAMxZFmN8b6eVx7wLYA2L%2F2seEkbaOBcO4%3D)
- Project44 supports a “login group cascade” concept. You can define two login groups – setting the Carrier API Login Group field at both the customer and default transportation profile levels. When quotes are retrieved from Project44, two queries are made, one with each login group. Quotes retrieved from the first query are masked out of the second query.
- Inquire of Project44 what customer-specific URL documents will be available from and add it as a Remote Site Setting. It will be of a format such as https://prod-44742-images.s3.amazonaws.com.
- Set the Pickup Only flag on Project44 carrier services if you do not want an immediate PRO Number generated. (If the PRO Number changes later tracking data will be invalid.)
- Project44 relies on a “push” approach to event processing, like MacroPoint.
- A TMS web service “listener” handles events pushed from Project44 in real time.
- You must set up the “Post-back” URL with Project44 support to point at your listener:
{API COM URL}/services/apexrest/rtms/tmslistener?org=00D180000008oA9EAI&source=Project44&pwd=4wGFDgnT950Ovg1
12. Project44 Tracking
- Note that you do not have to provide a listener URL for push updates from Project44 Tracking as the push URL is automatically created via the API when tracking is initiated.
- The webhook ‘configName’ for tracking is:
- Unified tracking: “unified-“ + 18-character org ID
- Truckload tracking: “truckload-“ + 18-character org ID
13. PC Miler
- The API Key is the only credential used for authentication.
- Check Dynamic Maps Enabled from TMS Admin🡪Configuration only if you purchased ALK Maps.
- The version of mileage data used can vary by customer. Set the Mileage API Version on the customer transportation profile as desired.
- Set the Mileage API Routing to Practical or Shortest on the customer Transportation Profile as desired. The default behavior is Practical.
- Make sure the following CSP Trusted Site is enabled: *.alk.com
14. MacroPoint
- The ID and password used to access their web site are NOT what we use for API connections.
- MacroPoint can also send tracking updates from the TMS to tracking sessions initiated by other systems. These events include Appointment Time, Stop Arrival, Stop Departure, and Location Update.
- Set the Tracking Update Frequency (Minutes) configuration field to “meter” how many location updates you track in a given time period.
- To use MacroPoint ELD trackingyou must provide MacroPoint a spreadsheet with the following data:
- Carrier Name
- Carrier Id (18-character Account Id – use CASESAFEID formula field to get this value)
- Carrier DOT
- Carrier MC Number
- Carrier NSC Number (Canada)
- Carrier CAAT (Mexico)
- MacroPoint relies on a “push” approach to event processing.
- A TMS web service “listener” handles events pushed from MacroPoint in real time.
- You must set up the “Post-back” URL with MacroPoint support to point at your listener:
{API COM URL}/services/apexrest/rtms/tmslistener TMS users can share MacroPoint updates with the designated customer on a Load. Make sure the MacroPoint Customer Id is set on the (Load) customer Transportation Profile:
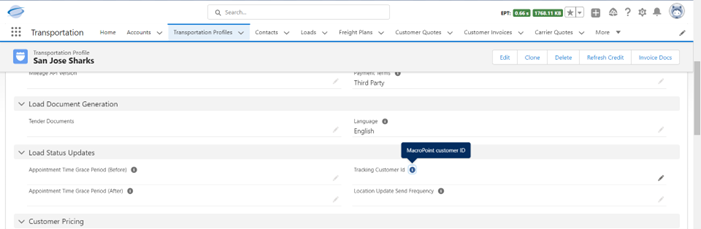
When clicking the Track button on the Tracking Log widget for Loads for this customer, and additional checkbox is provided to have MacroPoint share Load updates with both the TMS user and the Customer:
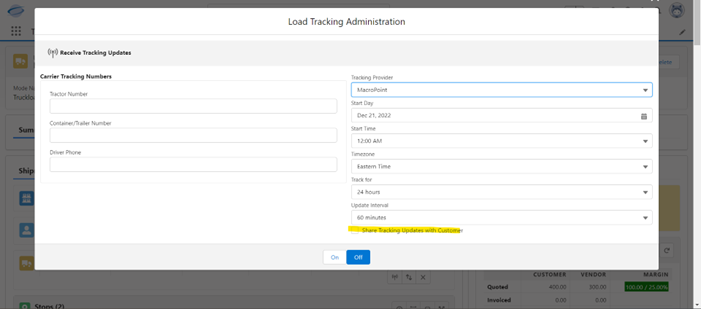
Make sure the MacroPoint IP Address field is populated from TMS Admin🡪Configuration. Any load status post-backs from MacroPoint that do not originate from this IP mask are rejected as a security feature.
15. LoadDex
- You must update the Service URL and Remote Site Setting with your customer-specific URL as provided by LoadDex.
16. FourKites
- FourKites relies on a “push” approach to event processing, like MacroPoint.
- A TMS web service “listener” handles events pushed from FourKites in real time.
- You must set up the “Post-back” URL on the FourKites web site to point at your listener.
- From the Four Kites portal, go to Settings🡪3rd Party Integration.
- Enter the Update Url based on your “email loop” sites page URL, 18-character org ID, and FourKites API credentials code (last column on page). For example:
{API COM URL}/services/apexrest/rtms/tmslistener?org=00D180000008oA9EAI&source=FourKites&pwd=4wGFDgnT950Ovg1 - Enter the Authorization Scheme: No Authorization.
- You must contact FourKites and have them provision the following call-back events:
- Location Update
- Carrier ETA Update
- Stop Arrival
- Stop Departure
- User Note
- Location and Carrier ETA event frequency is based on the following heuristic:
- If pickup/delivery day, every 30 minutes
- Else, every 4 hours
17. Trucker Tools
- Trucker Tools relies on a “push” approach to event processing, like MacroPoint.
- A TMS web service “listener” handles events pushed from Trucker Tools in real time.
- TruckerTools relies on a “push” approach to event processing.
- A TMS web service “listener” handles events pushed from TruckerTools in real time.
- You must set up the “Post-back” URL with TruckerTools support to point at your listener:
{API COM URL}/services/apexrest/rtms/tmslistener?org=00D180000008oA9EAI&source=TruckerTools&pwd=4wGFDgnT950Ovg1
18. Trucker Tools Load Board
- Truck posting search:
- The searching user email inside Revenova must match the username in Trucker Tools.
- A load must be posted to the load board to search for trucks on the load.
- Trucker Tools will only return in network carriers in Trucker Tools when returning trucks. To add carriers to Trucker Tools either follow the directions in their portal or reach out to a Trucker Tool representative. When generating a .csv file of the carriers the external Id will be the carrier’s Account Id in Revenova. The columns in red require values:
company_
name
mc
dot_
number
ext_
id
truck_
numbers_range
truck_
numbers
contact_
email
contact_
phone
can_see_
loads
book_it_
now
- USD currency must be enabled to use Book It Now functionality.
- If using Book It Now functionality you must set up the “Post-back” URL for the inbound Book It request:
{API COM URL}/services/apexrest/rtms/tmslistener?org=00D180000008oA9EAI&source=TruckerToolsLoadBoard&pwd=4wGFDgnT950Ovg1
19. EIA
- Obtain an API Key from https://www.eia.gov/opendata/register.php.
20. BIC
- Obtain a user Id and password from https://www.bic-boxtech.org.
- The password2 value for BIC credentials is (always) YmljYXBwOmJpY3NlY3JldGFwcA==
21. SMC3
- SMC3 provides Line Haul (only) via their APIs. Set up Accessorials and add Fuel Surcharge to the SMC3-related Rate Entries to incorporate locally-calculated accessorials and fuel surcharges.
- Make sure to enter the Tariff Effective Date for all Rate Entry records.
- When available, terminal information is provided for the pickup and delivery stops and is stored on the carrier quote and first/last stops.
- To treat discounts like surcharges, check the Apply As Negative Discounts checkbox. With this option, discounts will be added tot he freight chargest returned from SMC3 rather than subtracted.
22. AccuFrate
- You must run the Load Status Batch Job if you want automatic tracking updates from AccuFrate.
23. HubTran
- Credentials consist of:
- User Id: Revenova
- Password1: Revenova
- Password2: API Token (Looks like bf5f267000ae8e8e6pe0ef656746588x)
- Credentials can be group-specific. Set the HubTran Credentials Selector field from TMS Admin🡪Configuration to use group-based credentials and enter all the credentials from TMS Admin🡪Credentials.
- You must provide a URL for the “pushed” invoice documents and totals similar to other “push” APIs above:
{API COMM URL}/services/apexrest/rtms/tmslistener?org=00D180000008oA9EAI&source=HubTran&pwd=0mIMLnLen2BP6qF0 - You must set the Vendor Invoice Processor field on the Transportation Profile record for all participating carriers to “HubTran.”
- You must set the Vendor Invoice Processor field on the Load record for all participating loads to “HubTran.” This is set on carrier assignment if you do not set it earlier.
- Make sure to add the Vendor Invoice Number, Vendor Settlement Total, and Vendor Settlement Variance, and Vendor Invoice Date fields to the Carrier Quote (as read-only fields). These fields will be populated by HubTran.
- Bill of Lading Number on the Load record may also be populated by HubTran if available.
- HubTran must provide login credentials to users to access their web portal. There users can review and approve invoices and deal with exceptions related to the auto-parsing of invoices and other documents.
- To maximize the performance of HubTran, make sure to populate the SCAC, MC Number, US DOT Number, and Billing Address fields as well as possible for all participating carriers. Also add all carrier contact emails and keep them up to date. The email used for carrier documents sent to HubTran is a major determinant in the proper routing/parsing of them.
- You must pre-load carriers and loads into HubTran. Click the HubTran Data Load button from TMS Admin🡪Configuration to do this. This can be done multiple times. Only loads for participating carriers will be uploaded to HubTran.
- Note that load information is resent to HubTran when a load changes in any significant way.
- If the Carrier Remit To on a carrier’s Transportation Profile is updated, the updated carrier information is sent to HubTran.
- The Accounting Notes is passed to HubTran.
- The Load TMS19 Field Set and Stop TMS2 Field Set are used to pass “flex” references to HubTran.
24. LoadBoard Network
- The service key is the same for all Revenova customers.
25. TransCore
- Note that you must post a load on the load board in order to search for trucks for that load!
26. Banyan
- You must run the LoadStatusUpdateJob to get load tracking updates from Banyan. There is no load-specific status call for Banyan loads.
- You may add additional accessorials and limited access accessorial as they become available by adding API Accessorial records for Banyan. See the development team for more information.
- Both Code and Subcode must be populated correctly for Banyan API Accessorial records.
- Make sure the two Credentials checkbox options – Shipper Rates and Submit Pickup – are set correctly.
- We pass a “ClientRefNum” field to Banyan to determine which rates are used when quoting. This defaults to the 18-character org Id unless the Customer Transportation Profile’s Carrier API Login Group field is populated, in which case it uses that. Make sure to communicate all values for this field to Banyan during project setup.
27. Breakthrough Fuel
- You must populate the Breakthrough Fuel Shipper Id on all customer Transportation Profiles who are using BTF.
- The Customer Load Id must be populated on the Load in order to retrieve BTF data. This is the load identifier shared across BTF and TMS.
28. Worldwide Express
- Add any of the following Accessorial and API Accessorial records that you need.
| Accessorial Record Name | API Accessorial Record Name |
|---|---|
Limited Access Pickup – Church Limited Access Delivery – Church | limitedAccessPickup limitedAccessDelivery |
Limited Access Pickup – School/College/University Limited Access Delivery – School/College/University | limitedAccessPickup limitedAccessDelivery |
Limited Access Pickup – Military Limited Access Delivery – Military | limitedAccessPickup limitedAccessDelivery |
Limited Access Pickup – Prison/Correctional Facility Limited Access Delivery – Prison/Correctional Facility | limitedAccessPickup limitedAccessDelivery |
Limited Access Pickup – Hotel Limited Access Delivery – Hotel | limitedAccessPickup limitedAccessDelivery |
Limited Access Pickup – Farm Limited Access Delivery – Farm | limitedAccessPickup limitedAccessDelivery |
Limited Access Pickup – Cemetery Limited Access Delivery – Cemetery | limitedAccessPickup limitedAccessDelivery |
Limited Access Pickup – Construction Site Limited Access Delivery – Construction Site | limitedAccessPickup limitedAccessDelivery |
Limited Access Pickup – Country Club Limited Access Delivery – Country Club | limitedAccessPickup limitedAccessDelivery |
Limited Access Pickup – Golf Club Limited Access Delivery – Golf Club | limitedAccessPickup limitedAccessDelivery |
Limited Access Pickup – Mall/Shopping Center Limited Access Delivery – Mall/Shopping Center | limitedAccessPickup limitedAccessDelivery |
Limited Access Pickup – Mine Limited Access Delivery – Mine | limitedAccessPickup limitedAccessDelivery |
Limited Access Pickup – Park Limited Access Delivery – Park | limitedAccessPickup limitedAccessDelivery |
Limited Access Pickup – Storage Facility Limited Access Delivery – Storage Facility | limitedAccessPickup limitedAccessDelivery |
Limited Access Pickup – Utility Site Limited Access Delivery – Utility Site | limitedAccessPickup limitedAccessDelivery |
Limited Access Pickup – Other Limited Access Delivery – Other | limitedAccessPickup limitedAccessDelivery |
29. Samsara
- Samsara relies on a “push” approach to event processing, like MacroPoint.
- A TMS web service “listener” handles events pushed from Samsara in real time.
- You must set up the “Post-back” URL with Samsara support to point at your listener:
{API COM URL}/services/apexrest/rtms/tmslistener?org=00D180000008oA9EAI&source=Samsara&pwd=4wGFDgnT950Ovg1
30.Twilio
- User ID is the single verified sender email address from Twilio if you are using this option. If you have performed the Domain Authentication setup, enter “Revenova” for the User ID.
- Password1 is the API Key generated on the Twilio portal.
31. Blue Yonder
- Access tokens to Blue Yonder are granted through OAuth 2.0 Client Credentials grant type. The User ID represents the Client ID and Password 1 represents the Client Secret.
- The Blue Yonder credentials are used only for returning rates to the Blue Yonder system. All other actions are performed by the REST based classes in the TMS.
- The EDI Tenders checkbox under the Blue Yonder credentials should be enabled if the tenders to Blue Yonder loads will be done via EDI instead of through Blue Yonder. Enabling the field will automatically populate relevant EDI fields on Blue Yonder loads.
SMC3 Quoting + Project44/Banyan Tender/Track/Images
You may set up hybrid API carrier services that employ SMC3 for quoting and Project44 or Banyan for tendering, tracking, and image retrieval. These carrier services should be set up with the SMC3 RateWare Credentials Id.
Carrier Monitoring API Field Mapping
The following fields are inserted/updated by the Carrier Monitoring APIs as follows:
I – Insert
U – Update
(1) => update if the global setting “Allow Carrier Address Updates” is checked OR the value in the TMS field is null
(2) – update if the value in the TMS field is null
(3) – update if there is a value in the response
(4) – update if there is a value in the response AND the value in the TMS field is null
(5) – update if the global setting “Carrier Remit To Sync” is checked AND the response has factor company information
(6) – update to ‘Pending’ if RMIS Certified is not ‘Yes’
| Table | Field | SaferWatch | RMIS | MyCarrierPackets |
|---|---|---|---|---|
Account | BillingStreet | I | I / U (1) | I / U (1) |
Account | BillingCity | I | I / U (1) | I / U (1) |
Account | BillingStateCode | I | I / U (1) | I / U (1) |
Account | BillingPostalCode | I | I / U (1) | I / U (1) |
Account | BillingCountryCode | I | I / U (1) | I / U (1) |
Account | Currency | I | I | I |
Account | DBA Name | I / U (2) | I / U (2) | I / U (2) |
Account | Fax | I / U (2) | I / U (2) | I / U (2) |
Account | Name | I | I | I |
Account | Phone | I / U (2) | I / U (2) | I / U (2) |
Account | ShippingStreet | I | I / U (1) | I / U (1) |
Account | ShippingCity | I | I / U (1) | I / U (1) |
Account | ShippingStateCode | I | I / U (1) | I / U (1) |
Account | ShippingPostalCode | I | I / U (1) | I / U (1) |
Account | ShippingCountryCode | I | I / U (1) | I / U (1) |
Carrier Service | Name | I | I | I |
Carrier Service | Currency | I | I | I |
Carrier Service | Mode |
| I | I |
Carrier Service | Quote Contact | I | I | I |
Carrier Service | Tender Contact | I | I | I |
Carrier Service | Status Contact | I | I | I |
Contact | First Name | I | I | I |
Contact | Last Name | I | I | I |
Contact | I | I | I | |
Contact | Fax |
| I | I |
Contact | Mobile Phone |
| I | I |
Contact | Phone | I | I | I |
Contact | Title |
| I |
|
Contact | Transportation Role | I | I | I |
Insurance Policy | Name | I | I | I |
Insurance Policy | Currency | I | I | I |
Insurance Policy | Address | I | I | I |
Insurance Policy | Agent Company | I | I | I |
Insurance Policy | Agent Email | I | I | I |
Insurance Policy | Agent Phone | I | I | I |
Insurance Policy | Cancel Date |
| I |
|
Insurance Policy | City | I | I | I |
Insurance Policy | Coverage Amount | I | I | I |
Insurance Policy | Effective Date |
| I |
|
Insurance Policy | Expiry Date | I | I | I |
Insurance Policy | Fax | I | I | I |
Insurance Policy | Insurance Company | I | I | I |
Insurance Policy | Phone | I | I | I |
Insurance Policy | Postal Code | I | I | I |
Insurance Policy | Reefer Breakdown Coverage | I |
|
|
Insurance Policy | Reefer Breakdown Deductible | I |
|
|
Insurance Policy | Deductible | I |
| I |
Insurance Policy | Source | I | I | I |
Insurance Policy | State/Province | I | I | I |
Insurance Policy | Type | I | I | I |
Transportation Profile | Agreement Date |
|
| I |
Transportation Profile | Agreement Signed By |
|
| I |
Transportation Profile | Agreement Status |
|
| I |
Transportation Profile | Authority Granted Date | I / U | I / U | I / U |
Transportation Profile | Authority Points |
|
| I / U |
Transportation Profile | Authority Risk | I / U | I | I / U |
Transportation Profile | Broker Authority Pending | I / U (3) | I / U (3) | I / U (3) |
Transportation Profile | Broker Authority Revocation | I / U (3) | I / U (3) | I / U (3) |
Transportation Profile | Broker Authority Status | I / U (3) | I / U (3) | I / U (3) |
Transportation Profile | Canada Province Coverage |
| I / U (4) | I / U (4) |
Transportation Profile | CARB TRU Certificate Expiration Date |
| I / U |
|
Transportation Profile | CARB TRU Compliant Vehicles Reported |
| I / U |
|
Transportation Profile | CARB TRU Compliance Type |
| I / U |
|
Transportation Profile | CARB TRU Non-Compliant Reason |
| I / U |
|
Transportation Profile | Cargo Carried |
|
| I / U |
Transportation Profile | Carrier Operation | I / U (3) | I / U (3) | I / U (3) |
Transportation Profile | Carrier Pay To Name |
| I / U |
|
Transportation Profile | Carrier Remit To | I | I / U (5) | I / U (5) |
Transportation Profile | Carrier Review Status | I | I / U (6) | I |
Transportation Profile | Common Authority Pending | I / U (3) | I / U (3) | I / U (3) |
Transportation Profile | Common Authority Revocation | I / U (3) | I / U (3) | I / U (3) |
Transportation Profile | Common Authority Status | I / U (3) | I / U (3) | I / U (3) |
Transportation Profile | Company Risk | I |
| I |
Transportation Profile | Contract Authority Pending | I / U (3) | I / U (3) | I / U (3) |
Transportation Profile | Contract Authority Revocation | I / U (3) | I / U (3) | I / U (3) |
Transportation Profile | Contract Authority Status | I / U (3) | I / U (3) | I / U (3) |
Transportation Profile | Currency | I | I | I |
Transportation Profile | D&B DUNS Number |
|
| I |
Transportation Profile | Federal Tax ID |
| I / U (3) | I / U (3) |
Transportation Profile | Fleet Size |
| I | I |
Transportation Profile | FMCSA Insurance Cancellation Date | I / U |
|
|
Transportation Profile | FMCSA Insurance Cancellation Type | I / U |
|
|
Transportation Profile | Insurance Points |
|
| I / U |
Transportation Profile | Insurance Risk | I / U | I | I / U |
Transportation Profile | Last Carrier Review Date |
| I / U |
|
Transportation Profile | MC Number | I / U (3) | I / U (3) | I / U (3) |
Transportation Profile | Mexico State Coverage |
| I / U (4) |
|
Transportation Profile | Name | I | I | I |
Transportation Profile | NSC Number |
| I / U (3) |
|
Transportation Profile | NSC Safety Certificate Date |
| I / U (3) |
|
Transportation Profile | Number of Drivers |
| I | I |
Transportation Profile | Operation Points |
|
| I / U |
Transportation Profile | Operation Risk | I / U | I | I / U |
Transportation Profile | Other Carrier Capabilities |
| I / U | I / U |
Transportation Profile | Out of Service | I / U (3) | I / U (3) | I / U (3) |
Transportation Profile | Out of Service Date | I / U (3) | I / U (3) | I / U (3) |
Transportation Profile | Overall Points |
|
| I / U |
Transportation Profile | Overall Risk | I / U | I | I / U |
Transportation Profile | Provincial Authority |
| I / U (3) |
|
Transportation Profile | Provincial Permit Number |
| I / U (3) |
|
Transportation Profile | RMIS Carrier Payment Option |
| I / U |
|
Transportation Profile | RMIS Certified |
| I / U |
|
Transportation Profile | RMIS ID |
| I / U (3) |
|
Transportation Profile | RMIS Non-Certified Reason |
| I / U |
|
Transportation Profile | Safety Points |
|
| I / U |
Transportation Profile | Safety Rating | I / U | I / U | I / U |
Transportation Profile | Safety Rating Date | I / U | I / U |
|
Transportation Profile | Safety Risk | I / U | I | I / U |
Transportation Profile | SCAC |
| I / U (3) |
|
Transportation Profile | State DOT Number | I / U (3) | I / U (3) |
|
Transportation Profile | State DOT State |
| I |
|
Transportation Profile | Total Power Units | I / U (3) | I / U (3) | I |
Transportation Profile | Total US Vehicle Inspections | I / U (3) | I / U (3) | I |
Transportation Profile | US DOT Number | I / U (3) | I / U (3) | I |
Transportation Profile | US State Coverage |
| I / U (4) | I / U (4) |
Transportation Profile | W9 Address |
| I / U | I |
Transportation Profile | W9 City |
| I / U |
|
Transportation Profile | W9 State |
| I / U |
|
Transportation Profile | W9 Postal Code |
| I / U |
|
Transportation Profile | W9 Validated |
| I / U |
|
Transportation Profile | Watchdog Reports | I / U |
| I |
I – Insert
U – Update
(1) => update if the global setting “Allow Carrier Address Updates” is checked OR the value in the TMS field is null
(2) – update if the value in the TMS field is null
(3) – update if there is a value in the response
(4) – update if there is a value in the response AND the value in the TMS field is null
(5) – update if the global setting “Carrier Remit To Sync” is checked AND the response has factor company information
(6) – update to ‘Pending’ if RMIS Certified is not ‘Yes’
Queued Transactions
The following transactions are queued in the Queued Transaction table and then processed by the QueuedTransactionJob, which run every minute.
Inbound Transactions
- “Email Loop” transactions from customers and carriers
- Project44 LTL load status updates
- Project44 TL load status updates
- Project44 Unified load status updates
- MacroPoint load status updates
- FourKites load status updates
- Trucker Tools load status updates
- HubTran invoice transactions
- Carrier App Update Transportation Profile
- Carrier App Generate PDF
- Samsara driver/asset events
Outbound Transactions
- HubTran carrier and load updates
- HubTran document retrieval
- MacroPoint outbound updates
- Load Posting removal for covered loads
- EDI 214 transactions – Appointment, Arrival, Departure, Loading Complete, Unloading Complete
- Project44 Unified load status start/stop
Note that in an effort to reduce the footprint of this set of jobs, we are shunting some traffic to the Queued Transaction Event Platform Event (object) for asynchronous non-batch processing. Current traffic that can be shunted:
- HubTran outbound carrier and load updates
- HubTran document retrieval
Lanes and Zones
Lanes and Zones are globally defined – and usable across all shippers and consignees from the TMS Admin tab.
Lane Setup
Click on the Lanes link to access the global list of all Lanes. There are seven types of lane start/end point types:
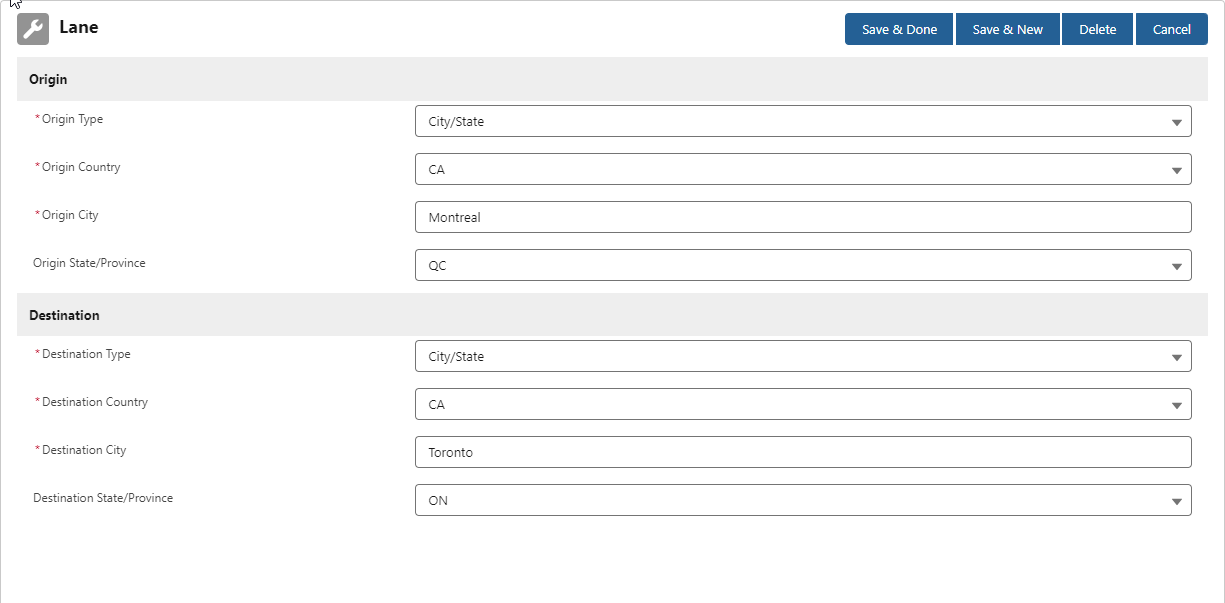
“Location” types refer to unique account records, which represent distinct locations in the TMS such as a warehouse, factory, corporate HQ, etc.
You can mix and match origin and destination types when defining a lane. For example, Origin = “Chicago, IL” and Destination = “California.”
Zone Setup
Click on the Zones link to access the global list of all zones. There are seven types of zones:
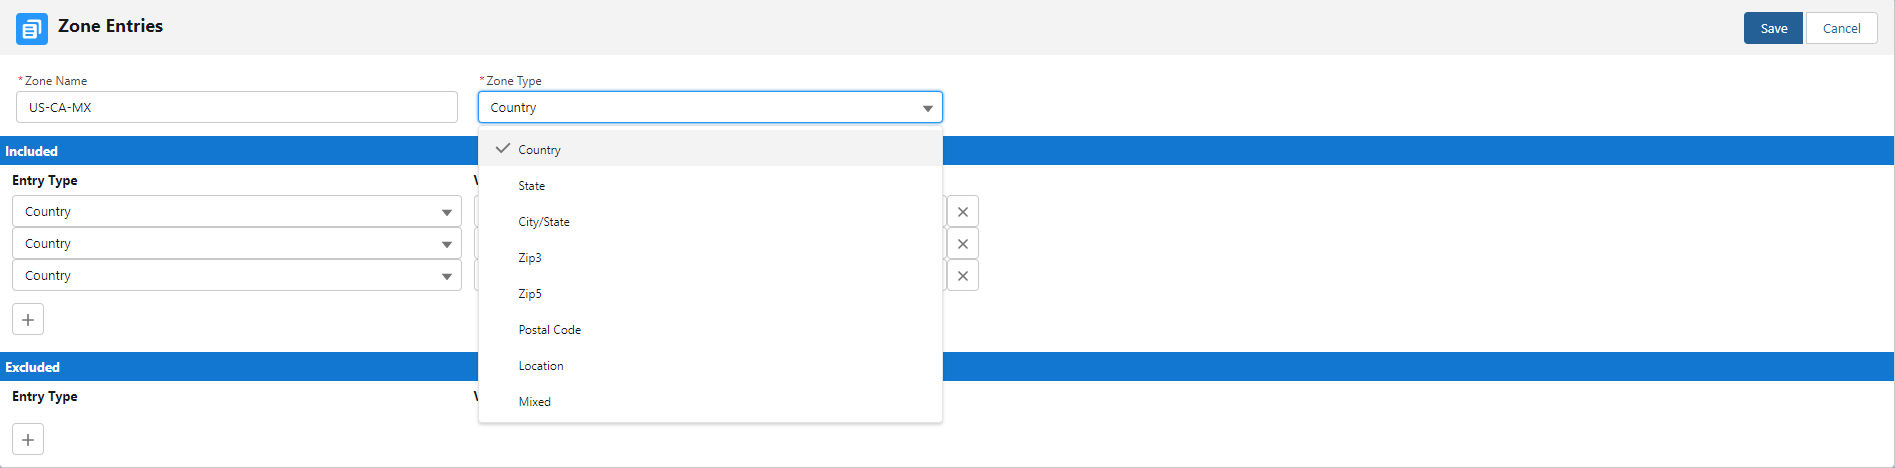
Zones represent origin and destination location “bags” and are an efficient way to capture arbitrarily-complex lanes.
For example, assume you have 50 cities that fall evenly into two zones. To define a lane using the two zones would require three setup steps: Defining zone one, defining zone two, and defining the zone-one-to-zone-two lane. Using lanes only would require 25 x 25 = 625 distinct lane setups, or 1250 setups if you needed bi-directional lanes.
Accessorials
Accessorial tracking is a pervasive aspect of TMS for almost every step in the lifecycle of a load. They are manually or automatically associated with loads, quotes, and invoices over time. In rough chronological order, accessorials come into play as follows:
- A global list of “generic” accessorials is defined in TMS.
- These records are stored in the Accessorial table.
- API-specific versions of the generic accessorials needed to invoke specific carrier aggregation APIs.
- These records are stored in the API Accessorial table.
- Generic accessorials are optionally associated with a load when it is created/configured.
- These records are stored in the Load Accessorial table.
- Accessorials to be automatically added to a load upon creation are stored in the Default Accessorial table.
- Auto-costed Accessorials can be defined in Rate Entry table records.
- Customer Quotes are manually/automatically generated for a load, with associated quotes for accessorial charges.
- These records are stored in the Customer Quote Accessorial table.
- Customer Invoices are manually/automatically generated for a load, with associated accessorial charges.
- These records are stored in the Customer Invoice Accessorial table.
- Carrier Quotes are manually/automatically generated for a load, with associated stored, API-based, or entered accessorial charges.
- These records are stored in the Carrier Quote Accessorial table.
- Vendor/Carrier Invoices received can be entered into TMS, with associated line item accessorial charges.
- These records are stored in the Vendor Invoice Accessorial table.
- Accessorial Exclusions are defined to exclude certain carriers from being assigned to loads with specific accessorials.
- These records are stored in the Accessorial Exclusion table.
These ten accessorial tables are highly interrelated to properly track and reconcile accessorial charges during the lifecycle of a load.
Access the global accessorial list from the TMS Admin🡪Accessorials link. Disable those accessorial charges that you never want to associate with loads.
Stop Charges
Stop Charges can be added to stored rate customer and carrier quote/invoices via stored rate setup. These are accessorial charges that are not explicitly added to loads – they are automatically added to customer and carrier quotes based on stored rate setup.
You may add accessorials as needed, but API-based Carrier Quotes (usually for LTL carriers) cannot process user-added accessorials.
API-based carrier service accessorials (usually for LTL carriers) are pre-loaded, as these are defined by the technical integrations to these carriers. When you create new Carrier Services, use the Transportation Profile detail page to enter carrier-specific assessorial stored rates.
DO NOT CHANGE THE NAME OF THE GENERIC ACCESSORIALS AS SOME CARRIER APIS DEPEND ON THESE NAMES.
Hazardous Materials Support
The Revenova TMS supports hazardous material loads via fields on the Line Item record:
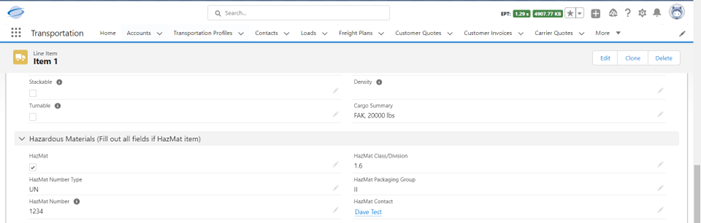
The HazMat checkbox field automatically rolls up to a Load-level field of the same name.
The Blue Grace, Worldwide Express, and Project44 LTL API all support hazardous materials quoting and tendering with some variation regarding what details are passed to the carriers.
The Transportation Profile
The Transportation Profile extends the Salesforce concept of an account to include additional information related to configuring, quoting, tendering, and tracking loads. The logistics concept of a “Routing Guide” is contained in the Transportation Profile and supporting tables for shippers, brokers, and consignees.
The Transportation Profile record also is used to store and analyze carrier data, and forms the home page for the TMS Carrier Management function.
An Account table lookup field (Transportation Profile) references this additional information.
Note that one Transportation Profile record can be shared by multiple related accounts. For example, a large customer with 10 account (location) records in the TMS may all reference the same single Transportation Profile record.
There are six types of Transportation Profiles, corresponding to the six types of accounts (for logistics purposes):
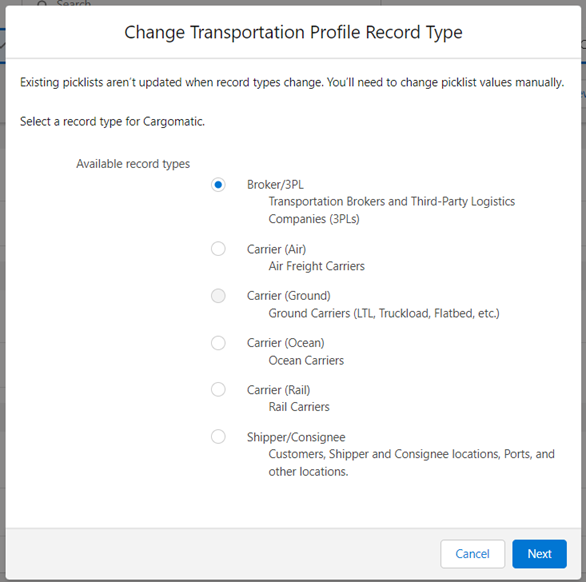
Transportation Profile Auto-Creation
Transportation Profile records are automatically created and associated with an account whenever an account is inserted or updated under the following circumstances:
- There is no existing Transportation Profile populated on the account record.
- The TMS Type field is populated with anything other than Factoring Company or Customs Broker.
This auto-creation occurs during the following TMS activities:
- Manual creation of an account from the New account button.
- Creation of a load with new Customer, Shipper, or Consignee accounts.
- Creation of a load on the Customer Portal with new Shipper or Consignee accounts.
- Creation of an account during the entry of an online carrier application.
Note that the TMS Type for Sharing field duplicates the TMS Type field value but is accessible as a criterion for account sharing rules. It should not be displayed on the account page layout.
Transportation Profile (TP) Processing Logic
When a TMS Load is created and worked, there are several Transportation Profiles that can affect the process:
- The Customer Account’s Transportation Profile
- The Bill To Account’s Transportation Profile
- The Stop Location Accounts’ Transportation Profiles
- The Global Default Transportation Profile
- The Carrier Account’s Transportation Profile
The following details how these Transportation Profile (TP) records and associated routing guide information (if present) interact with the Load during its lifecycle:
- Stop Creation
- The Stop’s Appointment Required field is copied from the Location TP.
- If null, the Stop’s Instructions field is copied from the Location TP.
- Stop Creation/Update
- If null, the Stop’s Shipping/Receiving Hours field is copied from the Location TP.
- Load Creation/Update
- A Transportation Profile for the Load is searched for in this order: Customer🡪Global. If null, the Load’s Payment Terms field is copied from the TP if present there.
- If null, the Load’s Customer Bill To field is copied from the Customer TP.
- The Load’s Tax Exempt field is copied from the Customer TP.
- The Customer TP Customs Brokers records are examined for any cross-border loads, and the appropriate one assigned to the load.
- The carrier TP Carrier Remit To will be populated when a load is tendered to a carrier.
- Load Accessorials
- If Default Accessorials are defined for any stop account’s Transportation Profile, they are automatically added to the load upon creation.
- Stored-Rate Customer Quote Auto-Creation
- A Transportation Profile for the Load is searched for in this order: Customer🡪Global.
- Lane/Rate matches for the Load from the TP are searched for and used to construct quote(s).
- TP Fuel Surcharge is used to calculate the quote’s fuel surcharges, if present.
- TP Accessorial charges are used, if present.
- Carrier Quote Auto-Creation
- A Transportation Profile for the Load is searched for in this order: Customer🡪Global.
- Carrier Service/Lane/Rate matches for the Load from the TP are searched for and used to construct quote(s).
- If a carrier is in the Carrier Exclusion table for a given customer/global transportation profile, it will not be considered.
- For Stored Rate Quotes:
- The Fuel Surcharge associated with the Carrier Service from the TP is applied.
- Customer Invoice Creation
- The Load’s Bill To TP is used to determine the invoice’s POD Required and Billing Method values.
- Load Tender
- A Transportation Profile for the Load is searched for in this order: Customer🡪Global.
- The TP defines which Carrier Service record is used to determine tendering method and carrier contacts.
- Tender Document Creation
- A Transportation Profile for the Load is searched for in this order: Customer🡪Global.
- The TP determines which tender documents to produce, if present.
- Else, the Product Configuration global setting determines which documents to produce.
- Bill of Lading Creation
- The SCAC field from the Carrier TP is displayed on the Bill of Lading.
- Carrier Equipment Type and Cargo Carried
- Carriers can be filtered in/out of the Available Carrier list via the Carrier Equipment Type related list and the Cargo Carried picklist on the Carrier TP.
Customer/Shipper/Consignee Transportation Profile Setup
From the Transportation Profiles tab, click the New button.
Select Record Type of Shipper/Consignee and click the Continue button. Fill in the appropriate header information and click the Save button:
![]()
![]()
![]()
Much of the information above defaults into loads when created, and each customer, bill to, shipper, and consignee may have an associated transportation profile.
The Refresh Credit button recalculates the A/R balances and credit limit available for this customer.
The Invoice Docs button navigates to the customer-specific invoice document requirements page.
Default Accessorials
A location/profile may always require certain accessorials. Create them for each Shipper/Consignee profile that requires them:
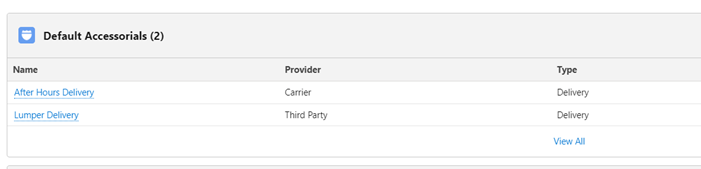
Carrier Exclusions
If a customer wants to exclude one or more carriers from being considered for quote/tender, add these via the Carrier Exclusions related list. Carriers can be excluded by:
- Global/Customer Transportation Profile
- Carrier
- Carrier Service
- Lane
- Location
- Exclusion Type
- Effective Date
- Expiration Date
Excluded carriers will not be included in the FQA or any stored carrier rate-generated Carrier Quotes.
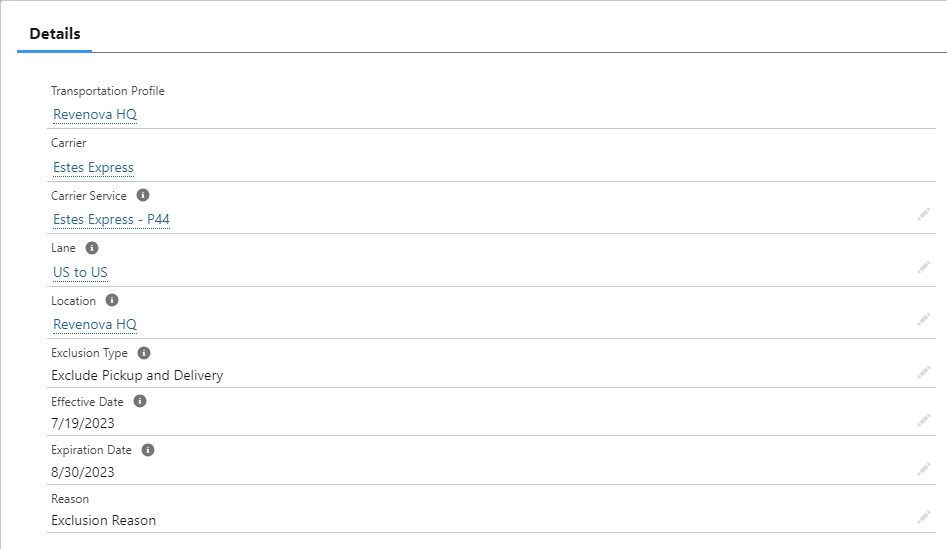
Carrier Markup Group Assignment
Assign a Carrier Markup Group to the global and/or customer transportation profiles to support cost-plus customer quotes.
Customs Broker Support
TMS supports customs brokers for cross-border loads. Customs brokers are set up in the Customer Transportation Profile:
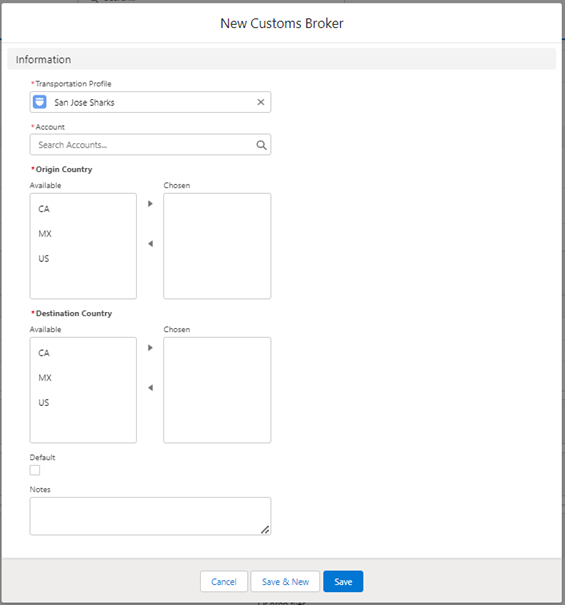
Load fields capture cross-border information:
- Entry Number
- Clearance Number
- Customs Broker
Accounts can be designated as Customs Brokers:
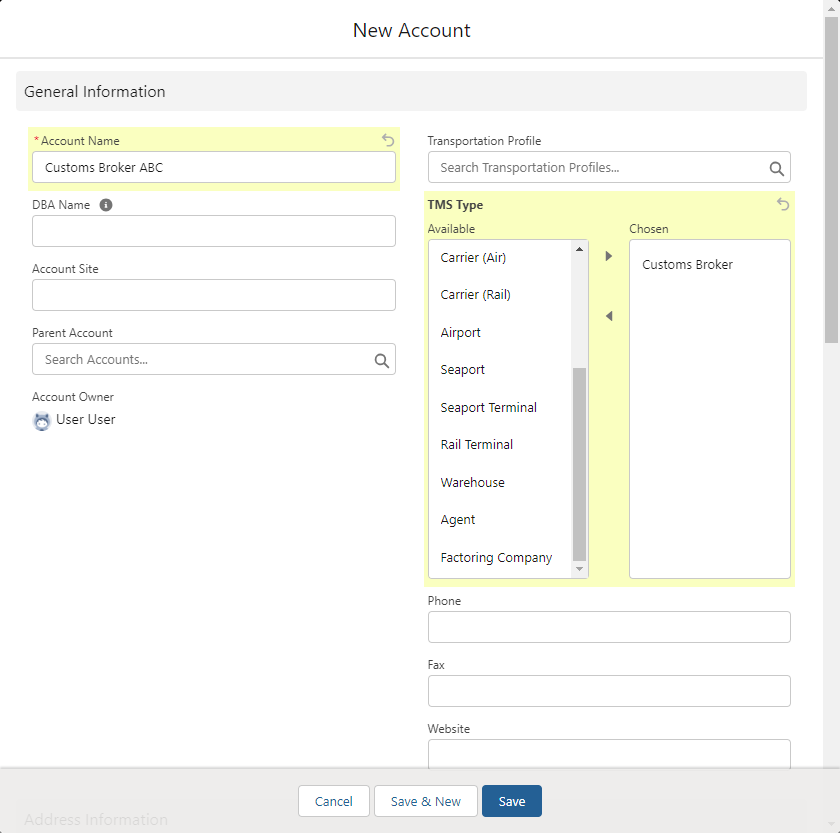
And all this information comes together on the Carrier Rate and Load Confirmation and Driver Load Confirmation documents:

Note that the Load’s Customs Broker field is auto-assigned on load creation based on the load from/to countries and the customer Transportation Profile settings.
Customer Reference Numbers
If a customer has specific reference numbers corresponding to Load or Stop fields that they always require, those reference numbers can be populated in this “Customer Reference Numbers” table. A customer can have zero-to-many reference number records defined. Each Customer Reference Number record defines the TMS Object (Load or Stop), the TMS Field (Load or Stop fields), the Mode, and the Load Validation Status (Tendered, Assigned, Dispatched, In Transit or Delivered). For customers with these reference number requirements created, a modal will pop-up on the Load at different events in the Load lifecycle if the required field is blank. The modal will warn the user that one of the customer’s required reference number fields is not populated, and it will allow the user to either populate and save the field updates or skip the warning entirely. Note that any Load or Stop field can be added to the ‘TMS Field’ picklist, including custom fields.
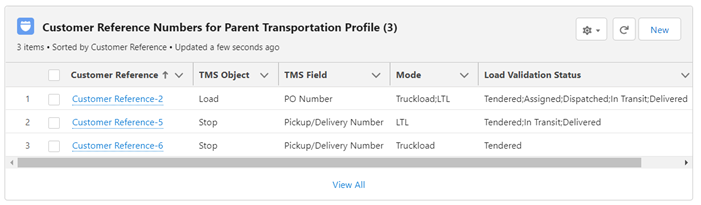
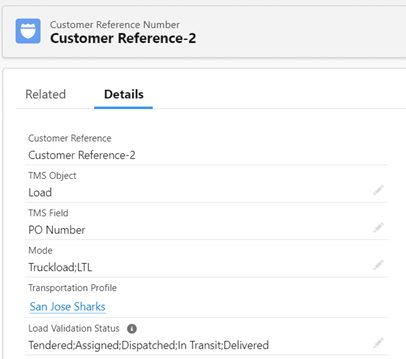
The events that will cause the modal to pop-up are:
- Clicking the ‘Tender’ or ‘Assign’ button on the Carrier Quote Builder (Load Status moving to ‘Tendered’ or ‘Assigned’).
- Clicking the ‘Tender’ or ‘Assign’ button on the Carrier Quote List (Load Status moving to ‘Tendered’ or ‘Assigned’).
- Clicking the ‘Save’ or ‘Thumbs Up’ button on the Stop Detail widget for the first stop or last stop of the Load after making a Stop Status update (Load Status moving to ‘Dispatched’, ‘In Transit’ or ‘Delivered’).
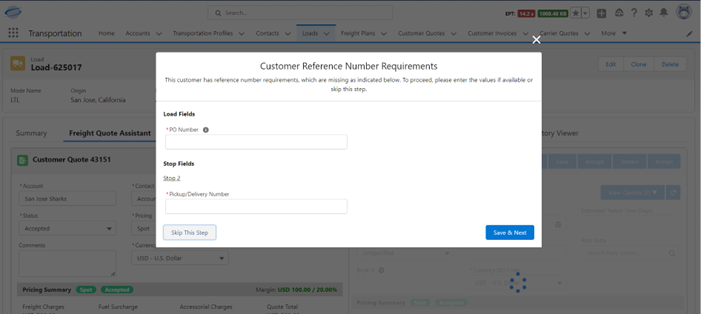
Broker/3PL Transportation Profile Setup
This process is virtually identical to the Shipper/Consignee process, with slightly different header information exposed.
Stored customer and carrier rates can be defined for this type of profile, as it is often selected as the type for the global transportation profile.
Stored Rate Support
Summary
TMS supports the entry of both customer and carrier stored/negotiated rates and lanes via the Rate Entry LWC and Lane LWC:
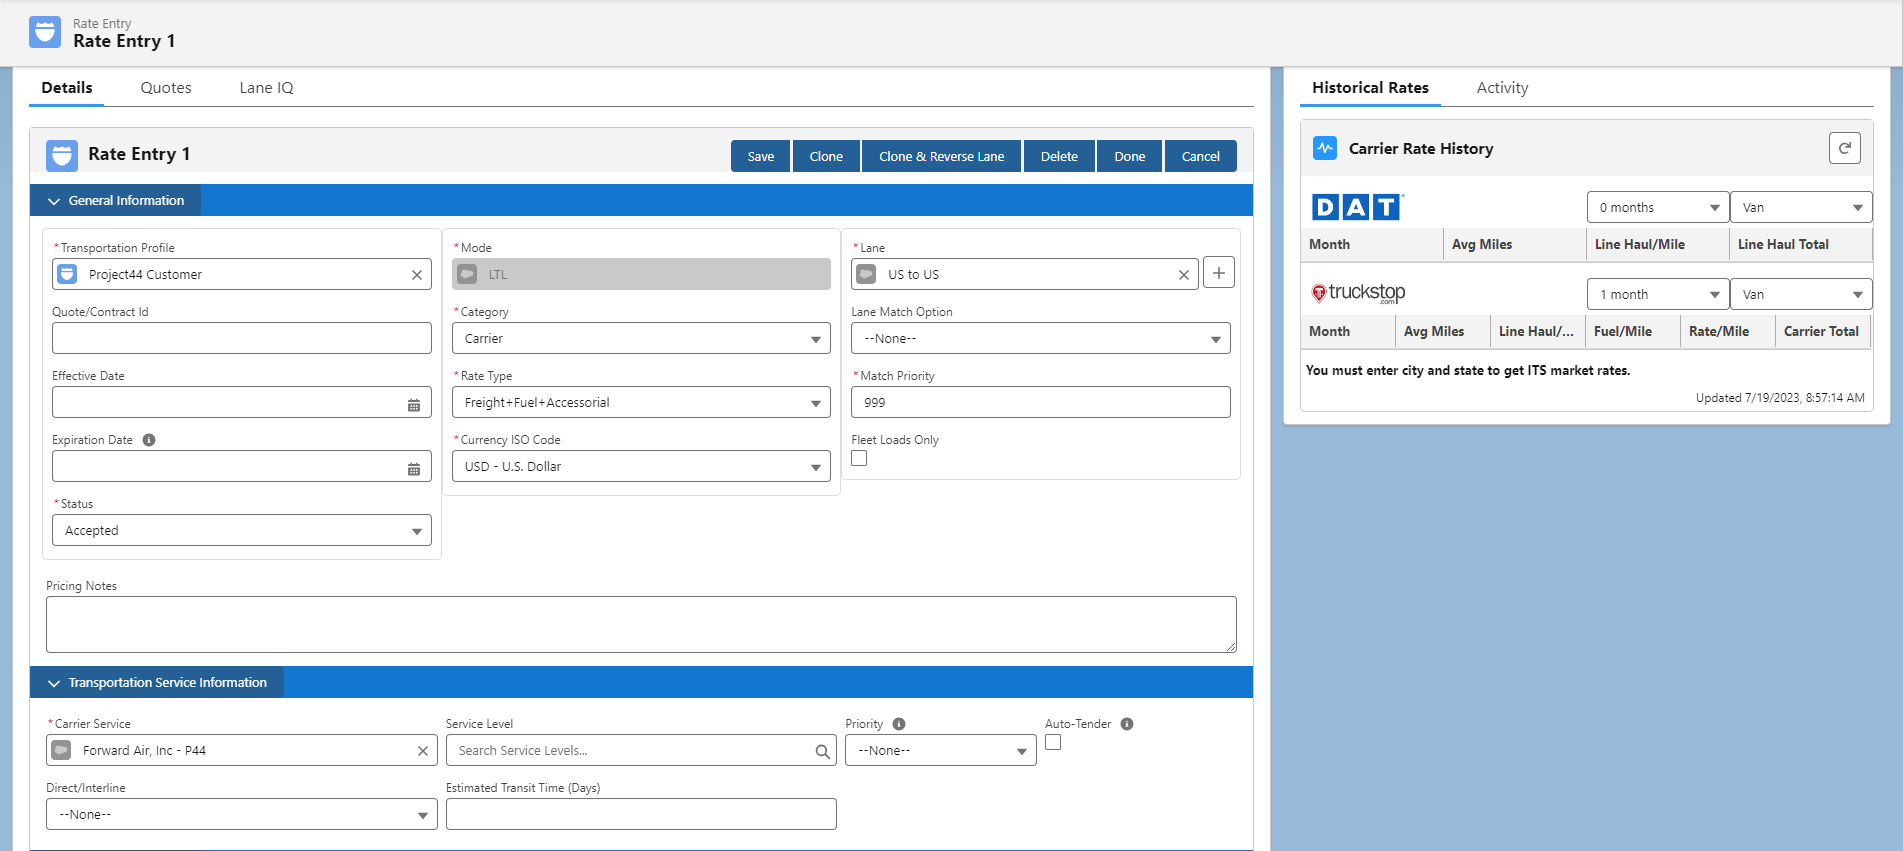

Lanes can be defined by any A-to-B permutation of the following:
- Country
- State
- City
- Zip 3
- Zip 5
- Postal Code
- Location (Account)
- Zone
Customer and Carrier rate entries can be based on the following calculation methods:
- API
- Manual
- Fixed Amount
- Per Mile
- Per Kilometer
- Per Pound
- Per Pound (Billable)
- Per Kilogram
- Per Kilogram (Billable)
- Per CWT
- Per Ton (US)
- Per Cubic Foot
- Per Cubic Meter
- Per Gallon
- Per Liter
- Per Linear Foot
- Per Square Foot
- Per Square Meter
- Per Handling Unit
- Per Packaging Unit
- Per Equipment Type
- Per Stop
- Per Day
- Per Hour
- Percent of Amount
- Per 100.00 of Amount
Rate Entries can have a Base, Minimum, and/or Maximum calculation defined, using the following logic when calculating the cost for a quote:
If(Base Cost > Maximum Cost) {
Use Maximum Cost
}
Else If(Base Cost < Minimum Cost) {
Use Minimum Cost
}
Else {
Use Base Cost
}
If two Rate Entry records match when generating a stored rate customer quote, the Lane Rate Entry Match Priority field will determine which Rate Entry is used based on the sum of the Origin and Destination Type score as follows (lowest score record is selected):
- Location => 10,
- Postal Code => 40,
- Zip5 => 60,
- Zip3 => 80,
- City => 100,
- State => 120,
- Country => 140,
Zone Match Priority:
- Location => 20,
- Mixed => 30,
- Postal Code => 50,
- Zip5 => 70,
- Zip3 => 90,
- City/State => 110,
- State => 130,
- Country => 150,
Billable Weight-Based Notes
The Rate Entry DIM Factor field is used to calculate the DIM (Dimensional) Weight. TMS calculates the DIM Weight by dividing the volume of the load by the DIM Factor. If the load does not have the volume specified, TMS will calculate the volume based on the handling unit L/W/H dimensions of the line items of the load.
The Billable Weight will be the greater value of the DIM Weight and Total Weight on the load.
The DIM Weight and the Billable Weight are on the Customer Quote and Carrier Quote objects are populated by billable weight-based rate entries. They are in the load weight units.
Global Rate Entry Access
You can access all customer and carrier stored rates from TMS Admin🡪Rate Entries:
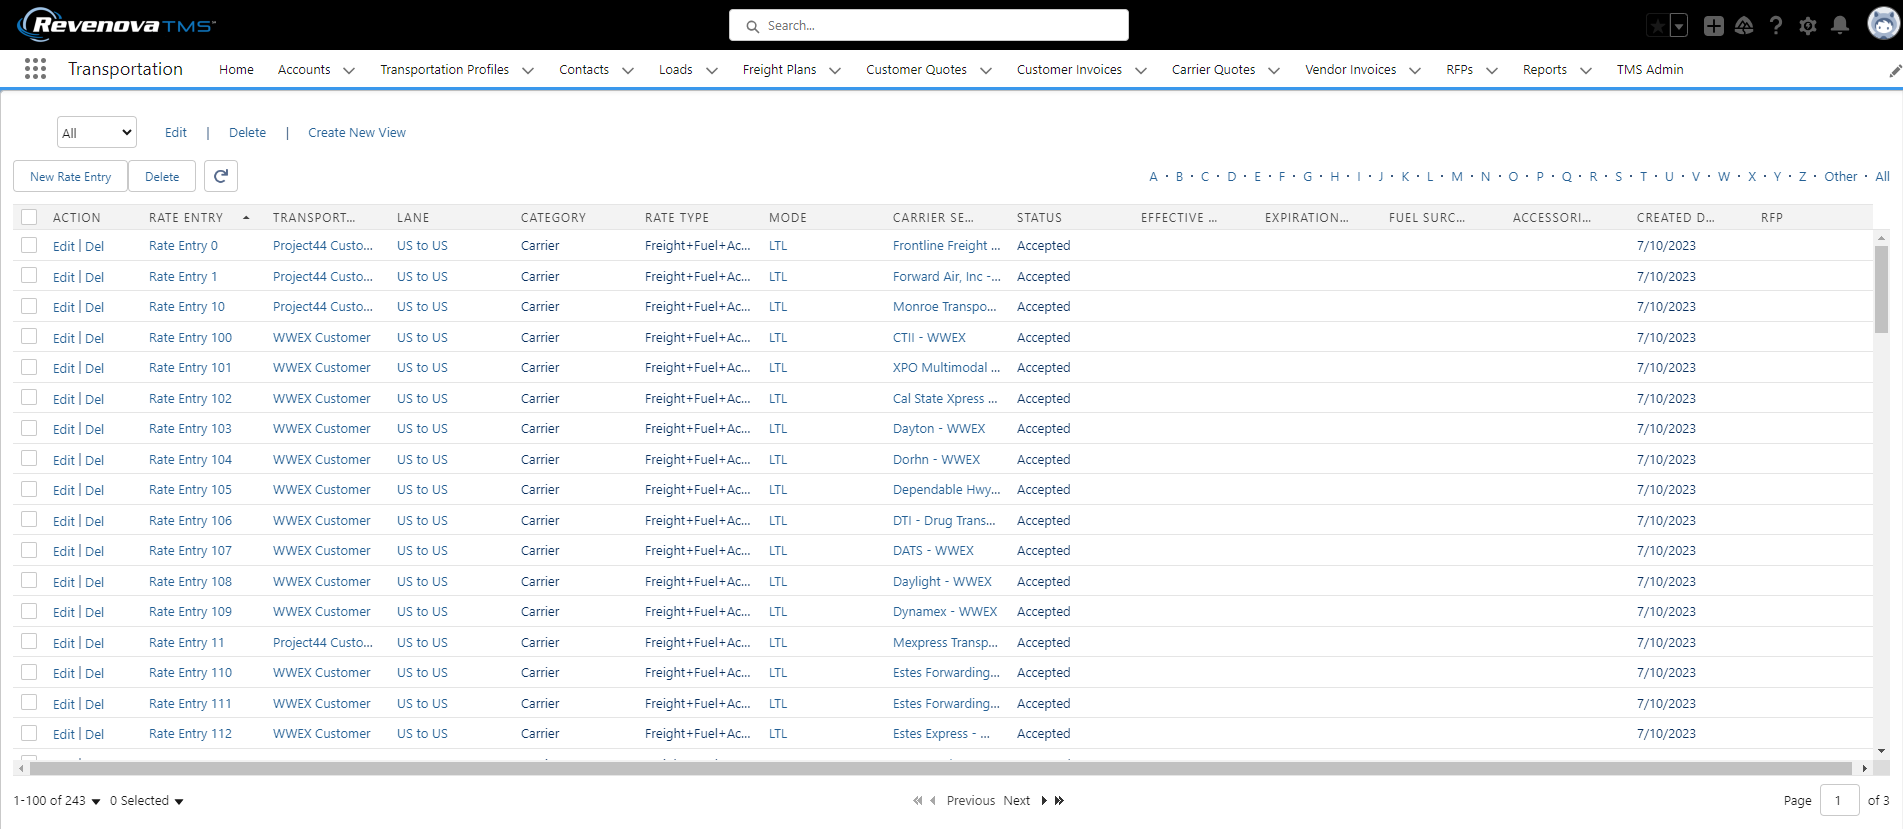
Fuel Surcharges
Fuel Surcharges are specified at the Rate Entry record level. This means that the fuel schedule can vary by Customer, Carrier Service, Lane, Mode, etc.
Accessorial Negotiated Rates
All negotiated rates should be set up as Rate Entries of Rate Type Accessorial.
RFP Support
Customer and Carrier RFP support is now available in the TMS, including the bulk import of lane/rate spreadsheets to facilitate setup, response, and operationalizing RFP-based stored rates.
Lanes and Rate entries can be uploaded from a .csv file via the RFP Banner LWC:

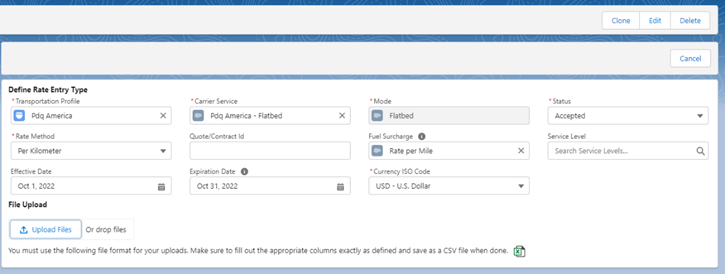
LTL Tariff Rating Support
LTL Tariff-based carrier and customer quotes are available via the SMC3 API integration. From TMS Admin🡪Rate Entries, define Tariff Schedules as inputs to the rating process.
Tariff-Based Rate Entries
Associate Tariff Schedules with the appropriate Rate Entries from TMS Admin🡪Rate Entries. You can also elect to prevent deficit rating with SMC3 by checking the Prevent Deficit Rating checkbox on the Rate Entry record. As a shipment increases in weight, the rate per 100 pounds will decrease. Within each weight break there is generally a point at which the charge would be lower if a higher weight break were used (alternation). This is when deficit weight rating is used. The weight necessary to take the shipment up to the higher weight break is added to the shipment so that the shipper gets the benefit of the lower rate. If the Prevent Deficit Rating checkbox is checked, the maximum weight to stop the rating alternation is set equal to the total load weight plus one pound. Stop Alternation allows the user to turn off a desired weight level (and higher).
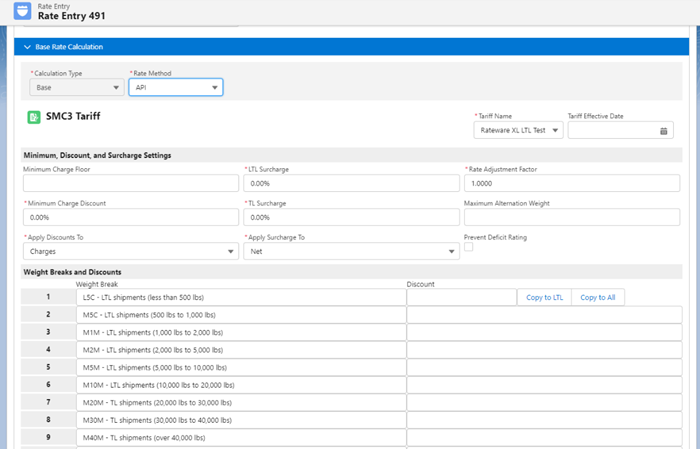
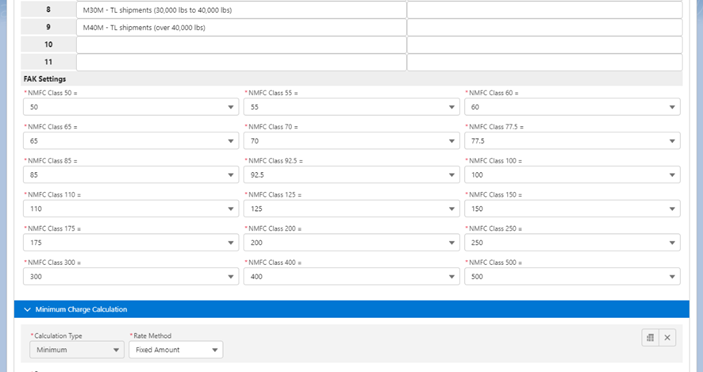
SMC3 Carrier Service Setup
To set up an SMC3-based carrier service, perform the following steps:
- Quote Method Field Setting: API
- Tender Method Field Setting: Email
- Status Method Field Setting: Email
- Credentials Field Setting: The record Id of the SMC3 RateWare credentials from TMS Admin🡪Credentials
Note that you can set up Fuel Surcharge and Accessorial rate entry records for SMC3-based quotes (as only Line Haul is provided via the API).
SMC3 Quoting and Invoicing
When utilizing SMC3 to retrieve customer or carrier quotes via API, the itemized freight charges by load line item will be captured on the Customer Quote Freight Charge Item and Carrier Quote Freight Charge Item objects respectively, which can be viewed from the record detail page.
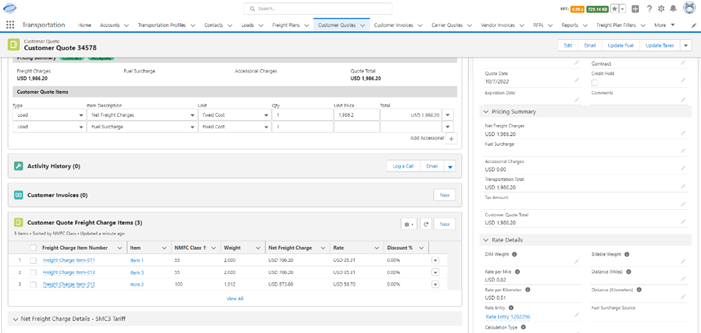
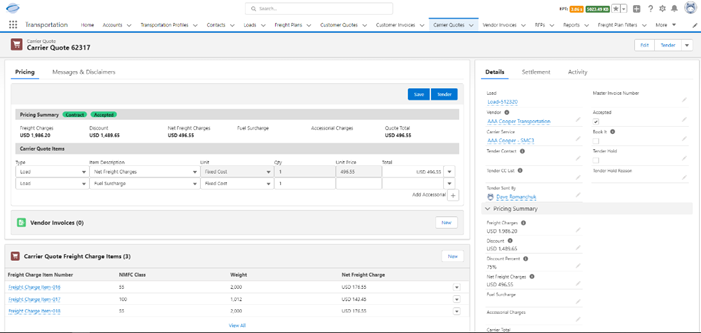
For customer invoicing, if there are Customer Quote Freight Charge Items associated with the Customer Quote associated with the Customer Invoice being processed, those itemized freight charges will appear in the invoice PDF.

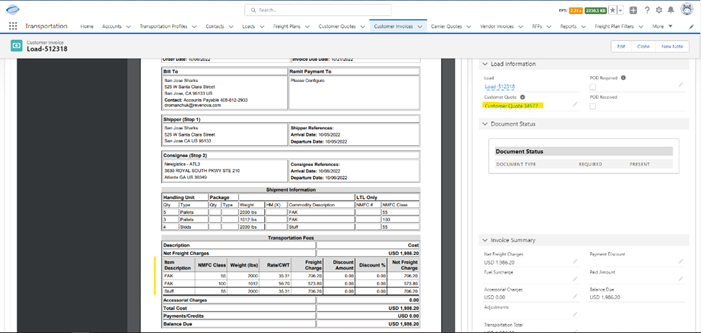
If the invoice is an EDI invoice, the itemized freight charges will be included in the EDI 210 XML (see the Revenova TMS 7.9 EDI Specification for details of the XML transaction). Note* - if you plan to utilize this itemized freight charge format, you will need to contact your EDI VAN (e.g., Kleinschmidt) to ensure they have the configuration and mapping set up to process the additional elements.
Rerate/Rebill
Users can be notified of changes in loads that require requoting or re-invoicing. This capability is turned on by Mode by setting the Rerate Notification field.
Three fields on the load table manage this information:
- Carrier Rerate Notification – “true” if a change has occurred requiring rerating.
- Customer Rerate Notification – “true” if a change has occurred requiring rerating.
- Rerate Fingerprint – stores the most recent hash of the load configuration.
Three field sets control which fields are monitored for changes to the load “fingerprint”:
- Load TMS11
- Stop TMS5
- Line Item TMS2
The customer quote portion of the Freight Quote Assistant has new components to support rerate/rebill:
- Refresh Quote/Rerate Quote Badge – visible when a change has occurred requiring rerating.
- Rerate Button – visible when a quote can be rerated/refreshed and user has rights to this button.
- Update Invoice Button – visible when a pending invoice exists for this quote and user has rights to this button.
- Lock Button – visible if user has lock rights to this button.
The user object Rerate/Rebill Permissions field controls which users have access to these added buttons.
The carrier quote portion of the Freight Quote Assistant has new components to support rerate/rebill:
- Refresh Quotes/Rerate Quote Badge – visible when a change has occurred requiring rerating.
Note that only stored rate and marked-up quotes can be auto-rated.
A new Customer Quote field, Billing Status, can be used to auto-create the Customer Invoice by setting it from Pending to Approved and saving the Customer Quote.
Carrier Management
The carrier’s Transportation Profile record functions as the “home page” for the TMS Carrier Management function. Carrier Management capabilities include:
- An online application carriers can use to request addition to your carrier network.
- Storage of critical carrier information needed for quoting, tendering, and tracking loads.
- Real-time access to FMCSA data in order to perform initial and periodic carrier certification and review.
- A carrier “watch list” whereby any FMCSA changes to watched carriers are flagged for review on a daily basis.
- A “Quick Carrier Review” sidebar link that allows access to FMCSA given the entry of a US DOT Number.
- Load Board and internal truck posting retrieval/search, with the ability to quickly set up a new carrier from a load board truck posting.
Online Application
The online application allows carriers to self-register on your carrier network if you expose the URL on your web site. Please see below on how to set up this capability.
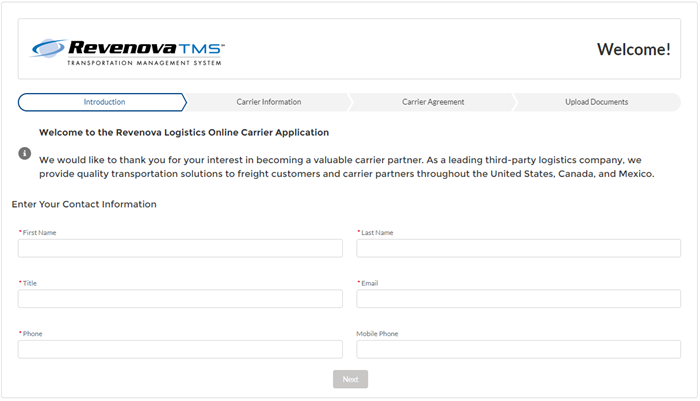
The result of a complete, submitted carrier application creates the following data in TMS:
- An Account record.
- One or more Contact records.
- A Transportation Profile record.
- One or more Insurance Policy records.
- One or more (disabled) Carrier Service records.
- Zero or more Carrier Equipment Type records.
- Zero or more Bank Account records.
- Insurance, authority, and tax form attachments.
- An application attachment with eSignature.
Carrier Transportation Profile
Navigating to the Transportation Profile detail page for a just-captured carrier application:
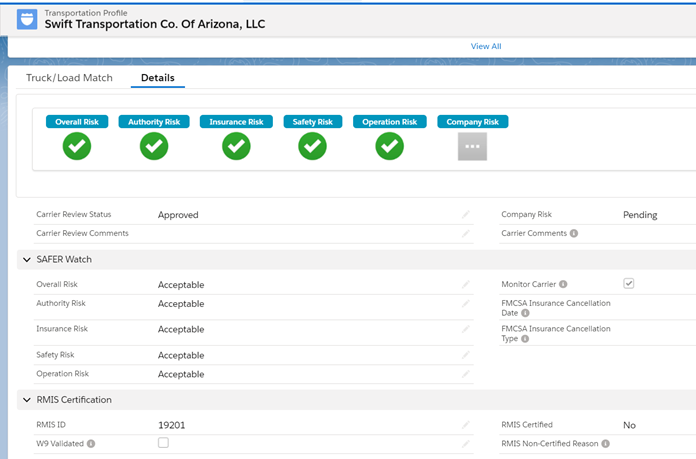
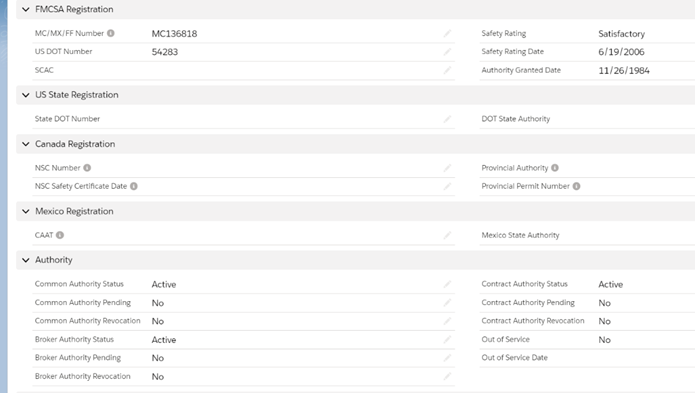
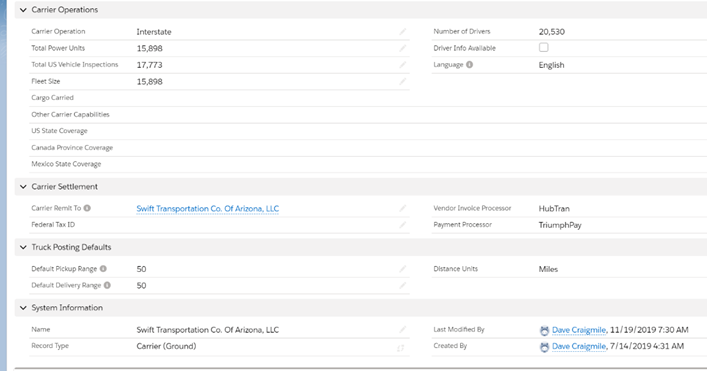
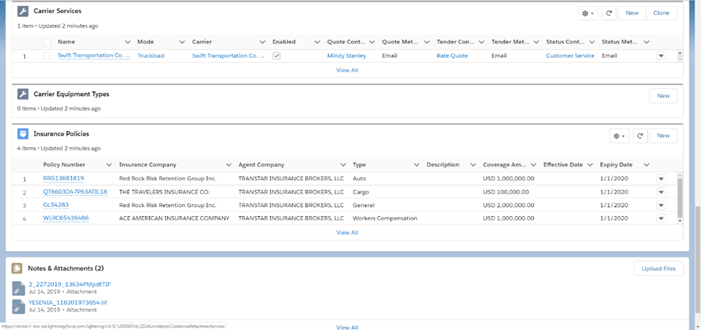
Note that when a load with an Equipment Type is tendered to a carrier, a Carrier Equipment Type record is created for the carrier’s Transportation Profile if it is not there already.
This allows the system to “learn” which carriers support which Equipment Types.
Carrier FMCSA Review
If the SaferWatch, RMIS or MyCarrierPackets API is enabled, you can click on the Review button from the Transportation Profile detail page to access the latest FMCSA data and risk categorizations for this carrier.
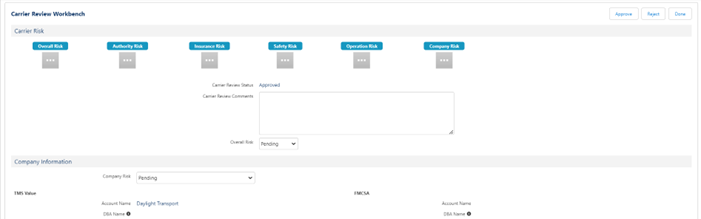
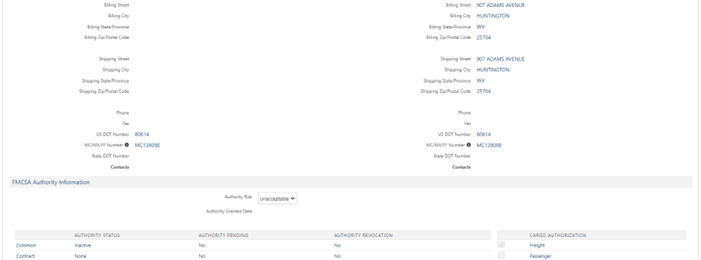
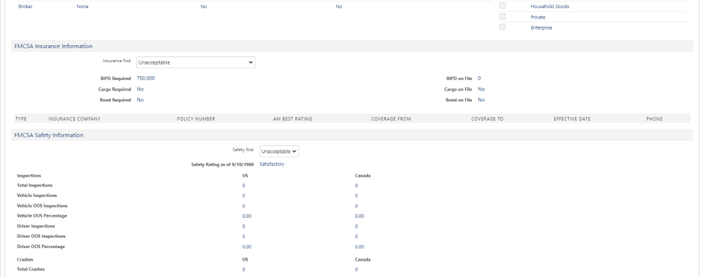
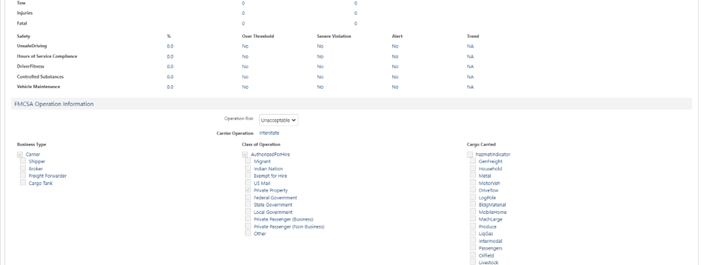
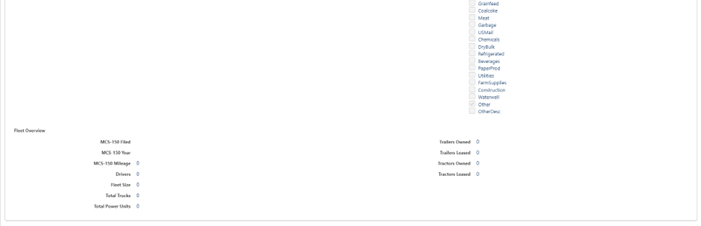
The user may manually override the SaferWatch-calculated or MyCarrierPackets risk fields, and enter other information related to the certification process.
If the Get Certificate button is visible in the insurance section, you may retrieve an image of the insurance certificate for this carrier (as an attachment).
Carrier Approval
Clicking the Approve button from this page performs two important tasks:
- The Carrier Service records for this carrier are enabled.
- Saferwatch: the carrier is added to the Watch List. FMCSA changes to this carrier will be flagged on a daily basis.
You must click the Approve button to add a carrier to the (SaferWatch) Watch List.
You may go to the SaferWatch web site to view your Watch List or modify it outside of the TMS.
The Monitor Carrier field on the Transportation Profile record is set to “true” for all monitored carriers.
- MyCarrierPackets: the carrier is added to the Monitored Carriers list with the next run the batch job.
Carrier Rejection
Clicking the Reject button from this page performs two important tasks:
- The Carrier Service records for this carrier are disabled.
- Saferwatch: the carrier is removed from the Watch List.
You must click the Reject button to remove a carrier from the (SaferWatch) Watch List.
- MyCarrierPackets: the carrier is removed from the Monitored Carriers list with the next run the batch job.
Quick Carrier Review
Accessed from the App Launcher, the user can look at FMCSA data by providing a US DOT or MC Number:
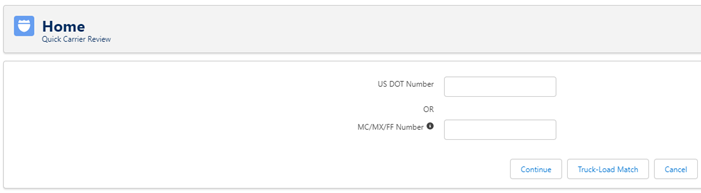
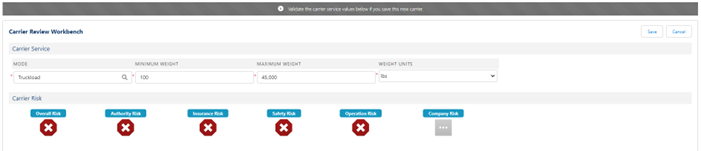
Bulk Carrier Review
Click the FMCSA Review button from a Carrier (ground) list view to perform a refresh of FMCSA data for an entire list of carriers:

On-Time Performance
The Load table OTD Counter and Stop table OTD Counter fields allow you to measure carrier performance for every Stop and every Load. These fields are numeric and are “1” for early or on-time arrivals, and “0” for late arrivals. Use this field in reports to generate carrier performance by customer, lane, mode, ship to, ship from, driver, etc.
Daily Carrier Monitoring
Carriers on the Watch List can be monitored daily for FMCSA changes. You need to schedule the Carrier Monitor Job to enable this capability from TMS Admin🡪Batch Processes or Setup🡪Develop🡪Apex Classes🡪Schedule Apex button.
Run the job daily at 6 am CT.
Carriers flagged by the batch job will have a Carrier Review Status of “Updated (FMCSA)”:
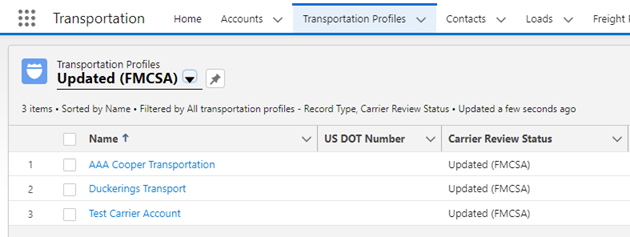
Barcode Generation
Barcodes are automatically included in the Bill of Lading and Shipping Labels documents for carriers that are configured for Barcodes.
Barcode files are generated in a background process when the PRO Number changes on the load and a load is tendered or assigned to a carrier and the Carrier Sales Rep on the load is not null.
In addition to the above state of the load, the other requirements to generate barcodes are:
- Valid credentials record for TEC-IT. Only the Password 1 field needs to be set with the access key from TEC-IT. Note that TEC-IT is a paid subscription and the client can choose the monthly plan that fits their needs.
- Platform Events must be enabled in the Configuration page.
- The Barcode Type field on the Transportation Profile of the carrier record needs to be set based on the carrier’s barcode type. The rest of the fields are optional and should be configured based on the carrier’s barcode requirements.
- In addition to the Barcode Type, the following fields are available on the Transportation Profile record of the carrier.
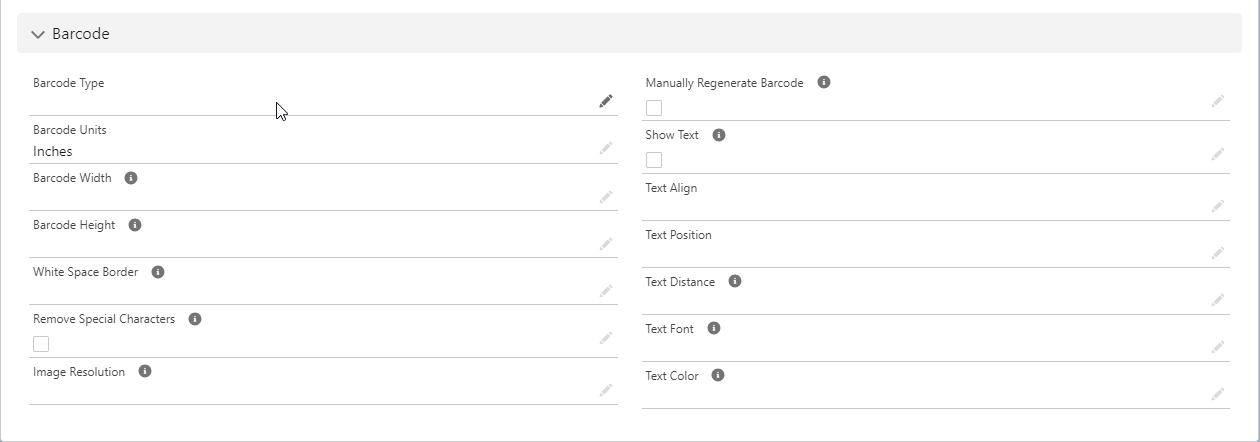
- Barcode Type: Code 39 or Code 128. The character set for each type of barcode varies as follows:
- Code 39: accepts 43 characters: A-Z, 0-9 and the following special characters: period, -, $, /, +, %, and space. The additional * character is used as start and stop delimiters.
- Code 128: accepts all 128 ASCII characters: numbers, upper case/lower case letters, symbols, and control characters.
Note that the field used to generate the barcode is the PRO Number of the load. Generally, the PRO Number is an alphanumeric value with a length of 7 to 10 characters, with an optional 11 character as the check digit. The TMS does NOT validate the PRO Number.
- Barcode Units: Inches (default) or Pixels. The unit applies to the width, height and white space border values.
- Barcode Width: when set, it is sent to the TEC-IT to create the barcode with that width size.
- Barcode Height: when set, it is sent to the TEC-IT to create the barcode with that height size.
- White Space Border: up to 4 comma delimited values in the Barcode Units setting. Examples:
- 0.01 => 0.01 of an inch of white space in all 4 borders.
- 0.2,0.1 => 0.2 of an inch on the top/bottom, 0.1 of an inch on the left/right sides.
- 0.05,0.04,0.055,0.035 => 0.05 of an inch on top, 0.04 of an inch on the right side, 0.055 of an inch on the bottom and 0.035 of an inch on the left side.
- Remove Special Characters: when checked, all special characters are removed from the PRO Number to generate the barcode. Only the alphanumeric characters of the PRO Number are used.
- Image Resolution: DPI of the barcode. Highest value should be 600 for barcode images.
- Manually Regenerate Barcode: when checked, the barcode is NOT automatically regenerated when the PRO Number changes. To manually generate it, the user will need to go to the Documents tab on the load, click on the Generate subtab where the “Barcode” option will be available.
- Show Text: When checked, the barcode text will show in the barcode image. Use the Text Align, Text Position, and Test Distance to show the text in the appropriate part of the image.
- Text Align: choices are Left, Center, or Right.
- Text Position: choices are Top or Bottom.
- Text Distance: Space between the barcode and the text based on the Barcode Units unit of measure.
- Text Font: name of the font with optional font size and style. Examples:
- Font only: Arial
- Font and size: Calibri, 24pt
- Font, size and style: Consolas, 24pt, bold
- Text Color: the color of the text specified in RGB hex codes. Examples:
- Black is 000000
- White is FFFFFF
- Red is FF0000
- Barcode Type: Code 39 or Code 128. The character set for each type of barcode varies as follows:
- Barcode images can be found in the Files subtab of the Documents tab of the load record:
.png?sv=2026-02-06&spr=https&st=2026-07-04T23%3A38%3A45Z&se=2026-07-05T03%3A22%3A45Z&sr=c&sp=r&sig=rES11nFGXeAMxZFmN8b6eVx7wLYA2L%2F2seEkbaOBcO4%3D) The barcode file name has the following format: <Load Number> - <PRO Number> - Barcode.png
The barcode file name has the following format: <Load Number> - <PRO Number> - Barcode.png - Error processing: since the barcode is automatically generated by a background process, an email will be sent to the Carrier Sales Rep on the if there is an error generating a barcode.
- Manually generating a barcode: the user will have the ability to generate a barcode in the “Generate Document” subtab of the “Documents” tab of the load record. There are a couple of scenarios under which the user can manually generate a barcode image:
- The barcode image has been deleted.
- There is an error generating a barcode, OR a barcode has been generated but the PRO Number changed and the “Manually Regenerate Barcode” checkbox of the Transportation Profile record of the carrier is checked.
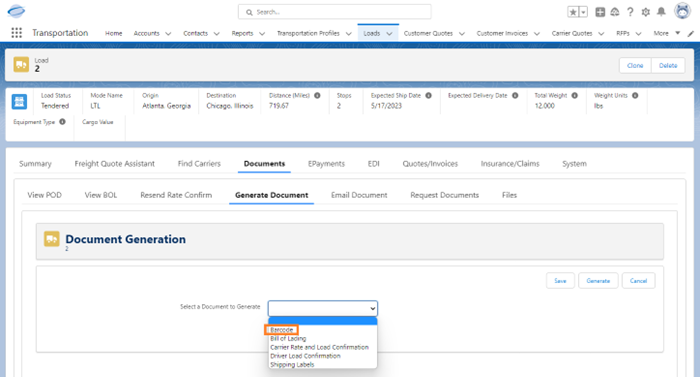
After clicking on the Barcode option, the barcode image will be generated. A message will be displayed for the user if an error occurs. If successful, the barcode image will be displayed: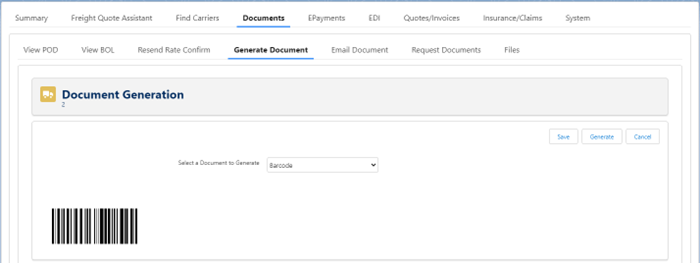
The user can then generate the Bill of Lading and/or Shipping Labels documents this same list for those documents to include the latest barcode image file.
The TMS will not automatically regenerate a barcode image if an existing barcode image with that name exists on the load. For example: a barcode image gets generated for PRO Number ‘1234567.” If the PRO Number changes to another value, another barcode image is generated again (assuming the Manually Regenerate Barcode checkbox on the Transportation Profile of the carrier is false). If the PRO Number changes back to “1234567” and the original barcode file has not been deleted, then the system will not automatically generate a new file.
Customer/Shipper/Consignee Configuration
Account Setup
A Transportation Profile is created for each Shipper and Consignee that have their own “routing guide” information:

You can also bulk-create/assign Transportation Profiles (of one type) from the TMS Admin🡪Transportation Profile Creation link.
Also, set the TMS Type field for each existing account as appropriate:
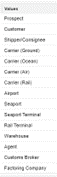
Contact Setup
Make sure to set up the TMS Role field for each contact based on their role(s) in the organization. Every tendered load must have a shipping contact (from the shipper contact list) and a receiving contact (from the consignee contact list).

When creating a Customer Invoice, the Billing Contact can be auto-populated if the Bill To account on the load is populated, and at least one contact record for that account has the Billing transportation role above.
All “Quoting” customer contacts are included as recipients when a customer quote is emailed.
All “Billing” customer contacts are included as recipients when a customer invoice is emailed.
Customer Credit Limit Management
Customer credit limits can be enforced internally and on the customer portal by turning on this feature from the TMS Admin🡪Configuration page:

For each customer Transportation Profile, manually set the appropriate credit limit:
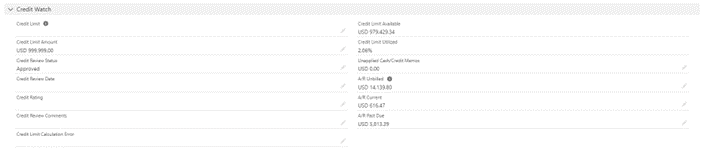
Make sure that the ARCalculationJob batch job is scheduled to run every morning. Note that A/R calculation only considers the past 15 months’ data. It is assumed that older quotes/invoices are closed or written off.
This job automatically calculates the A/R Unbilled, A/R Current, A/R Past Due, Credit Limit Available, and Credit Limit Utilized values. Note that Customer Quotes with the A/R Ignore flag set to “true” are not counted.
Credit Limit Available == Credit Limit – A/R Unbilled – A/R Current – A/R Past Due
Whenever a load is created, these values are also recalculated to keep the data “fresh” between daily batch updates.
The Customer Quote Credit Hold flag is set to “true” when a Customer Quote is created under the following conditions:
- If the Quote Total is greater than the Credit Limit Available
- If the Customer Transportation Profile Credit Review Status is set to Credit Hold
You cannot tender the load this quote is for until this flag is unset.
Freight Plan carrier loads cannot be tendered if they contain line items for a customer load on credit hold.
The Credit Limit Source field on the Load record determines whether the Customer or the Customer Bill To is used for credit calculations and checks.
Optional AR Calculation Override
Should there be a need, the Revenova calculation of A/R Unbilled, A/R Current, A/R Past Due and Unbilled Cash/Credit Memos can be overridden by developing a custom Apex Class with your business’ required logic. The name of the Apex Class should be entered in the ‘Override AR Calculator Class’ field on the TMS Admin -> Configuration page. For example, the business may need an Apex Class that does an API callout to an external system, which maintains A/R information from multiple sources in addition to the TMS.
Should this override be used, it is recommended that any overriding class be reviewed by a Revenova technical representative to ensure proper functionality. This AR calculation is performed in multiple places at multiple times throughout the application, and it is imperative that a code review is completed by a Revenova technical representative to prevent possible issues.
Shared Credit Limits
You can share a credit limit across multiple customer accounts if desired. Maintain shared credit limits from TMS Admin 🡪 Credit Limits.
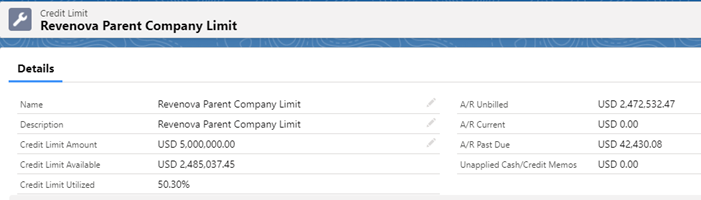
Set the Credit Limit field on any customer Transportation Profile that will use a shared credit limit.
The A/R Calculation Job calculates both shared and unshared credit limits for all customers.
Carrier Configuration
Account Setup
Each carrier should have an account record created to store name, address, and contact information, and provide a parent record for contacts. Make sure to set the TMS Type field on each carrier account.
Contact Setup
Be sure to set up at least one Contact record under each Carrier-Account record. This is strictly required for Carrier Services that use Email, Fax, or Phone for quoting, tendering, or status updates.
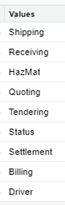
All Quoting contacts are emailed when an RFQ email is sent. All Tendering contacts are emailed when a tender email is sent. All Status contacts are emailed when a status update email is sent.
Carrier (Ground) Transportation Profile Setup
For GROUND carriers where TMS is generating the Bill of Lading, additional information about the carrier is populated in the Transportation Profile record.
Make sure to associate the appropriate Carrier Account(s) to the Transportation Profile from the Account detail page:
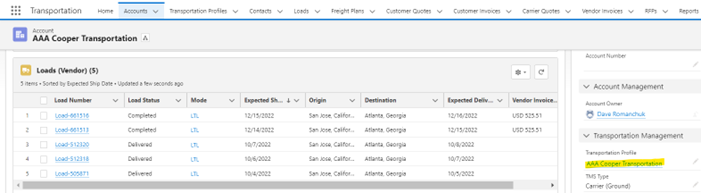
Carrier Service Setup
The Carrier Service record defines the quantitative parameters for quoting, tendering, and carrier status updates. The first section of this detail page contains the following fields: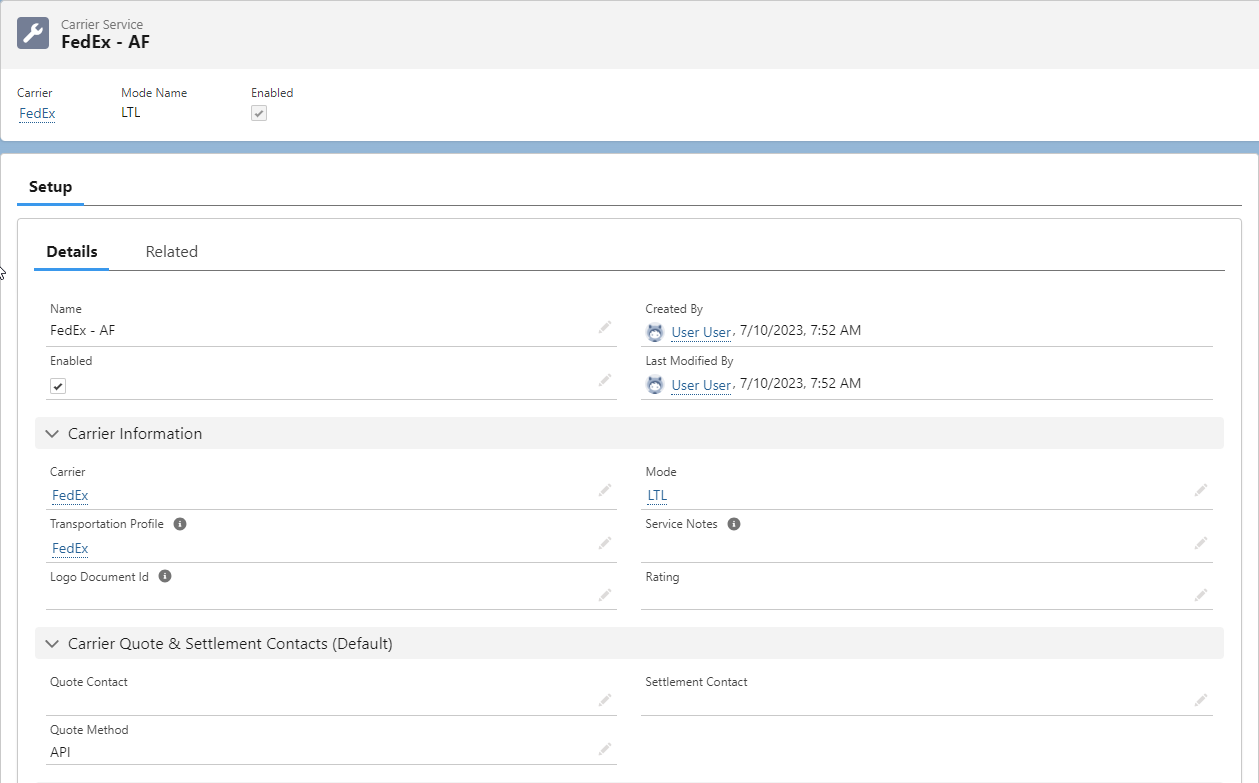
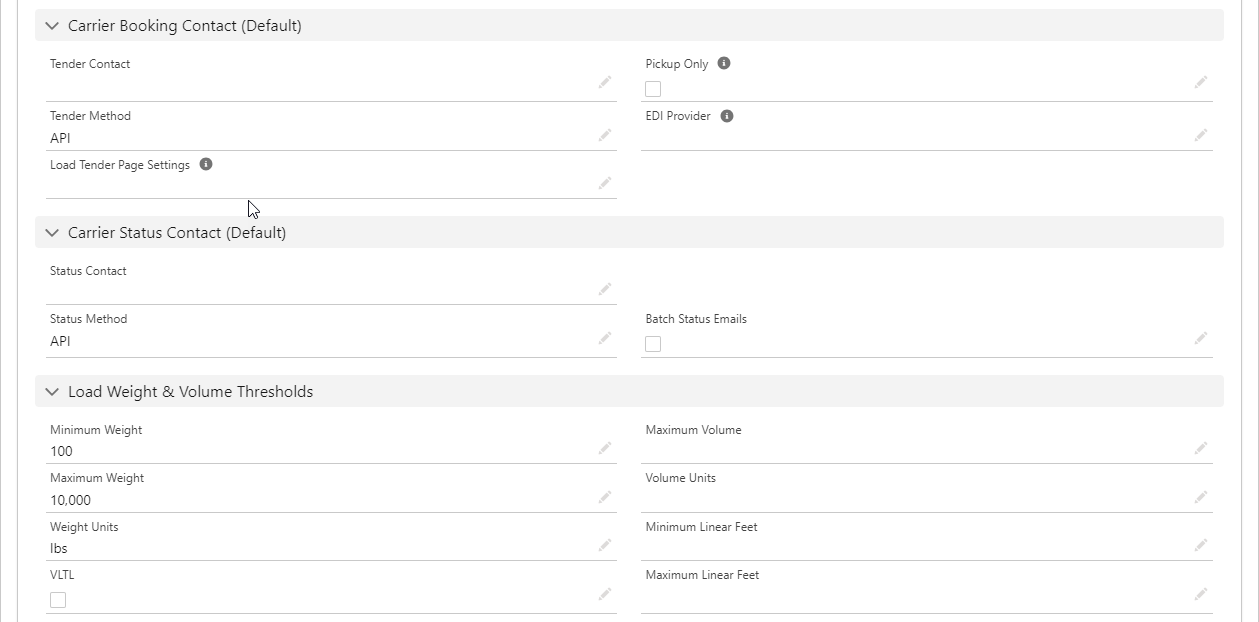
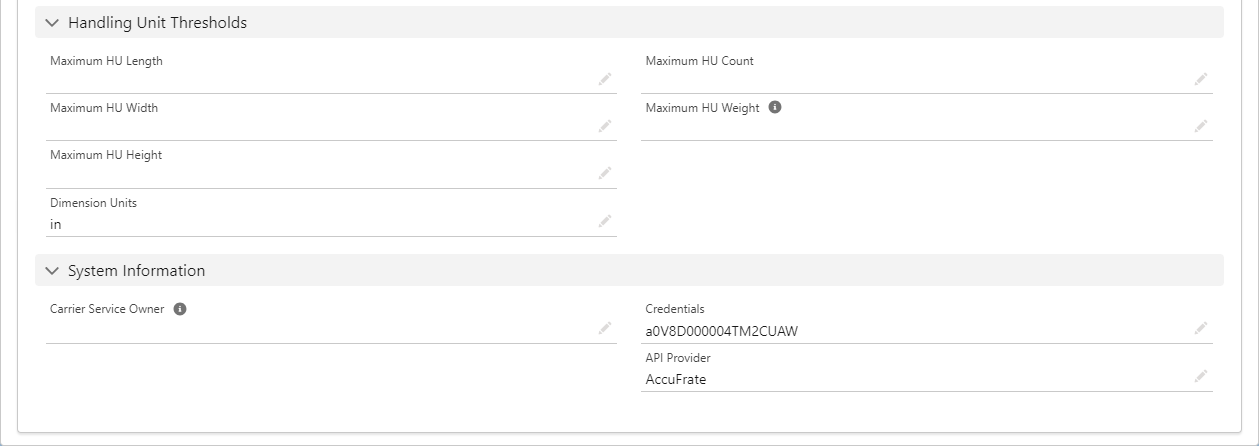
Select the Mode for reporting and informational purposes. The Minimum and Maximum Weight fields determine when a Carrier Quote will be auto-generated for a load.
Make sure the Transportation Profile selected is the same as the Transportation Profile selected on the Carrier’s Account record.
The Rating field is displayed when presenting carrier quote lists to both internal and customer portal customers.
Populate the Logo Document Id with the 18-character Id of a Document (image) to display an image for that carrier on the Customer Portal quote list.
The next section defines how communications are handled with carrier during the quote, tender, and load status operations.
Quote Method choices are:
- Phone
- Fax
- API
- Stored Rate
Tender Method choices are:
- Fax
- API
- EDI
Status Method choices are:
- Phone
- API
You must enter the appropriate contact(s) from the Carrier Account for Email, Phone, and Fax method choices. These are the primary contacts (or addressees for the emails.)
The Load Weight & Volume Thresholds section defines weight and geometry limits to be applied against loads during carrier-load matching.
The fields in the Pickup Cutoff Information section are used to generate notifications both in the Customer Portal and inside the TMS for loads that have a pickup date of today. See the “Carrier Pickup Cutoff Time Notifications” section to configure this feature.
The Credentials field should only be populated for API-based Carrier Services. It should be the Record ID from the TMS Admin🡪Credentials page for the appropriate carrier.
The Related subtab shows the related sections are as follows: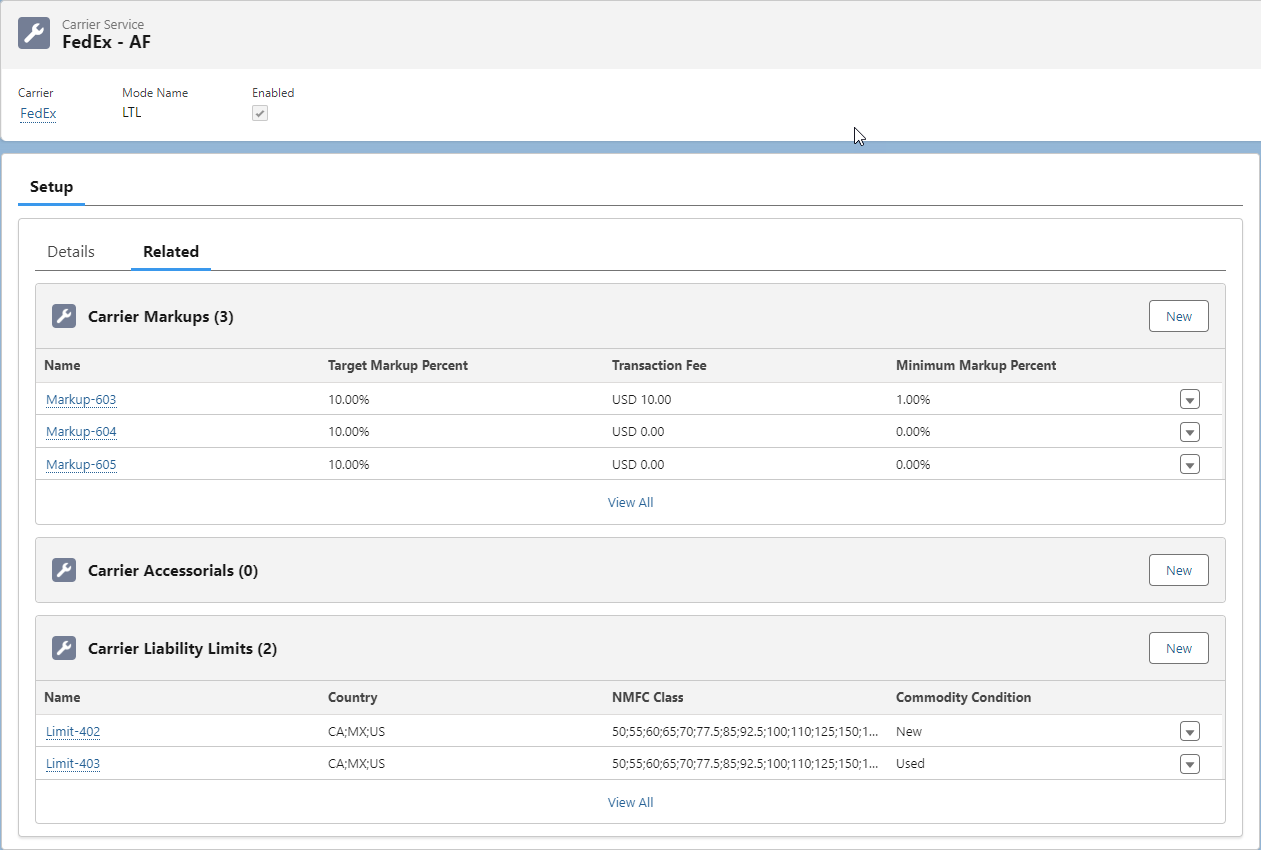
Carrier Markup Groups
Carrier Markup Groups are groups of related Carrier Markups. Carrier Markups define “cost-plus” calculations that generate a Customer Quote total based on a Carrier Quote. They are used to auto-calculate the customer’s price on the self-serve customer portal. They are also indicated on the Freight Quote Assistant page to assist the user in properly pricing a load. Associate a Carrier Markup Group with a customer by setting this field on the Transportation Profile. You can also “cascade” by setting a default Carrier Markup Group on the global Transportation Profile.
Create Carrier Markup Groups from TMS Admin🡪Carrier Markup Groups. Each Carrier Markup has criterion and calculation fields which respectively determine if these is a match and calculate the carrier markup: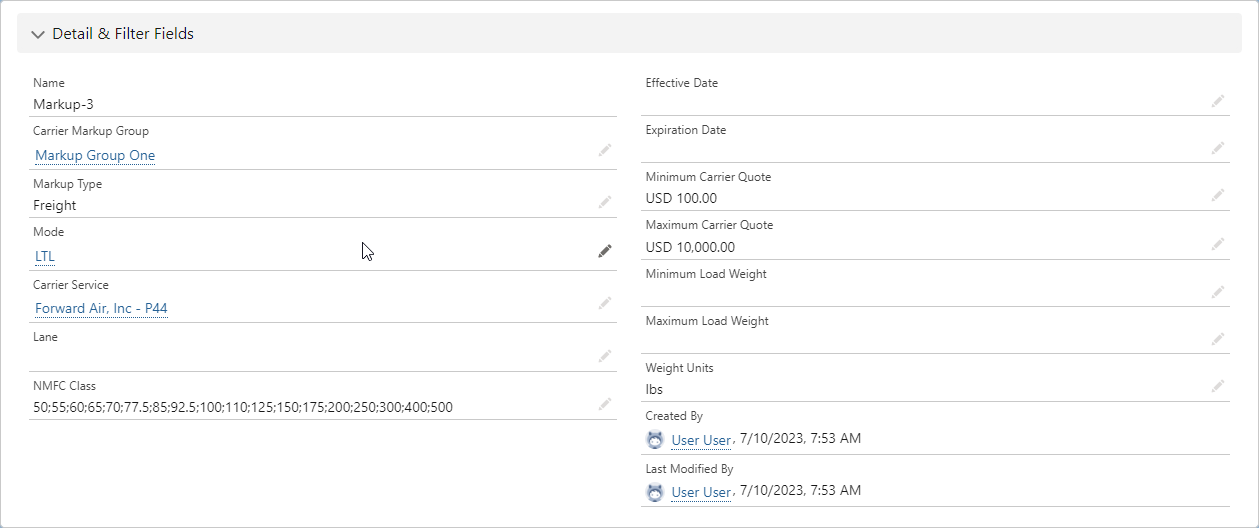
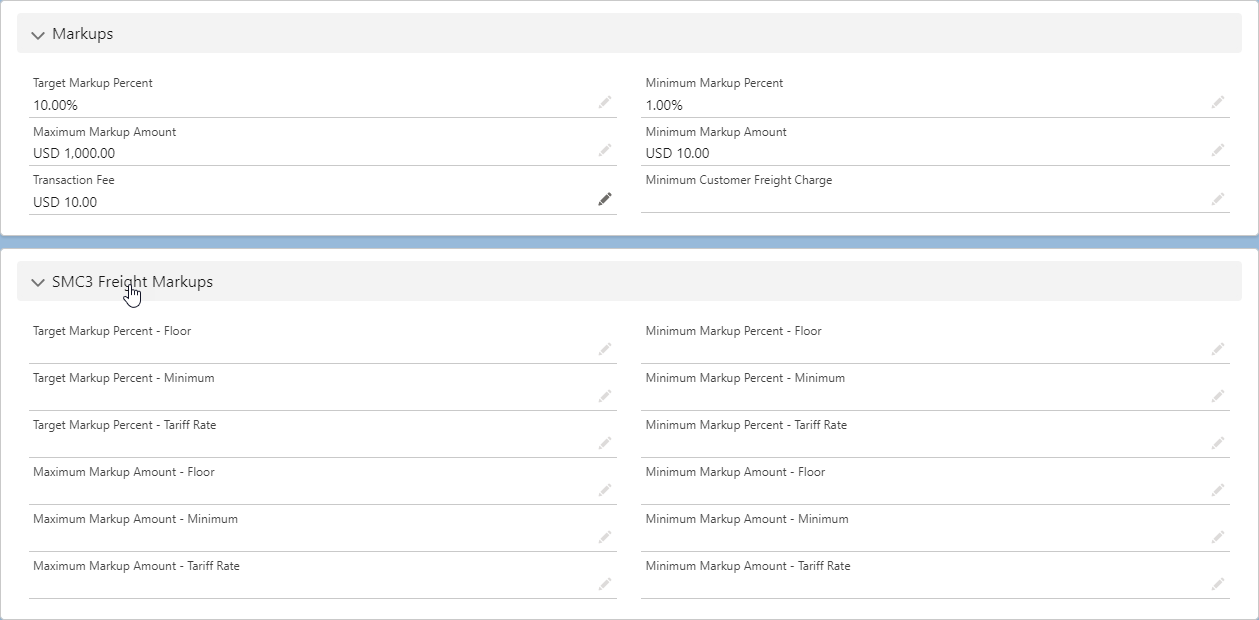
Carrier Markups types include:
- Freight
- Fuel
- Accessorial
Customer Rate Entries and Carrier Markups can be used together on the same customer quote, as each cost item can be calculated independently. Rate Entries have priority over Carrier Markups if both match for a cost item.
The SMC3-related calculation fields are only relevant for SMC3 carrier quotes where the Freight Charge Applied field is populated.
Carrier Pickup Cutoff Time Notifications
Configuring this functionality requires the following steps:
- Add the following fields to the Carrier Service page layout and set the appropriate time for each field:
.png?sv=2026-02-06&spr=https&st=2026-07-04T23%3A38%3A45Z&se=2026-07-05T03%3A22%3A45Z&sr=c&sp=r&sig=rES11nFGXeAMxZFmN8b6eVx7wLYA2L%2F2seEkbaOBcO4%3D)
- Same-Day Tender Cutoff Time: when this time has passed based on the time zone of the pickup stop for a given carrier quote, the appropriate tender disabled notification will display.
- Pickup Cutoff Time: informational field only. Not used in the business logic of the TMS. When a carrier quote is created for that carrier service these two fields are copied into the carrier quote record. The TMS will then check these values in the carrier quote to display the appropriate notifications.
- Add these two fields to the Carrier Quote page layout also. This will allow the user to change the times as needed for a customer portal user to be able to tender a load that has been covered.
- Add the following fields to the Mode page layout and configure the messages that are displayed to the user when the past date, same day, and tender disabled message is to be displayed:
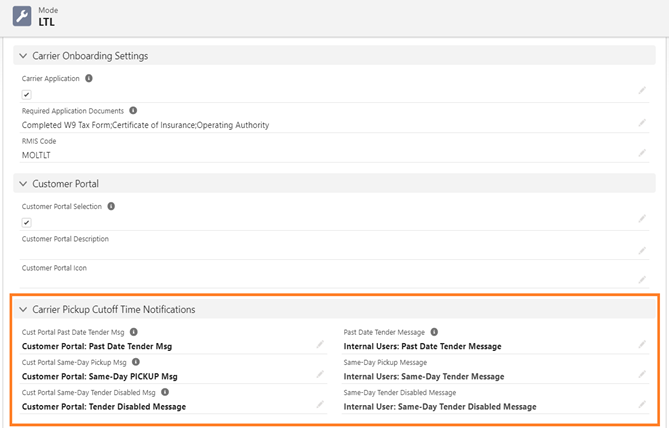
- If the client is not using the Fleet module, go into the Configuration page in the TMS Admin tab, and make sure the Fleet Management Enabled checkbox is unchecked:
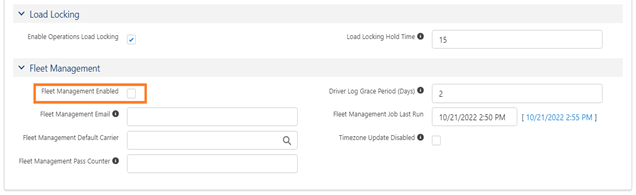
- Run the FleetManagementJob from the Job Monitor LWC:
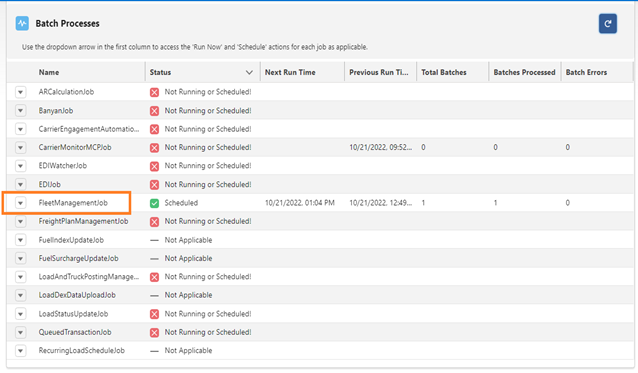
The Fleet Management Job will set the Time zone field of all shipping locations on the Account table. The time zone of the shipping location is needed to calculate if the cutoff time has passed to display the appropriate Tender message on the load.
Examples:
- Customer Portal – Same Day notification using the default message (e.g., no custom message in the “Cust Portal Same Day Pickup Msg” field of the Mode record):
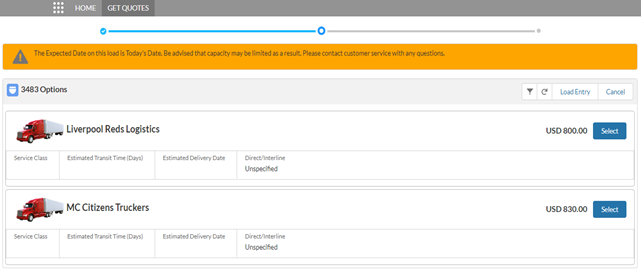
- Customer Portal – Tender Disabled notification using the default message (e.g., no custom message in the “Cust Portal Same Day Tender Disabled Msg” field of the Mode record) and the Tender button is disabled:
.png?sv=2026-02-06&spr=https&st=2026-07-04T23%3A38%3A45Z&se=2026-07-05T03%3A22%3A45Z&sr=c&sp=r&sig=rES11nFGXeAMxZFmN8b6eVx7wLYA2L%2F2seEkbaOBcO4%3D)
- Internal user - Same Day notification using the default message (e.g., no custom message in the “Same Day Pickup Message” field of the Mode record):
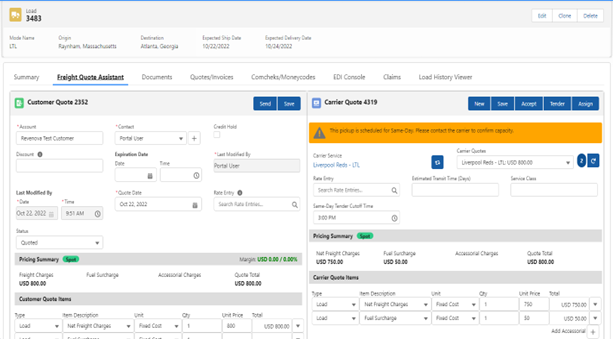
The notification also appears on the Carrier Quote list:
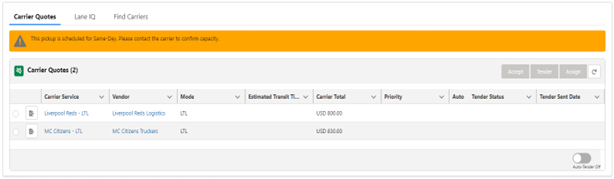
- Internal user – Tender disabled notification using the default message (e.g. no custom message in the “Same-Day Tender Disabled Message” field of the Mode record):
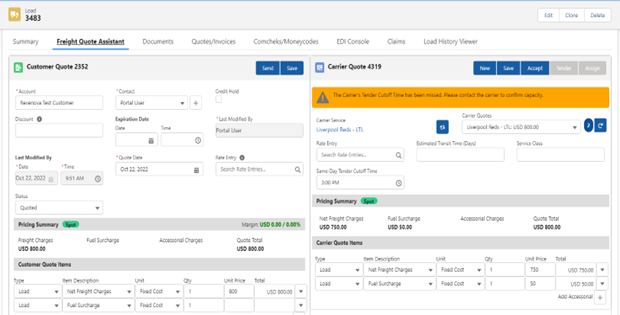
Note that the Tender and Assign buttons are disabled since the cutoff time on the carrier quote has passed.
The Carrier Quote list displays the Same-Day notification message if no carrier quote is selected. When a carrier quote is selected, either the Same-Day or the Tender disabled notification is displayed:
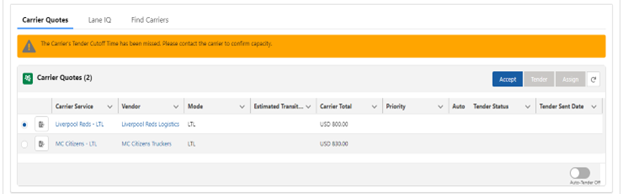
Note that the Tender and Assign buttons are disabled for the selected quote.
Past Date Notifications
Past Date Notifications will also be displayed for loads with carrier quotes configured with Same Day Notifications. To enable Past Date Notifications for all loads, check the “Display Load Past Date Notification” global preference in the Configuration page.
Online Carrier Application Access Setup
Community Setup
TMS provides for the secure submission of a web-based carrier application for those customers who want to provide potential GROUND carriers with this opportunity.
A Salesforce “Community” must be set up to expose this information to carriers.
Application Configuration:
- Configure the custom content fields in the appropriate Document Options that the client uses:
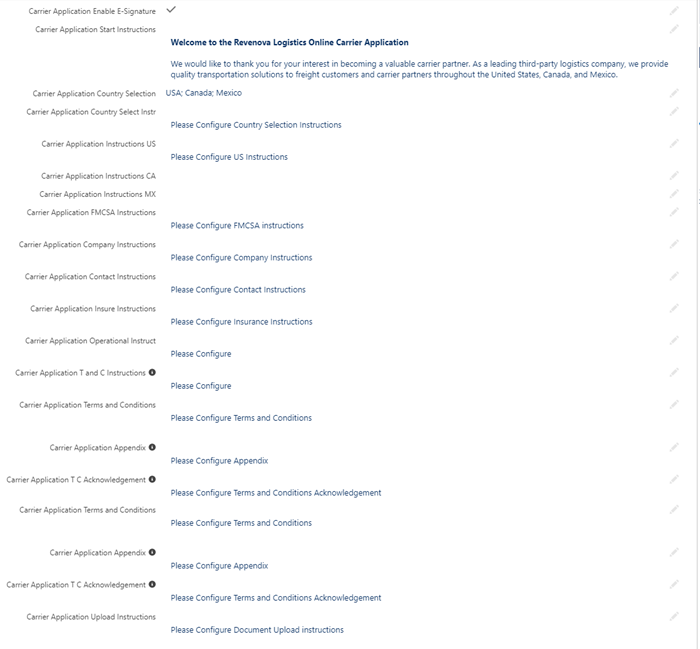

- Configure the Modes, Equipment Types and Payment Terms that should be available in the Carrier Application: a checkbox field called “Carrier Application” exists in the Modes, Equipment Type, and Payment Terms objects. Add this checkbox field to each page layout and make it editable to the appropriate profile(s).
- Go to Setup, then type Communities and click on the “All Communities” link.
- Click on the “New Community” button.
- Click on the “Build Your Own” community option.
- Click on the “Get Started” button.
- Enter “Carrier Application” in the Name field, add “carrierapp” to the URL field and click on the “Create” button.
- You will get a message when the community is created and the “Carrier Application” workspaces page will be displayed. Click on the “Builder” icon. The “Home” page is displayed. Delete the “Let’s get started!” component ( 1 ).
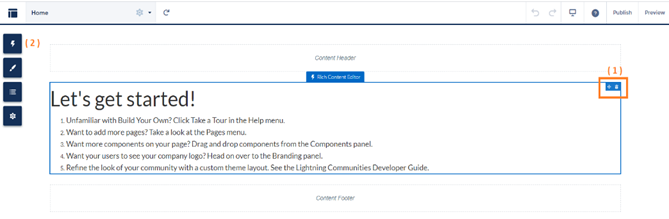
- Click on the Components icon ( 2 ), scroll to the “Custom Components” section at the bottom of the list, find the “Credit Application” component, and drag it to the middle section where the “Let’s get started!” component was:
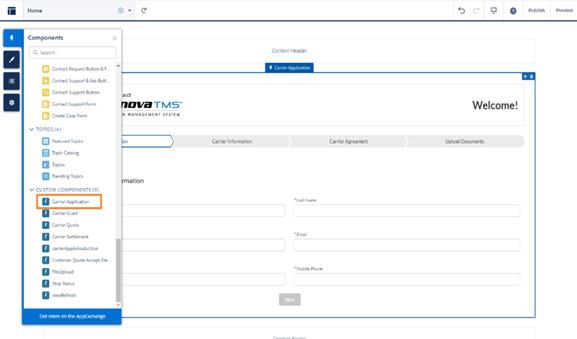
- Click on the Settings icon:
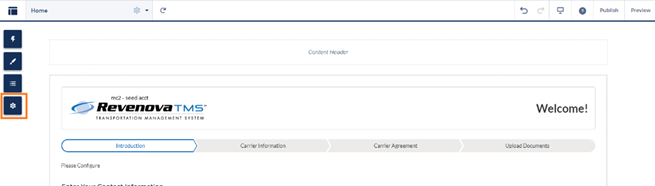
- Check the “Public can access the community” checkbox:
 Then click on the “Carrier Application Profile” link at the bottom of the page. This will open a new browser tab; you will need to come back to this tab after the profile settings are complete. Or you can also create a Permission Set with the settings below and assign it to the user.
 - Click the Edit button and check the “View Private Static Resources” checkbox.
- A permission set called “TMS Carrier Application Community” was added in TMS 7.1. You can clone this permission set, add access to the Bank Account table as described below, and assign that permission set to the user. Otherwise, check the "Read" and "Create" checkboxes for the following objects for the profile:
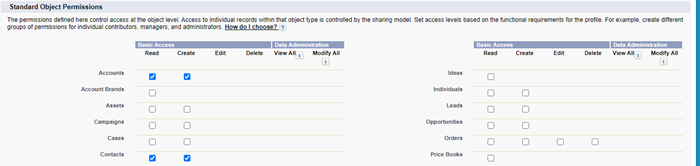

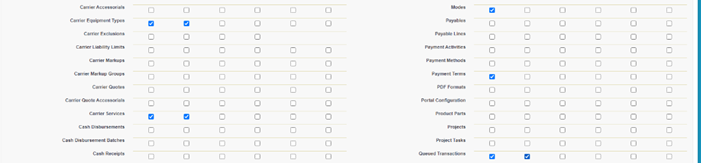


- Set Field Level Security for all objects marked above. Select all fields for each object as follows:
- Read only objects (e.g., Mode, Document Options, Equipment Type, etc.): “Read Access” column is checked on all fields.
- Read/Create objects (e.g., Account, Contact, Bank Account, etc.): “Edit Access” column is checked on all fields.
- Grant access to this profile (via a permissions set) to the following LWC controllers:
- CarrierApplicationController2
- DBShareAll
- LightningUtilController
- Click on the View Users button:
- Assign a TMS license to the Carrier Application Site Guest User.
- Assign the TMS Carrier Application Community permission set.
- Add a sharing rule for the Carrier Application Site Guest User to the following objects:
- Account
- Document Options
- Equipment Type
- Mode
- Payment Terms
- Transportation Profile
The sharing rules will look like this:.png?sv=2026-02-06&spr=https&st=2026-07-04T23%3A38%3A45Z&se=2026-07-05T03%3A22%3A45Z&sr=c&sp=r&sig=rES11nFGXeAMxZFmN8b6eVx7wLYA2L%2F2seEkbaOBcO4%3D)
- Go back to the Carrier Application community tab and click the Publish button.
Once the community has been published you will receive an email. Use the link to test the creation of a carrier as an external user in a different browser.
Carrier Application Implementation Notes
- Make sure you have set CRUD access for all tables and fields on the application appropriately.
- At least one country must be selected in the Document Options.
- Customize the Transportation Profile TMS1 field set to customize which fields are visible/required in the Enter Additional Company Information section of the application.
- Add “?did=[DOCUMENT OPTIONS ID]” to the URL of the carrier application to use a specific document options record. This allows for multiple look-and-feel scenarios based on, for example, customer office or division.
- The name and number of Insurance Policy records that appear in the Insurance page are based on the Insurance Type Selection field of the Document Options. Keep these values in synch with the Type field of the Insurance Policy object.
- Existing carriers will be able to apply online to sign the application and upload documents to apply online via the Carrier Application if they already are present in the database.
- There is no save and continue later functionality in the carrier application.
- The following sections can be skipped by setting the Document Options Carrier Application Optional Sections field to exclude them:
- FMCSA Details page
- Equipment and Capacity
- Geographic Coverage
- Insurance
- Insurance Agents
- If you don’t select the Insurance in the document options, we will attempt to populate the insurance policy table with SaferWatch Assure Assist insurance policy data.
- The name and number of documents are determined by the Mode table’s Required Application Documents field:
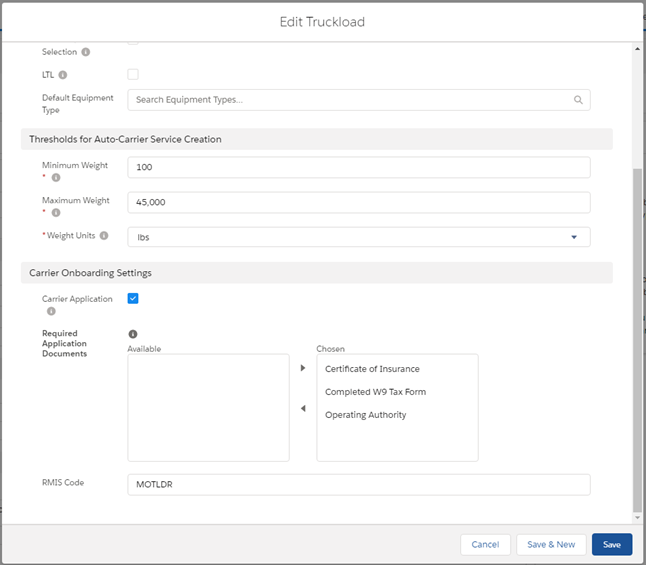
Customer/Carrier “Email Loop” Community Setup
- Create a partner community (“Customer Service”) for customer guest user access.
- Create a new standard community page (1 full-width section) with name and URL of customerguest.
- From the Builder click the left side Settings snowflake🡪General tab:
- Check the Public can access the community checkbox.
- Click the Guest User Profile link:
- Click on View Users:
- Assign a TMS license to the guest community user.
- Assign the TMSCustomer Email Loop permission set.
- Click on View Users:
- Drag the Customer Guest LWC component onto the page. Garnish the page with other useful customer-related information as desired. The Customer Guest LWC has two properties:
- Allow Search: check this property if your client wants to provide the URL to this page to allow the customer to search for loads anonymously.
- Load Field Set Name: the name of a CUSTOM field set on the Load with the fields that the Customer Shipment Tracking will display. If left blank, the BOL Number, PRO Number, and Load Number will be displayed.
- Publish and activate the community.
- From TMS Admin🡪Configuration set the Public Customer Community URL to the page you have created. Include the full URL to the page you created.
- Example: https://full-revesc1.cs64.force.com/email/s/customerguest
- Create a partner community (“Customer Service”) for carrier guest user access. (You may use the same community as above if it is dedicated solely to the email loop, as both customers and carriers would interact with it. If the email loop is part of a larger customer or carrier community keep them distinct.)
- Create a new standard community page (1 full-width section) with name and URL of carrierguest.
- From the Builder click the left side Settings snowflake🡪General tab:
- Check the Public can access the community checkbox.
- Click the Guest User Profile link:
- Click on View Users:
- Assign a TMS license to the guest community user.
- Assign the TMSCarrier Email Loop permission set.
- Click on View Users:
- Drag the Carrier Guest LWC component onto the page. Garnish the page with other useful carrier-related information as desired.
- Publish and activate the community.
- From TMS Admin🡪Configuration set the Public Carrier Community URL to the page you have created. Include the full URL to the page you created.
- Example: https://full-revesc1.cs64.force.com/email/s/carrierguest
- From Setup🡪Salesforce Files🡪General Settings check the Allow site guest users to upload files field.
- From Setup🡪Security🡪CSP Trusted Sites add a new trusted site to enabled display of google maps:
- Name: GoogleMap
- Trusted Site URL: https://maps.a.forceusercontent.com
- All Checkboxes checked
- From TMS Admin🡪Document Options set up the configurable community textual information fields:
- Customer Load Confirm Accept Message
- Customer Load Confirm Decline Message
- Carrier Load List Instructions
- Carrier Stop Status Instructions
- Carrier Stop Status Footer
- Carrier Settlement Instructions
- Carrier Book It Message
- Carrier Quote Submit Message
- Carrier Quote Footer
- Note the following new fields that support the Email Loop:
- Customer Quote
- Accept Link
- Decline Link
- Carrier Quote
- Book It
- Tender Contact
- Tender CC List
- Load
- Hashcode – Used to secure the URLs of the email links.
- Carrier Quote Link
- Tender Accept Link
- Tender Decline Link
- Carrier Status Link
- Carrier Settlement Link
- Customer Tracking Link
- Stops
- Driver Name
- Driver Phone
- (Note that these driver fields may supersede the Driver lookup field for some customers)
- Customer Quote
- Update the email template links as follows:
- Lightning Email Templates
- Customer Rate and Load Confirmation Accept:
- {{{!rtms__CustomerQuote__c.rtms__Accept_Link__c}}}
- Customer Rate and Load Confirmation Decline:
- {{{!rtms__CustomerQuote__c.rtms__Decline_Link__c}}}
- Quotation Request Submit:
- {{{!rtms__Load__c.rtms__Carrier_Quote_Link__c}&c={!Contact.Id}}}
- Load Tender Accept:
- {{{!rtms__Load__c.rtms__Tender_Accept_Link__c}}}
- Load Tender Decline:
- {{{!rtms__Load__c.rtms__Tender_Decline_Link__c}}}
- Load Status Update Status:
- {{{!rtms__Load__c.rtms__Carrier_Status_Link__c}}}
- Load Status Batch Update Status:
- {{{!rtms__Load__c.rtms__Carrier_Status_Link__c}}}
- Carrier Document Request Upload Documents:
- {{{!rtms__Load__c.rtms__Carrier_Settlement_Link__c}}}
- Customer Rate and Load Confirmation Accept:
- Classic Email Templates
- Customer Rate and Load Confirmation Accept:
- {!rtms__CustomerQuote__c.rtms__Accept_Link__c}
- Customer Rate and Load Confirmation Decline:
- {!rtms__CustomerQuote__c.rtms__Decline_Link__c}
- Quotation Request Submit:
- {!rtms__Load__c.rtms__Carrier_Quote_Link__c}&c={!Contact.Id}
- Load Tender Accept:
- {!rtms__Load__c.rtms__Tender_Accept_Link__c}
- Load Tender Decline:
- {!rtms__Load__c.rtms__Tender_Decline_Link__c}
- Load Status Update Status:
- {!rtms__Load__c.rtms__Carrier_Status_Link__c}
- Load Status Batch Update Status:
- {!rtms__Load__c.rtms__Carrier_Status_Link__c}
- Carrier Document Request Upload Documents:
- {!rtms__Load__c.rtms__Carrier_Settlement_Link__c}
- Customer Rate and Load Confirmation Accept:
- Lightning Email Templates
- Instructions to use the Customer Shipment Tracking LWC (part of the Customer Guest LWC):
- Add the Company Logo field (Transportation Profile) to the Carrier and Shipper/Consignee page layouts so the appropriate customer and carrier logos can be uploaded.
- Add the “Show Carrier on Shipment Tracking” field (Mode) to the page layout so the appropriate modes show the carrier logo (or name if no logo) in the LWX.
- A custom email template and workflow need to be created. Add a custom formula field on the Customer Quote object that references the rtms__Load__r.rtms__Customer_Tracking_Link__c field. The custom email template can then use this formula field on the Customer Quote object to provide the link to the load for tracking.
- Note that the template links above are no longer dependent on the proper sequence of button clicks to use them. They can be used/sent any time.
- Modify the Load table TMS12 and TMS13 field sets to add/remove fields from the Carrier Quote LWC component. The TMS12 field set controls the 4-column header field section. The TMS13 field set controls the 1-column header field section.
- Note that all customer and carrier actions are now processed by the InboundQueuedTransactionJob which runs every minute. From TMS Admin🡪Batch Processes start the job if you have not already.
- Test (both) communities thoroughly!
- IMPORTANT: For the three guest communities above, guest users must have access to the records.
- Email Loop – Create view all sharing rules for the following tables:
- Account
- Contact
- Load
- Freight Plan Load
- Customer Quote
- Document Options
- Mode
- Accessorial
- Customer Invoice Document
- Transportation Profile
- API Community – No sharing rules required
- Carrier Application
- Email Loop – Create view all sharing rules for the following tables:
Carrier Tender Accept/Decline Setup
If field set TMS30 on the Load object has no members populated, the carrier when accepting or declining an email tender will be directed to the simple version of the tender accept/decline page. No additional input will be required from the carrier and the load will accepted/declined based on the link clicked:
If field set TMS30 on the Load object is populated, the carrier will be directed to the detailed version of the tender accept/decline page when clicking either the accept or decline link. Additional information/input fields will be available to the carrier and the carrier will be able to accept or decline the tender on this page:
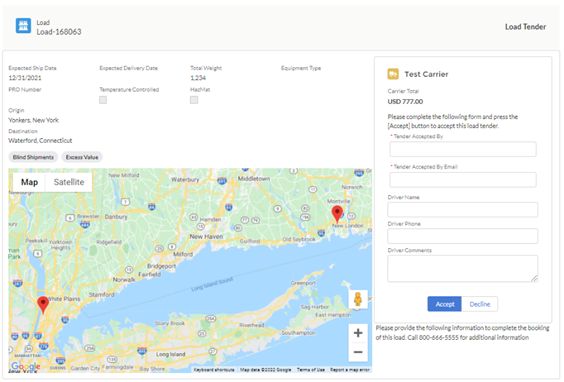
The detailed tender accept/decline page can be customized as followed:
- Load field set TMS30 dictates the output fields displayed in the four-column section on the left.
- Load field set TMS31 dictates the output fields displayed in the one-column section on the left.
- Load field set TMS32 dictates the load input fields displayed on the right.
- Custom Mode specific field sets can be used (e.g., TMS30 Truckload).
- The Carrier Load Tender Instructions field on the Document Options object dictates the instructions displayed at the top right.
- The Carrier Load Tender Footer field on the Document Options object dictates the footer displayed at the bottom right.
- The Request Tender Decline Reason field on the Document Options object dictates whether the “Decline” button can be clicked outright or (if checked) will open an additional pop-up for the carrier to specify why the tender is being declined.
- The Load Tender Page Settings field on the Carrier Service object dictates if the picklist includes:
- Email Signature: Tender Accepted By and Tender Accepted By Email fields (Carrier Quote table) will be displayed and required to be filled out prior to tendering.
- Carrier Details: the input fields from TMS32 will be visible.
The site guest user will require additional permissions to utilize features on the detailed tender accept/decline page:
- Load input fields: Create rights on the Load object, Edit rights to all fields in TMS32.
- Accepted by fields: Create rights on the Carrier Quote object, Edit rights to the Carrier Quote Tender Accepted By and Tender Accepted By Email fields.
- Decline fields: Create rights on the Carrier Quote object, Edit rights to the Carrier Quote Tender Declined Reason and Tender Declined Comments fields.
Inbound Email Handler Setup
The Inbound Email Handlers enables partners, such as carriers, to send emails and attachments which are captured and stored in the Inbound Email object. They can then be integrated into TMS processes, such as invoice review and customer document preparation.
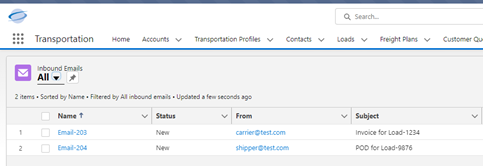
From Setup🡪Develop🡪Email Services set up your email handler similar to this:
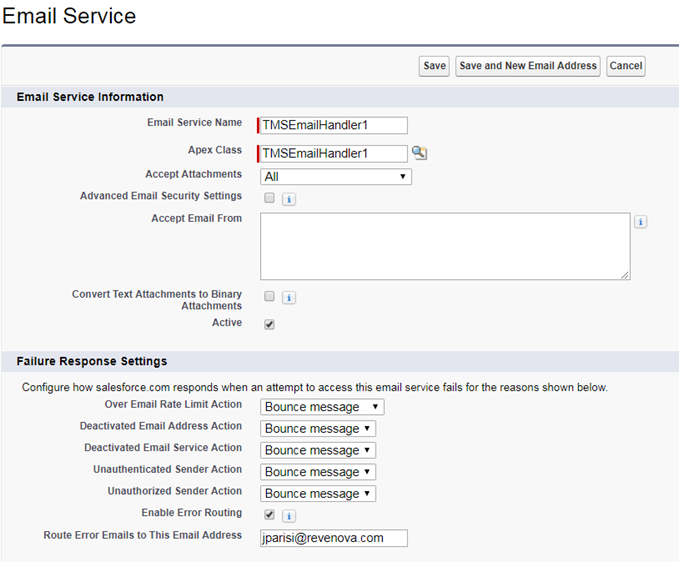
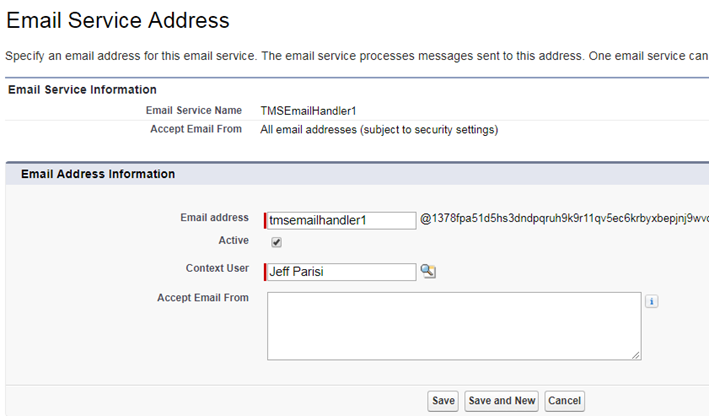
Freight Quote Assistant
To generate Customer Quotes (brokers) and Carrier Quotes (brokers and shippers) go to the Freight Quote Assistant tab on the Load detail page:
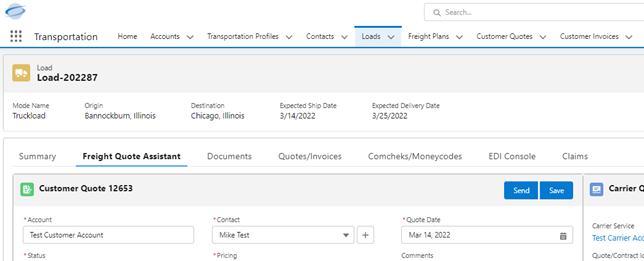
While the page is rendering, any stored-rate customer and/or carrier quotes are created. This process can include API callouts to LTL carriers.
Freight Quote Assistant – LWC Properties
- Show Customer Quote: Un-hides/hides the Customer Quote section of the FQA.
- Show Carrier Quote: Un-hides/hides the Carrier Quote Section of the FQA.
- Show Insurance Quote: Un-hides/hides the Insurance Quote Section of the FQA.
- Insurance Program Name: The display label of the Insurance Quote section (default: All Risk Insurance Coverage).
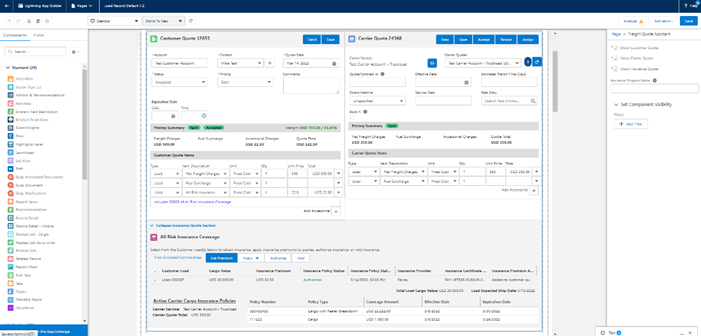
Customer Quote Section
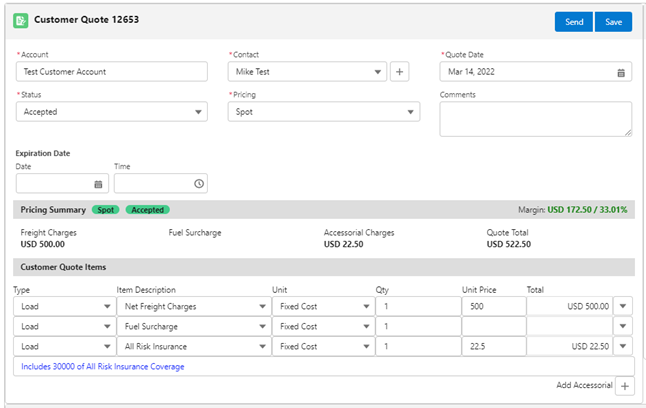
This section allows the user to:
- Enter and send a Customer Quote to a customer contact.
- Enter/Update and save a Customer Quote.
- Dynamically calculate both amount-based and rate-based quotes.
- Add accessorials to the load and quote.
- Price Legs if you have customer stored rates for one or more possible legs of a load route.
Note that the Customer Quote aspects of this page are not visible for shippers.
To add additional fields to the Customer Quote section of this page, add fields to the TMS1 field set on the Customer Quote object from Setup🡪Create🡪Objects🡪Customer Quote.
Carrier Quote Section
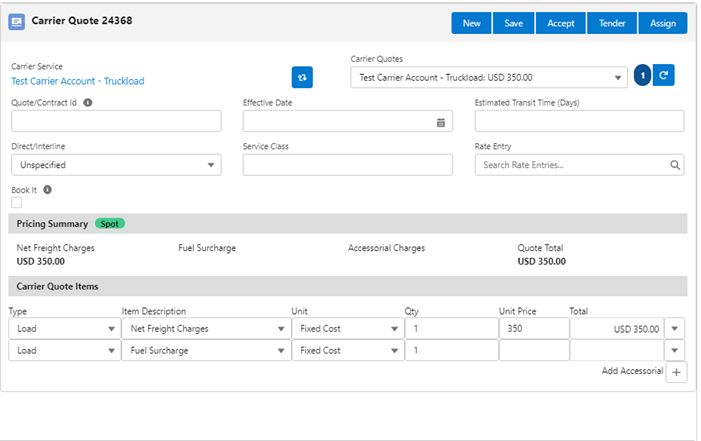
This section allows the user to:
- Get a quote from a carrier.
- Enter/Update and save a Carrier Quote.
- “Quick” Tender a load to a carrier.
- “Quick” Assign a load to a carrier.
- Look at any all existing carrier quotes from any source.
- Dynamically calculate both amount-based and rate-based quotes.
The Max Pay Amount and Offer Rate are informational, load-level fields that represent bounds to any quotes from carriers.
To add additional fields to the Carrier Quote section of this page, add fields to the TMS3 field set on the Carrier Quote object from Setup🡪Create🡪Objects🡪Carrier Quote.
Insurance Quote Section
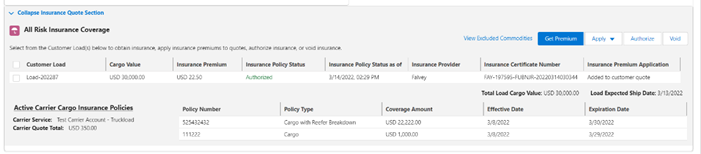
To use this feature, it is assumed that an Insurance API integration (e.g., Falvey Shippers Insurance) is active. Hide this Insurance Quote section if not.
The lower half of this widget will show the Carrier Service Name, Quote Total, and non-expired Cargo Insurance Policies for the Carrier of the selected Carrier Quote in the section above. This is meant to assist in determining if additional insurance is required or not.
This section allows the user to:
- View Excluded Commodities
- Clicking the ‘View Excluded Commodities’ link will open a modal listing the excluded commodities as defined under TMS Admin 🡪 Configuration 🡪 “Cargo Insurance Excluded Commodities” field.
- Get Premium
- Select the rows from the list of Customer Loads for which to request an insurance quote. In order to request insurance, “Cargo Value” must be present on the Load.
- Clicking the ‘Get Premium’ button will return the Insurance Premium from the Insurance API Integration.
- Apply
- Select the rows from the list of Customer Loads with Insurance Premiums obtained.
- Clicking the ‘Apply’ drop-down button will allow you to do the following:
- For a non-Freight Plan Load:
- Add premium to customer quote (adds Customer Quote Accessorial)
- Deduct premium from carrier quote (adds negative Carrier Quote Accessorial)
- For a Customer Load in a Freight Plan
- Add premium to customer quote
- For a Carrier Load in a Freight Plan
- Deduct premium from carrier quote
- For a non-Freight Plan Load:
- Note that even though the premium is shown as applied in the widget, the user must still click the “Save” button on the quote itself (similar to when a user clicks the ‘Add Accessorial’ button).
- Authorize
- Select the rows from the list of Customer Loads with Insurance Premiums obtained.
- Clicking the ‘Authorize’ button will commit to the insurance policy provided by the Insurance API Integration provider.
- The “Insurance Policy Status” changes to ‘Authorized,’ the “Insurance Certificate Number” is tagged on the Customer Load, and the Insurance Certificate PDF is saved as a new attachment to the Customer Load.
- Void
- Select the rows from the list of Customer Loads with Insurance Policies ‘Authorized.’
- Clicking the ‘Void’ button will attempt to void the authorized policy commitment with the Insurance API Integration provider. If successful, the “Insurance Policy Status” will change to ‘Voided’, the “Insurance Certificate Number” will be removed, and any customer quote application or carrier quote deduction for that policy will be deleted.
Carrier Quotes List

This widget displays any existing carrier quotes for this load. The number of quotes displayed by default can be set on the lightning page editor and can be toggled using the Show More ink. You may also perform the following activities here:
- Click Show Customer View to display the quotes in a format suitable for sending to a customer.
- Click Accept to accept the selected carrier quote (but not tender).
- Click Assign to assign the selected carrier quote.
- Click Tender to tender the selected carrier quote.
- Click Refresh Quotes to delete all existing non-spot, stored rate carrier quotes and retrieve new quotes.
Find Carriers Subtab
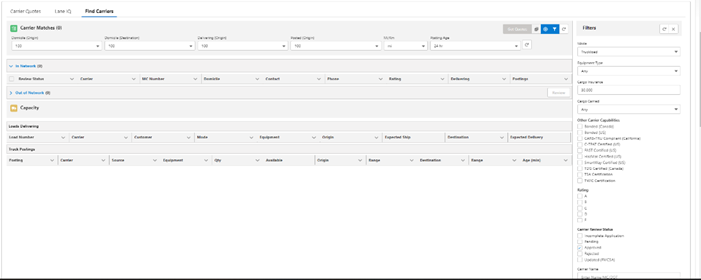
This section allows the user to retrieve carrier quotes from approved carriers. Carriers can be filtered based on:
- Name
- Mode
- Rating
- Carrier Domicile State
- Cargo Carried
- Cargo Insurance Amount
- Equipment Type
- Other Carrier Capabilities
The Get Quotes button requests/retrieves quotes from the selected carriers.
Matches are based on load and posting geolocations using the following criteria:

Domicile (Origin): Search range in miles/km for any Carrier domiciled near the load pickup location.
Domicile (Destination): Search range in miles/km for any Carrier domiciled near the load delivery location.
Delivering (Origin): Search range in miles/km for any loads delivering near the load pickup location on the day before or the day of the load pickup.
Postings (Origin): Search range in miles/km for any internal or load board Truck Postings near the load pickup location on the day before or the day of the load pickup.
Mi/Km: Miles or Kilometers for search range.
Posting Age: Maximum age of truck postings to return in search.
Approved Carrier Services
The list of Carrier Services is filtered based on the following criteria:
- The optional Name filter matches the Carrier Service record name.
- The optional Cargo Carried filter matches the Carrier’s Transportation Profile record field value.
- The optional Cargo Domicile filter matches the Carrier’s Account Shipping State value.
- The optional Mode filter matches the Carrier Service record mode.
- The optional Rating filter matches the Carrier Service record rating.
- The optional Equipment filter matches a Carrier Transportation Profile’s Carrier Equipment related list entry.
- The optional Other Carrier Capabilities filter matches a Carrier Transportation Profile’s same field.
- The (Load) Customer’s Transportation Profile does not have a Carrier Exclusion related list entry for the Carrier.
- The global Transportation Profile does not have a Carrier Exclusion related list entry for the Carrier.
- The Load Weight matches the weight range of the Carrier Service record.
- The Origin State and Destination State match the Carrier’s Transportation Profile record state/province coverage.
- The Carrier Service is enabled.
- The Carrier’s Transportation Profile Carrier Review Status is Approved or FMCSA Update.
- If it is an API-based Carrier Service, the API Credentials are enabled.
Load Board Rates
Load board rate data for DAT and Truckstop are available on the Carrier Rate History widget. The load board equipment category is determined based on the category of the equipment type on the load or the category of the default equipment type on the mode. The default months displayed can be set on the lightning page editor. It is recommended to set DAT default months to 0 to avoid unnecessary charges.
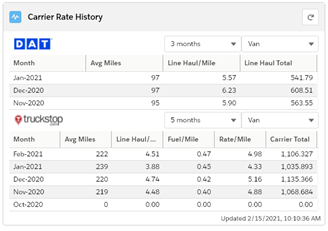
Lane Conditions and FreightWaves SONAR
Truckstop lane conditions are available on the Lane Conditions widget. The Truckstop equipment category is determined based on the category of the equipment type or the category of the default equipment type on the mode. The FreightWaves SONAR widget will display if a token is populated on the lightning page editor.
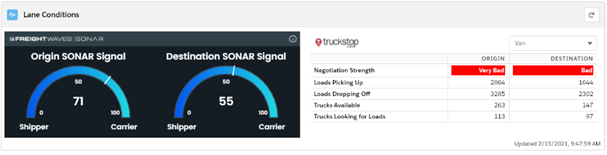
Lane IQ
The Lane IQ widget includes the Truck/Load Match and Sales History (formerly Quote History) widgets. The Lane IQ widget contains several properties that apply to the lane section, the Truck/Load Match and Sales History widgets. Lane IQ can be placed in the following places:
- Home page, Lightning App or Utility Bar: all contextual fields are blank. Defaulted properties will be initialized upon rendering (e.g. Default Country). Both the Truck/Load Match and the Sales History widgets will be empty.
- Load record page: the lane (all stops in the load) and filters (Customer, Customer Bill To, Carrier, etc., plus any additional filter fields in the custom field set) are defaulted from the information in the load. There are two behaviors for how the lane is set when the user goes into the Lane IQ widget:
- Loads that have not been assigned a Carrier will show the stops in the order of the load.
- Loads that have been assigned a Carrier will show the destination of the load as the origin lane and default the destination lane with the country of the origin lane.
Given the contextual information, both the Truck/Load Match and Sales History widgets will retrieve and display the data found in the db.
- Transportation Profile record page (for the Carriers): the Carrier and related values are displayed in the appropriate fields. Both the Truck/Load Match and the Sales History widgets will be empty.
- When used in the Load record page, the lane and filters are defaulted from the information in the load.
On the Home tab, Lightning App or Utility bar:
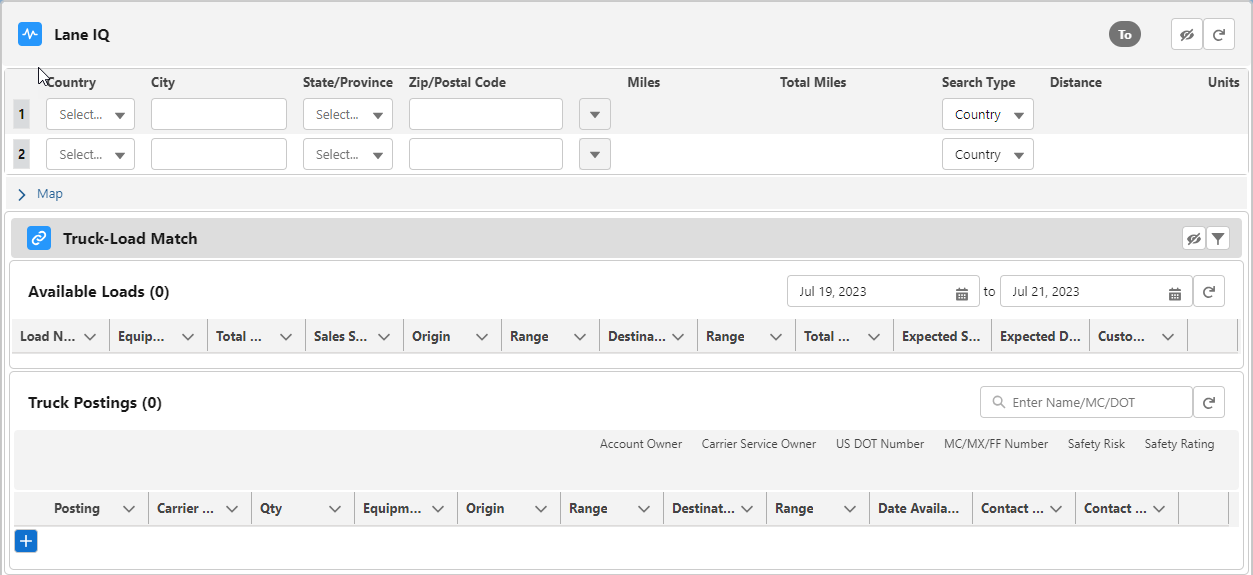
.png?sv=2026-02-06&spr=https&st=2026-07-04T23%3A38%3A45Z&se=2026-07-05T03%3A22%3A45Z&sr=c&sp=r&sig=rES11nFGXeAMxZFmN8b6eVx7wLYA2L%2F2seEkbaOBcO4%3D)
On the Load record:
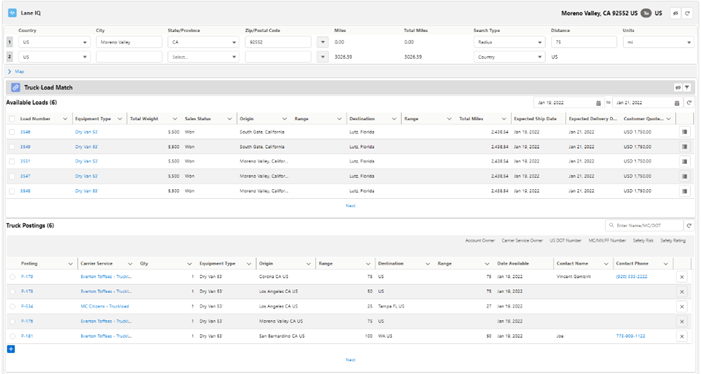
On the Transportation Profile record:
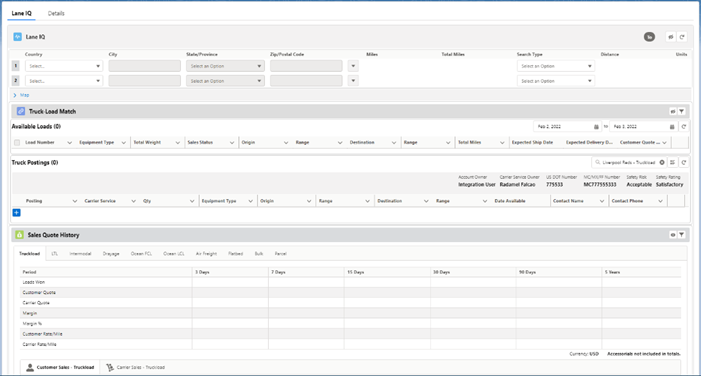
Lane IQ Properties:
Widget Properties |
|
Functions and buttons:
- Use the action menu button next to the Zip/Postal Code column on each lane (row) to access the available lane features:
- Add Location Above
- Add Location Below
- Remove Location
- Swap O/D
- Use Load O/D
- Clear Form
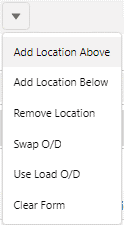
- The Map is hidden by default when the widget opens.
- Map markers are shown on the map are as follows:
- Green dot: lane origin
- Red dot: lane destination
- Blue dot: available loads (in the Truck/Load Match results)
- Brown squares: available trucks (in the Truck/Load Match results)
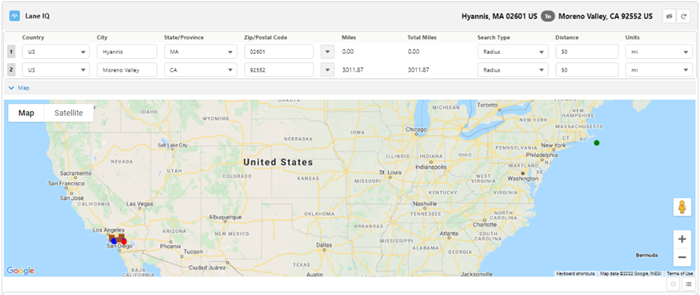
- Use the Borders button at the bottom right hand of the map to recalculate the distance between the origin and destination with open and closed borders.
- Use the Show List of Locations button at the bottom right hand of the map to show a textual list of all the map markers:
 Click on each map marker to be directed to it on the map.
 - Each widget has a show button and hide button that allows you to show and hide that section of the widget:
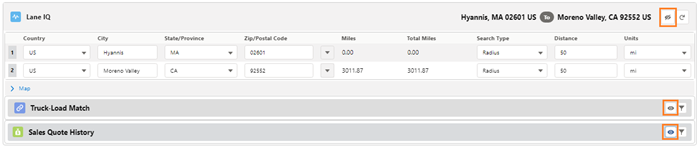
- The Lane IQ banner has a Refresh button that executes the refresh of the Truck/Load Match and Sales History widgets. The Truck/Load Match and Sales History widgets also have their own Refresh button.
- The Truck/Load Match and Sales History widgets have a Filter button that can be toggled to show and hide the filter section available on each widget.
- The from and to dates on the Truck/Load Match widget are used to retrieve the loads and truck postings where the pickup date on the origin lane is within that date range. This in addition to the rest of the filters in the Truck/Load Match widget:
 The Sales Status is a fixed filter. Additional filters can be added via the TMS28 field set on the Load object. Additional fields to display on the Available Loads table can be added via the TMS29 field set on the Load object.
 - Each load in the Available Loads section has a New Carrier Quote button. Clicking on this button will open the New Carrier Quote widget.
- Use the Carrier Service search field to find and select the carrier service you want to use to search truck postings:
.png?sv=2026-02-06&spr=https&st=2026-07-04T23%3A38%3A45Z&se=2026-07-05T03%3A22%3A45Z&sr=c&sp=r&sig=rES11nFGXeAMxZFmN8b6eVx7wLYA2L%2F2seEkbaOBcO4%3D)
Upon selection of the carrier service, click on the Refresh button next to it to perform the search. Use the Delete Truck Posting button on the truck posting row to delete the truck posting.
- Use the Delete Truck Posting button on the truck posting row to delete the truck posting.
- Use the New Truck Posting button at the bottom of the Truck Postings list to create a truck posting.
- Use the Next and Previous buttons on each list to view more data (e.g., Available Loads/Truck Postings sections in the Truck/Load Match widget and Customer Sales/Carrier Sales/All Carrier History subtabs in the Sales History widget). Note: the number of records to display is configurable through a Lane IQ property.
Selection Reason
When tendering or assigning a carrier quote from the Carrier Quote Section or Carrier Quotes List, the TMS allows enforcement of a selection reason when a non-lowest cost quote is chosen. Using the Selection Reason Required Modes field on the User table a selection reason can be required on a per user and per mode basis. When clicking a tender or assign button with a non-lowest cost quote where the mode is applicable:
- The selection reason modal will pop up.
- The user will not be able to proceed until a reason is selected.
- The selected option will be saved on the carrier quote in the Selection Reason field.
- The remainder of the tender or assign will proceed as normal.
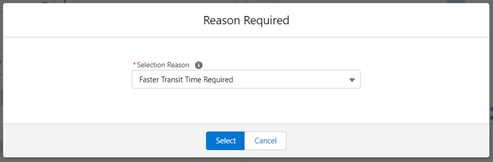
The Selection Reason Required Modes field is applicable for internal users only.
Invoice and Payment Management
The TMS provides full support for the creation and preparation of Customer Invoices and Carrier Invoices. Typically, Customer Invoices are generated in the TMS, while Carrier Invoices are manually or automatically imported into the TMS. Both types of invoices are directly accessed via a tab, which allows for rapid and custom filtered searches.
Customer Invoices
Customer invoices can be generated in three ways:
- From the Freight Quote Assistant widget:
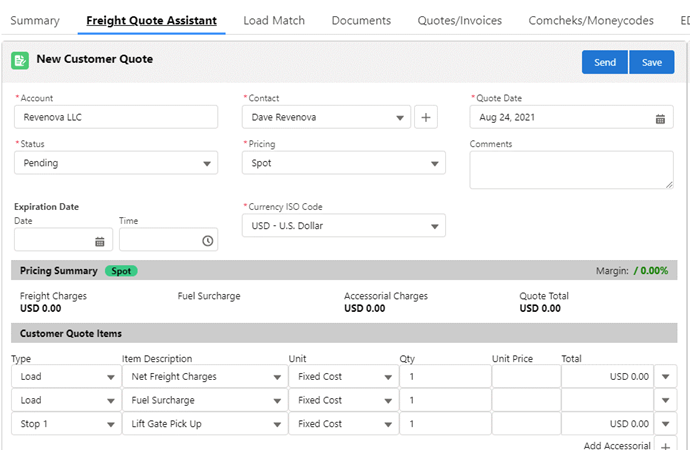
- From the Auto Create button on the Customer Invoice related list on the Load page layout.
- Automatically, based on transition to a particular Load Status value on a load. The invoice field values are based on the accepted Customer Quote record for this load. This Load Status value to trigger auto-generation of the invoice is set up from the TMS Admin🡪Configuration page:
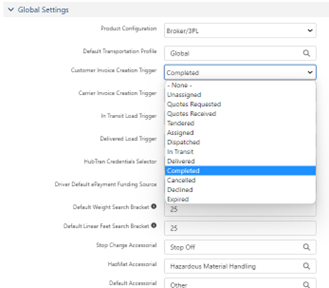
You can both generate and/or email a single Customer Invoice in PDF form by clicking the Generate or Generate and Email buttons on the Customer Invoice Banner.
Customer Invoice Banner
The Customer Invoice Banner is a component available on the Customer Invoice detail page:

It allows users to perform the following actions:
- Apply Terms: applies the customer invoice terms to the invoice. This includes recalculating the Invoice Date if the Customer Invoice Day field on the Transportation Profile record of the customer has a value in it. See the “Automated Customer Invoice Generation” section below for more details how the Invoice Date is calculated.
- Updates Taxes: recalculates the taxes on the invoice.
- Generate: generates the invoice in PDF form.
- Generate and Email: generates the invoice in PDF form and opens the email interface.
- Send via EDI: sends an EDI 210 if applicable.
Automated Customer Invoice Generation
The CustomerInvoiceGenerationJob is available to run from the Job Monitor page. The job will process invoices each time it runs based on the following criteria:
- The Auto-Send Invoices field in the Transportation Profile record of the customer is checked (true).
- The Invoice Date is today.
- The Invoice Status is set to “Approved.”
- The Billing Method is “Email” or “EDI.”
To run this job on regular basis the following settings need to be configured:
- Configuration page in the TMS Admin tab:
 Customer Invoice Job First Run of the Day: the time at which the job will run for the first time each day.
Customer Invoice Job Run Frequency: the number of hours in between each run. - Customer Transportation Profile settings:
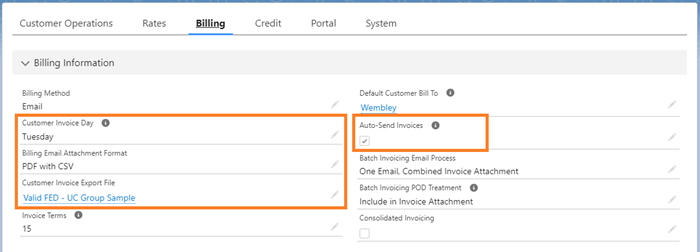
Customer Invoice Day: values are blank, and Monday through Sunday. This setting defines how the Invoice Date is calculated. When the value is blank, the Invoice Date is set to the current date. When it has a value, the date is set to the date of that day based on the current day of the week. For example, if the Customer Invoice Day is set to Thursday, the Invoice Date will be calculated as follows:- If today is Monday, the Invoice Date will be set to the date of Wednesday (3 days from Monday).
- If today is Thursday, the Invoice Date will be set to today’s date.
- If today is Friday, the Invoice Date will be set to the date of Thursday of next week (6 days from Friday).
Billing Email Attachment Format: value defaults to PDF. If you want to send a .csv along with the PDF, change this field to “PDF with .csv.”
Customer Invoice Export File: if when the “PDF with .csv” option has been selected, an export file definition is required. Each customer has one file export See File Export Definitions section.
Auto-Send Invoices: this field must be checked for the CustomerInvoiceGenerationJob to automatically generate and send customer invoices with a Billing Method of Email and EDI.
- Each invoice that is successfully processed will have its status set to Invoiced. The Date Sent is also set to “now”. The Invoice Status Comments will be set to blank.
- Invoices that generate an error will have the Invoice Status field set to “On Hold.” The Invoice Status Comments field will have the detailed error message. The list of errors are also emailed to the user.
Customer Invoice Batch Generation
User can select any list of invoices to generate invoice PDF files and mail these invoices to customers or print them in batches. The invoice Billing Contact Account’s Transportation Profile defines what batch processing mode to use when batch invoicing a given contact:
- One Email, Combined Invoice Attachment: One attachment containing all invoices and one email is sent to each billing contact.
- One Email, Individual Invoice Attachments: One attachment per invoice and one email is sent to each billing contact.
- Multiple Emails, Individual Invoice Attachments: One attachment and email is sent for each invoice. Any files attached to a load that contain the phrase “Proof of Delivery” can also be included (see below).
The default behavior if nothing is selected is One Email, Combined Invoice Attachment.
Notes regarding .csv files:
- When the “PDF with .csv” option is selected in the Billing Email Attachment Format field of a customer, a single .csv file will be generated that includes all the invoices selected for the Billing Contact regardless of the Batch Invoicing Email Process setting.
- The .csv file will be attached to the same email that includes the PDF.
- A .csv file will not be generated when the user clicks on the Generate & Print button.
To include PODs in your invoice communications, set the following field:
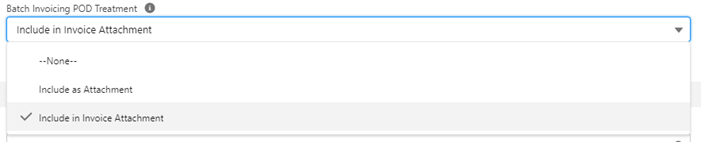
- Include as Attachment: Include each load attachment that contains the term “Proof of Delivery” as a separate attachment.
- Include in Invoice Attachment: Include each load IMAGE attachment that contains the term “Proof of Delivery” within the invoice PDF document.
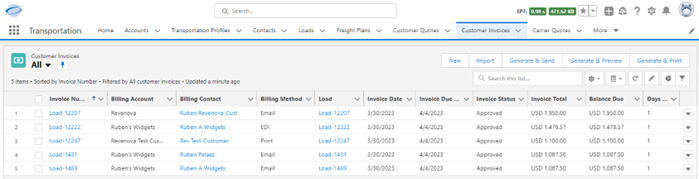
Customer Invoice Batch Email
To batch process a list of Customer Invoices, merely select the invoices and click the Generate & Email button. Note that you can select any invoices, crossing billing contact/customer boundaries.
This button initiates a background process that generates and emails the invoices to the appropriate parties. Note that invoices without a Billing Contact will be ignored.
The status of any invoice that is currently Pending or Approved will be set to Invoiced. The Date Sent is also set to “now.” The Invoice Status Comments is set to blank.
The POD Required field is populated automatically upon record creation from the Load’s Bill To Transportation Profile.
Any errors preventing the completion of this (batch) process will be emailed to the user.
Click the Generate & Preview button to view a set of invoices for one customer before sending them to the customer. A .csv file will be generated and attached to the email if the customer is configured with the “PDF with .csv” option.
Customer Invoice Batch Print
You can also batch print Customer Invoices by selecting them from the Customer Invoice tab and clicking on the Generate & Print button:
The status of any invoice that is currently Pending or Approved will be set to Invoiced. The Date Sent is also set to “now.” The Invoice Status Comments is set to blank.
Note that the Invoice Status field may also be auto-set to Paid or Short Paid based on the outstanding invoice balance and amount paid to date.
No .csv file is generated for this button.
Customer Invoice EDI
You can send customer invoices to EDI trading partners from the page layout or list view by clicking on the Send Via EDI button.
Customer Invoice Dispute Resolution
The following fields are available on customer invoices for dispute resolution:

Customers can also enter this dispute information from the Customer Portal.
Customer-Specific Invoice Attachments
You may specify – by customer -- which POD and other customer-facing documents attached to a load should be appended to customer invoices:
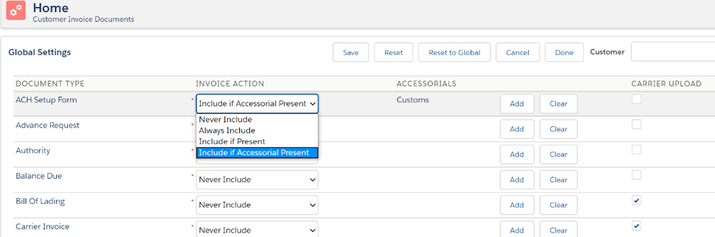
There are six inclusion actions:
- Never Include
- Always Include
- Always Include POD
- Include if Present
- Include if Accessorial Present
- Include if POD
There is a global configuration that determines which documents are included for those customers that do not have specific requirements.
The Carrier Quote and Customer Invoice page layouts display the status of required and optional documents:

Any attempt to email or print and invoice that does not have all its required documents results in a detailed warning message:

Note that the Document Type list is based on the Document Type picklist field on the Customer Invoice Document table. This picklist can be added to or entries can be disabled if they are not being used.
Master Invoice Number
The Master Invoice Number field is populated for all customer invoices. When a set of invoices for one customer is printed or emailed as one PDF document, this field will have the same value for all the invoices.
Customer Payments
Customer payments can be entered against specific loads and customer invoices:
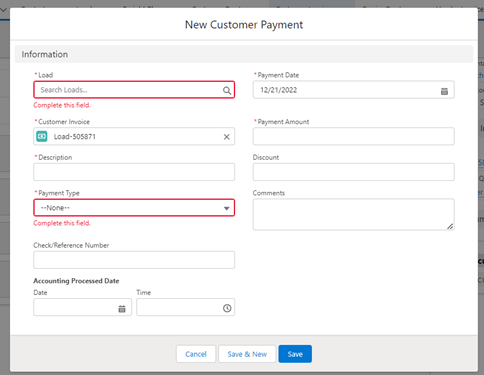
Note that payments automatically roll up to the Paid Amount and Balance Due fields on the parent Customer Invoice.
Vendor/Carrier Invoices
Vendor/Carrier Invoices are typically received individually as documents, or in a bulk file, from the carrier or your A/P department. To manually enter a Vendor Invoice, simply click the "New" button from the Vendor Invoice tab.

Note that the Invoice Status field is auto-set to Paid or Short Paid based on the outstanding Balance Due and Paid Amount.
You can also add Accessorials to both types of invoices from their respective detail pages.
Click the Split button to split a vendor invoice for partial payment or dispute resolution purposes.
Factoring Company Support
The carrier’s Transportation Profile record contains a Carrier Remit To field. This account lookup field can reference a factoring company if they are the recipient of payments. This value will “cascade” to loads and vendor invoices.
Carrier Invoices can also be generated automatically, based on transition to a particular Load Status value on a load. The invoice field values are based on the accepted Carrier Quote record for this load. This Load Status value to trigger auto-generation of the invoice is set up from the TMS Admin🡪Configuration page:
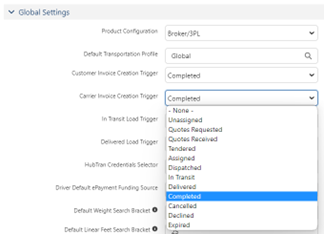
Intelligent Carrier Invoice Upload
When providing final load status, carriers can now be prompted to upload invoice information:

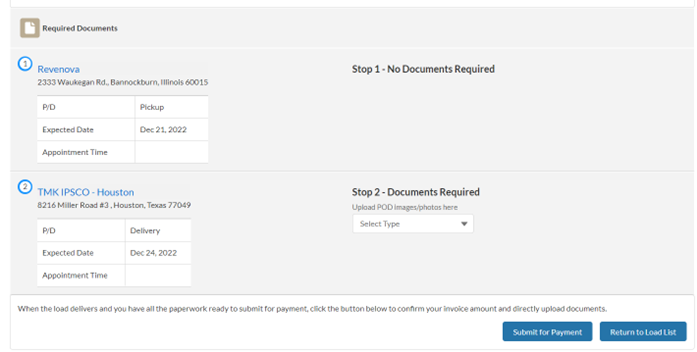
Carrier Quote Settlement
The ‘Settlement’ tab and load attachment viewer on the Carrier Quote page layout allows for the entry of carrier settlement information. Variances between carrier quotes and carrier invoices can be managed here:
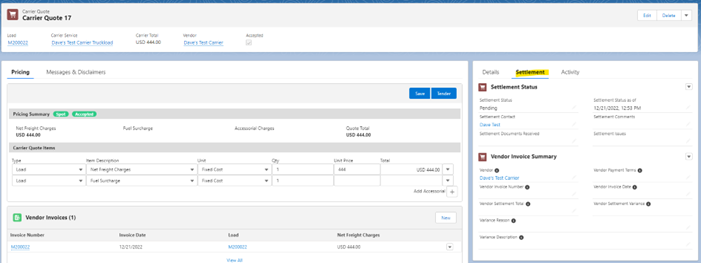
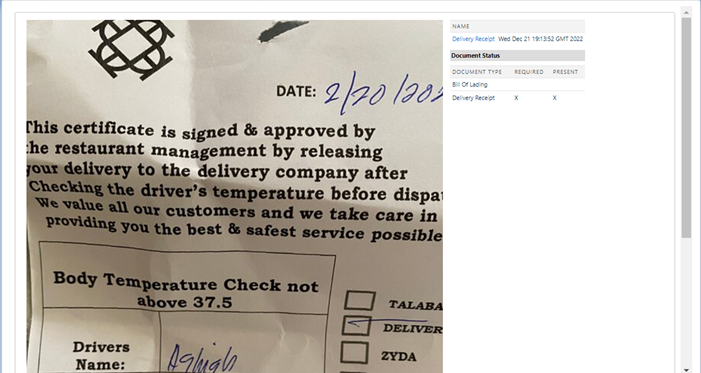
Note that the Vendor Payment Terms selected will determine the Payment Discount and Invoice Due Date for the corresponding Vendor Invoice/Payable.
Make sure that history tracking is turned on for all settlement fields, especially ones the carrier might be entering.
Note that the Vendor Invoice Number and the Vendor Invoice Date fields on the Carrier Quote are used when auto-creating the Vendor Invoice.
Vendor/Carrier Payments
Vendor/Carrier payments can be entered against specific loads and invoices:
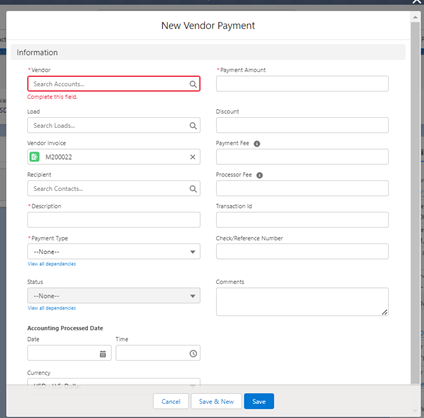
Note that payments automatically roll up to the Paid Amount and Balance Due fields on the parent Vendor Invoice.
Vendor payments created on a load before a vendor invoice exists will be automatically associated with the vendor invoice when it is subsequently created – except for Comcheks and MoneyCodes.
Carrier Remit To Admin
This widget can be added to the record page of Transportation Profile of the carrier and/or the Account.
Sample TMS LWC:
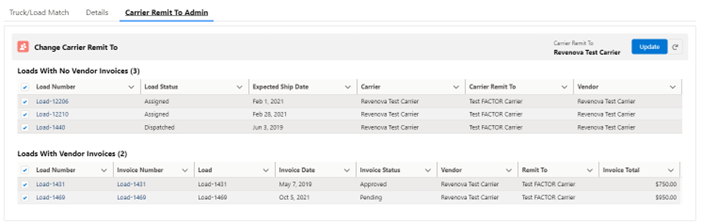
Sample TMS Accounting Seed LWC:
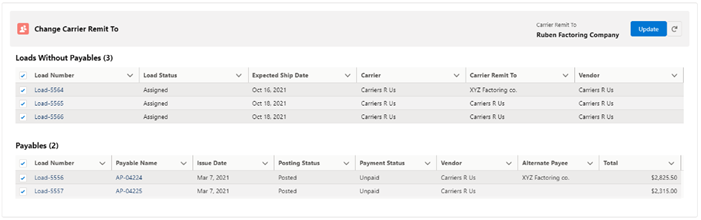
If the “Carrier Remit To” changes in the Transportation Profile of a carrier, this widget will display and allow you to do mass updates of loads and vendor invoices that have a different Carrier Remit To:
- Loads with no Vendor Invoices: shows loads with zero vendor invoices in a load status of:
Assigned
Dispatched
In-Transit
Delivered
Completed
- Vendor Invoices: show vendor invoices with an Invoice Status not equal to:
Paid
Short-Paid
The banner of the widget will display the value of the current “Carrier Remit To” next to the Update and Refresh buttons.
The Loads and Vendor Invoices are automatically selected. The user can review the list and deselect any record(s). Pressing the Update button will submit a batch job that updates the selected loads and vendor invoices. While the batch job runs, the Update button will remain disabled.
There is also a new field on the Transportation Profile called “Carrier Remit To As Of.” This field is updated with the current date and time each time the “Carrier Remit To” field changes.
Carrier/Customer Invoice Adjustments
To deal with after-the-fact carrier adjustments – for example, additional charges due to an incorrect weight or NMFC class on a load, the TMS provides a Carrier Invoice Adjustment capability.
These adjustments are entered from the Carrier Invoice page layout and can propagate to the corresponding Customer Invoice.
For example, say we have a $100 re-weigh charge on a Carrier Invoice. Go to the page layout and click on the New related list button:

Next, enter in the adjustment information, and how it should apply to the corresponding Customer Invoice:
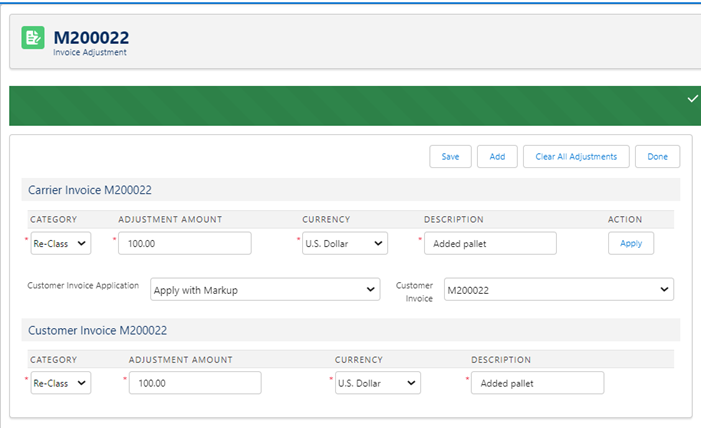
The Adjustment Amount fields populate the Adjustments field on the appropriate Customer Invoice and Vendor Invoice records.
(Pre-tax) Invoice Total == Net Line Haul + Fuel Surcharge + Accessorial Charges + Adjustments
There are no taxes for Carrier Quotes or Carrier Invoices (in the TMS data model).
Sales Taxes
Canadian and Mexican sales taxes can be computed on Customer Quote and Customer Invoices. From TMS Admin🡪Sales Tax maintain the tax tables. These tables currently support Mexican worldwide and Canadian inter- and intra-province sales tax calculations:

Click the Calculate and Display Taxes checkbox from TMS Admin🡪Configuration to enable auto-calculation of these taxes.
The Customer Quote Taxes and Customer Invoice Taxes related lists respectively display calculated taxes for Customer Quotes and Customer Invoices:

Note that pure cross-docks (where line items in == line items out) do not incur taxes.
Tax records are automatically rolled up the to the parent invoice/quote in the Tax Amount field:
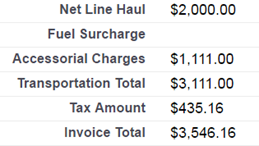
These fields are automatically synchronized such that:
- Net Line Haul + Fuel Surcharge + Accessorial Charges = Transportation Total
- Transportation Total + Tax Amount = Invoice Total
All TMS customers must ensure that the Sales Tax table is up to date with the appropriate tax rates.
Make sure that the Sales Tax, Customer Quote Tax and Customer Invoice Tax tables are read-only for ALL users.
Canadian Tax Allocation for Complex Loads
The allocation of taxable freight charges for multi-stop loads can be a complex process. TMS allocates based on the following:
If Stop-level Cumulative Miles is Available, use
[Weight Delivered x (To Stop Cumulative Miles – From Stop Cumulative Miles)]
Else, use
[Weight Delivered]
In other words, the allocation of taxable freight charges for a stop is based on (1) weight x distance or (2) weight only.
For example:
| Stop | Type | Weight Delivered | Cumulative Distance | Allocation Percent |
|---|---|---|---|---|
1 | Pickup | N/A | 0 miles | 0% |
2 | Delivery | 1000 lbs | 100 miles | 25% |
3 | Delivery | 1000 lbs | 300 miles | 75% |
| Stop | Type | Weight Delivered | Cumulative Distance | Allocation Percent |
|---|---|---|---|---|
1 | Pickup | N/A | N/A | 0% |
2 | Delivery | 1000 lbs | N/A | 50% |
3 | Delivery | 1000 lbs | N/A | 50% |
Mexican Tax Calculations
Mexican sales taxes are calculated for Customer Quotes and Customer Invoices, for loads where the Customer Bill To billing address is in Mexico.
The calculation is based on the quote/invoice Transportation Total value times the tax rate.
A reduction of taxes is calculated if the Customer Bill To Transportation Profile Mexico Tax Retention field is set to “Yes.”
Examples (based on 2019 tax rates):
Case 1
- Tax Exempt Load
- No taxes calculated
Case 2
- Customer Bill To billing address in US
- No taxes calculated
Case 3
- Customer Bill To billing address in Mexico
- Customer Bill To Mexico Tax Retention equals “No”
- VAT tax calculated: [Transportation Total * 16.000%]
Case 4
- Customer Bill To billing address in Mexico
- Customer Bill To Mexico Tax Retention equals “Yes”
- VAT tax calculated: [Transportation Total * 16.000%]
- RET tax calculated: [-1 * Transportation Total * 4.000%]
Sales Tax Exclusions
You can exclude certain taxes on a customer-specific basis from TMS Admin🡪Sales Tax Exclusions. Here you can designate a specific tax to be excluded for a given customer one of two ways:
- Do Not Calculate or Display
- Display as Zero Amount
Claims Management
Claims can be tracked, by load, and are visible from a related list on the Load detail page:
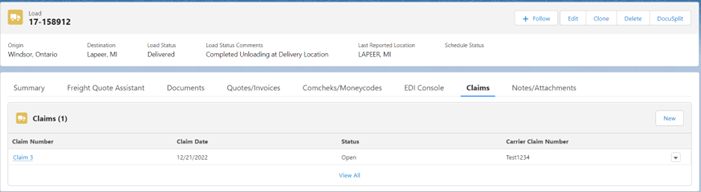
Click in the New Claim button to enter a new claim, or the Edit link to edit an existing claim.
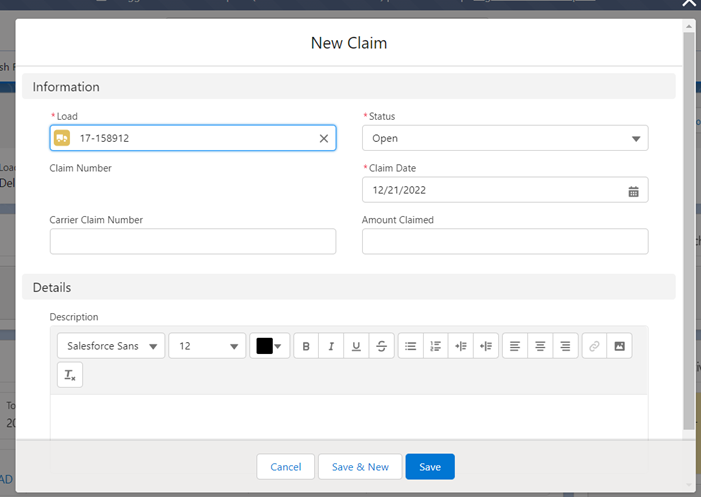
Add custom fields to Claim table to support additional, customer-specific data.
“Master Book” Scheduling
Loads and freight plans can be scheduled to repeat on weekly or bi-weekly basis using the Master Book Scheduling feature. To create a schedule, click on the TMS Admin🡪Recurring Load Schedules link.
A Recurring Load Schedule contains the following key fields:
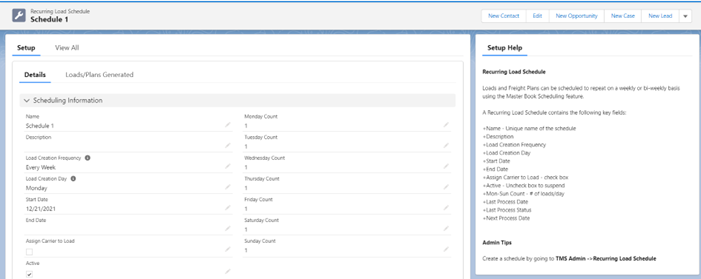
- Name – Name of schedule.
- Description – Description of schedule.
- Load Creation Frequency – How often to clone loads/freight plans.
- Load Creation Day – Day of week to create loads for next week pickup.
- Start Date – Date schedule becomes active.
- End Date – Date schedule becomes inactive.
- Assign Carrier to Load – If true, schedule-created loads’ status will be Assigned if an approved carrier quote is present, and the Carrier Service and Carrier fields will be populated.
- Active – Flag that allows a schedule to be temporarily suspended.
- Monday-Sunday Count – Number of copies of load(s)/freight plan(s) to create for a given pickup day.
- Last Process Date – The last date the schedule was batch processed.
- Last Process Status – The execution status of the last batch process run.
- Next Process Date – The next date the schedule should be processed.
The following related lists further define a schedule:

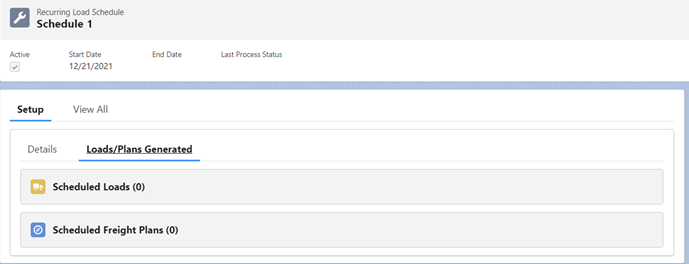
- Recurring Loads – The loads to be cloned according to the schedule.
- Recurring Freight Plans – The freight plans to be cloned according to the schedule.
- Scheduled Loads – The cloned loads based on schedule execution.
- Scheduled Freight Plans – The cloned freight plans based on schedule execution.
If helpful, think of Recurring Loads and Recurring Freight Plans as “cookie cutters” and Scheduled Loads and Scheduled Freight Plans as “cookies” made from them.
The RecurringLoadSchedule job should be Scheduled to run each morning. This job creates the cloned/scheduled loads and freight plans.
You can navigate to or create a Recurring Load Schedule by clicking on the Schedule button from the Load Detail page.
You can bulk tender loads by clicking on the Tender button from the Load list view. Note that loads need a Carrier Quote to be tendered.
If recurring loads/plans have stored rate customer and/or carrier quotes, the fuel surcharge is recalculated based on the relevant fuel indexes each time the schedule produces new loads (and quotes).
Load Detail Page
The Load Detail page is the “cockpit” and starting point for most activities related to moving loads. It consists of a detail section, related child record lists, and action buttons that provide entry points to most load-related processes.
Note that every page layout element is completely tailorable -- by user profile -- with just a few mouse clicks.
Load-Related Lightning Web Components
Load Financial Summary
This component shows quoted, invoiced, and paid revenue, costs, and margins:
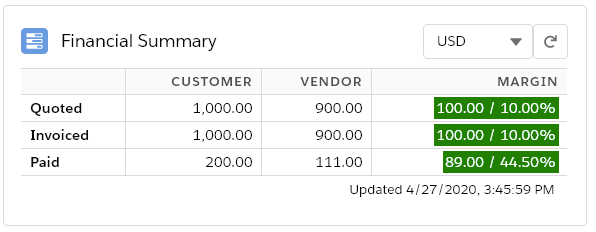
Load Tracking Log
This component displays an audit trail of key in-transit load events:
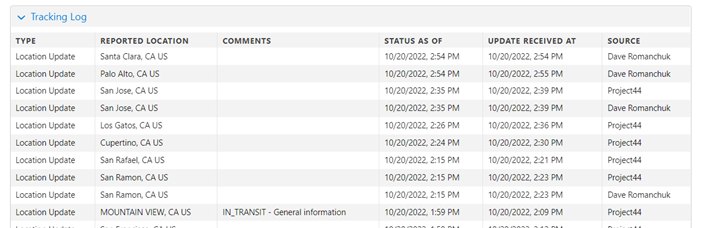
Note that the following fields need to have history tracking turned on for this widget to display complete data:
- Last Reported City
- Last Reported State/Province
- Last Reported Country
- Last Tracking Update Source
- Last Tracking Update
- Schedule Status
- Load Status Comments
- Driver Comments
Customer Banner
This component displays load fields and customer quote fields from the accepted customer quote both driven by field sets. The widget will display a badge if the load is an EDI load and a badge with the sales status persistently:

The antenna button on the component will open a window where the EDI status can be sent to the customer by clicking the Send EDI 214 Update Now button. API tracking provider updates can also be sent to the customer from this screen (see the Load Tracking section for more details).
Carrier Banner
This component displays load fields and carrier quote fields from the accepted carrier quote both driven by field sets. The widget will also display a badge with the load status persistently.

The antenna button on the component will open a window where an API tracking session can be initiated (see the Load Tracking section for more details). The arrow button will request a status update from the carrier on the load based on the Status Method of the carrier service. The “X” button will open a window for carrier removal:
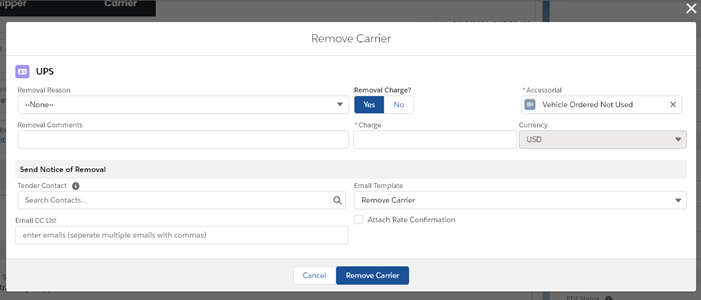
The Removal Reason and Removal Comments fields will be populated on the respective carrier quote when the carrier is removed. A removal charge can be added by clicking "Yes" on the Removal Charge button. The charge will be captured on the carrier quote for information and a vendor invoice or payable will be created based on the amount. If the Tender Contact field is populated the system will send an email to the contact and the Email CC List based on the Email Template field. If the Attach Rate Confirmation box is checked the system will generate a Truck Order Not Used Confirmation, save it the to the load, and attach it in the email.
Load Banner
This component displays load fields driven by a field set:

Load History Viewer
This component pulls in the field history (Field History Tracking must be enabled for the appropriate fields) for all records related to that Load. The objects included in the viewer are Load, Stops, Line Items, Load Accessorials, Carrier Quote (the Accepted quote for this load), Carrier Quote Accessorials, Customer Quote (the Accepted quote for this load), Customer Quote Accessorials, Customer Quote Taxes, Claims, and Container. The tool allows the user to filter the history by object type as well as by date range.
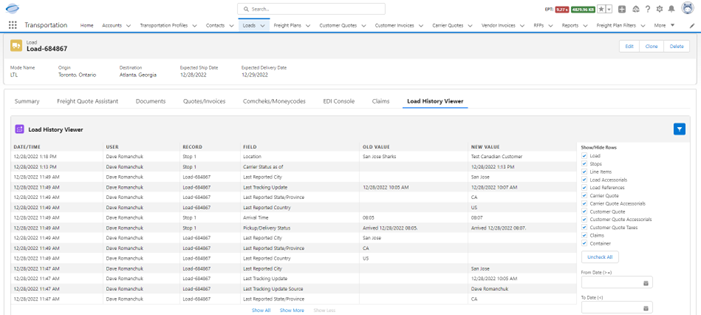
Load Detail Financial Information Fields
There are 16 important revenue- and cost-related fields on the Load objct:
- The Customer Quote Total is taken from the accepted customer quote, if any.
- The Customer Quote Transportation Total is taken from the accepted customer quote, if any.
- The Customer Quote Tax Amount is taken from the accepted customer quote, if any.
- The Customer Invoice Total is the sum of all customer invoices.
- The Customer Invoice Transportation Total is from all customer invoices.
- The Customer Invoice Tax Amount is from all customer invoices.
- The Customer Payment Total is the sum of all customer payments.
- The Carrier Quote Total is taken from the accepted carrier quote, if any.
- The Vendor Invoice Total is the sum of all carrier/vendor invoices.
- The Vendor Payment Total is the sum of all carrier/vendor payments.
- The Margin (Quoted) is (2) - (8).
- The Margin % (Quoted) is [(2) - (8)] / (2)
- The Margin (Invoiced) is (5) - (9).
- The Margin % (Invoiced) is [(5) - (9)] / (5)
- The Margin (Paid) is (7) - (6) - (10).
- The Margin % (Paid) is [(7) - (6) - (10)] / (7).
Line Item Detail Page
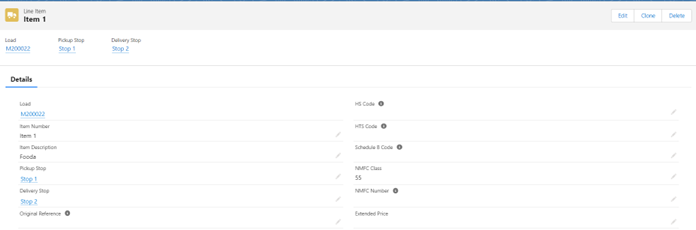
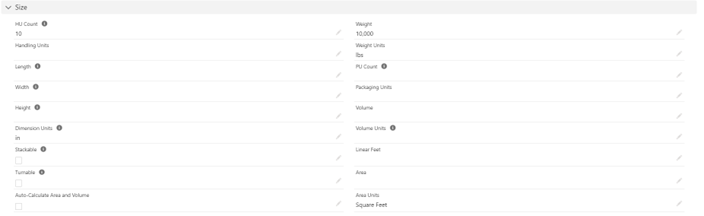

Every load has one or more line items, which contain the shipment contents. All line items have one Pickup Stop and one Delivery Stop. Handling Units are usually required to quote and tender a load. Weight is always required. Packaging Units are optional, but are usually required for certain modes, such as Ocean FCL.
HazMat info is required for all HazMat loads, of course. Every field in that section should be populated to receive accurate quotes.
HS Code, HTS Code, and Schedule B Code are needed for Ocean mode loads. NMFC Class and NMFC Number are used for LTL loads, generally.
Line Item Detail LWC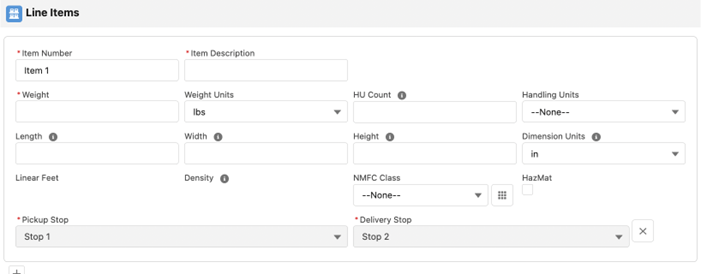
The Lightning Line Item Detail component is used on the Load tab and in the Customer Portal where customers create loads. It is used in many contexts. You enter Line Item information or alternatively use Commodity Search features to populate the Line Item fields from data on commodities.
Linear Feet and Density fields, if included in the Line Item object’s field sets (TMS1, TMS6 – see installation guide), will be rendered read only. The component will automatically compute and render values in these fields after sufficient data is provided to compute these – Weight, HU Count, Length, Width and Height (Note Stackable and Turnable fields can also impact the Linear Feet calculation).
Commodity Search from Line Items
There are two ways to search commodities from Line Item Detail and Quick Entry Line Items:
- Quick Commodity Search – just start typing either into the Item Description or Item Number fields of the Line Item and a search results list will be rendered after 3 characters are typed. It will show commodities with Item Description or Item Number (depending on the field you are typing in) that contain the string fragment you have typed.
- Enhanced Commodity Search – after gaining focus on either the Item Description or Item Number fields, before you even start typing, a button called Search Catalogues appears. Click on it to open the Enhanced Commodity Search dialogue.
 The above image shows the search features after typing ‘ban’ into Item Description. It shows two commodities where the string ‘ban’ is contained in the Item Description of each of those commodities. In the screen shot, we call attention to important features with red arrows labeled 1 and 2:
- Click this Quick Search link to select the Bananas commodity and to populate line item fields from that commodity.
- Click the Search Catalogues button to open the Enhanced Commodity Search dialogue.
The following screen shot shows the Enhanced Commodity Search dialogue:
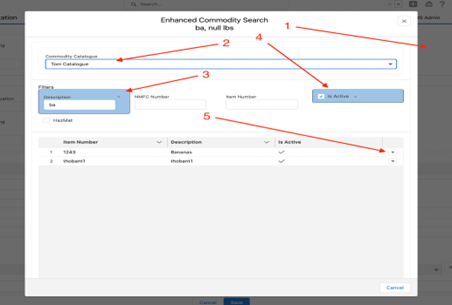
In the screen shot, we call attention to some features with 5 red arrows:
- The dialogue opens as a modal, so you must either select a commodity from the search results or cancel the page to return to the load.
- By default, the customer’s catalogue is selected at the top. You select a global catalogue instead if you want to select commodities from another catalogue.
- Upon opening the modal, the description filter is already active with the data that was typed on the Line Item Detail dialogue. Any filter fields that were already populated on the Line Item before opening this dialog will be active. The blue band the encapsulates the filter field indicates the filter on that field is active.
- The Is Active filter is turned on automatically. When this filter is on, only active commodities are shown in the results. The component determines if commodities are active based on the commodity Effective Date and Expiration Date fields; and the First Stop Pickup Date (Effective Date < Pickup Date < Expiration Date).
Complete Guide to Using Enhanced Commodity Search
Filtering
- To filter on text fields, just start typing the text you want to match. The filter is applied with each keystroke. Records with text that contain your filter value are rendered.
- To filter on numeric fields, type the entire number you want to match. The filter is applied with each keystroke. But only records that match your value exactly are rendered.
- To filter on checkbox fields, click the checkbox to initiate the filter. The records with a checked value will be rendered. Then to see records where the value is unchecked, click again to uncheck the filter.
- When you initiate filtering on a field, a blue colored box will envelop the filter fields. The box includes a small Clear Filter button you can click on to deactivate the filter on that field.
- For text and numeric fields, you can deactivate the filter two ways:
- Clear all characters in the filter.
- Click on the Clear Filter button.
- For checkbox fields, you can only deactivate the filter one way:
- Click on the Clear Filter button.
- You can activate filters on multiple fields. Only commodities that match all active filters are shown in the search results.
- The Is Active filter is used to filter based on the Commodity records’ status based on the Commodity object Effective Date and Expiration Date fields. The Is Active filter will be rendered if the Is Active field is included in the TMS2 field set defined on the Commodity object. If the Is Active filter is rendered, then by default, the checkbox is checked and filter is active upon opening the Enhanced Commodity Search modal.
- For a commodity to be considered active, then the Pickup Date of the Load’s first stop must fall between the Effective Date and the Expiration Date of the Commodity.
- Effective Date <= Pickup Date <= Expiration Date
- If Effective Date is null then Pickup Date is treated as greater.
- If Expiration Date is null then Pickup Date is treated as less than.
- For a commodity to be considered active, then the Pickup Date of the Load’s first stop must fall between the Effective Date and the Expiration Date of the Commodity.
- The Match Density filter, unlike other checkbox filters, is not applied to a checkbox field on the Commodity. Instead, when this filter is checked, the page will compare the Density computed on the line item to Density Minimum and Density Maximum fields on the commodity.
- Match if Density Minimum <= Density < Density Maximum
Sorting on Columns
- Click on the header of any column to sort the table by that column.
- On the initial click, the records will be sorted in ascending order.
- Click on that column header again to sort in descending order.
- All data columns are sortable.
Global Commodity Catalogues
- Commodity Catalogues, other than customer’s default catalogue, become available to the Enhanced Commodity Search dialogue if the Global checkbox field on the Commodity Catalogue is checked.
- This is done in TMS Admin->Commodity Catalogues.
- All global catalogues appear in the Commodity Catalogue select list at the top of the Enhanced Commodity Search dialogue.
- The customer’s assigned default Commodity Catalogue is selected by default if one is assigned to the customer’s TP.
- Only users with standard user license can see the drop down select list. This implies that the select list will not appear in the Customer portal.
- If the customer is not assigned to a Commodity Catalogue and there is more than one global catalogue, then no catalogue is selected by default. The user must select one.
- If the customer is not assigned to a Commodity Catalogue and there is only one global catalogue, then that catalogue is selected by default.
- Only commodities belonging to the selected catalogue will be shown in the search result.
Actions You Can Take on Search Result Rows
- On the far right of each row, there is a drop down with actions.
- The possible actions include:
- Select- clicking Select…
- (1) copies all information from the Commodity record onto the Line Item record on which the dialogue was invoked.
- (2) The dialogue closes and you land back in the Line Item editor with fields populated from the commodity record.
- Select and Save to Customer Catalogue-
- (0) Only appears if (a) the user has selected a global catalogue and (b) The user has the create permission on the Commodity object.
- (1) copies all information from the Commodity record onto the Line Item record on which the dialogue was invoked.
- (2) Clones the Commodity record from the Global catalogue into the Customer catalogue.
- If there is an NMFC number present on the selected Commodity and the customer catalogue already includes a commodity with the same NMFC Number, then the copy is cancelled, an error is rendered to the user and control remains on the Enhanced Commodity Search dialog.
- (3) The dialogue closes and you land back in the Line Item editor with fields populated from the Commodity record.
- If the Is Active filter is set to show inactive commodities in the search results, if the Commodity in the search results is inactive either because the First Stop Pickup Date is before the Effective Date or after the Expired Date, then no action is available on that search result row commodity. See Active Commodities below.
- Select- clicking Select…
Adding a new Commodity to the Customer Catalogue
- A "+" button on the lower right corner of the dialogue can be clicked to add a commodity to the Customer Catalogue.
- The button will not appear if
- The user is viewing a Global catalogue, or…
- The user does not have write access to the Commodity object.
- Clicking the "+" button opens a dialog to create a new Commodity.
- Enter commodity data and click the Save button to add the new commodity to the catalogue.
- If the user entered an NMFC number and the customer catalogue already includes a commodity with the same NMFC Number, then an error is rendered to the user and control remains on the Enhanced Commodity Search dialog.
Active Commodities
- Two fields on the Commodity object determine if the commodity is active…
- Effective Date
- Expired Date
- If neither field is populated, then the record is active.
- If both fields are populated, assuming Expired Date > Effective Date, then the First Stop Pickup Date must land between the two dates for the commodity to be active.
- If only the Expired Date is populated, then if First Stop Pickup Date < Expired Date, the commodity is active.
- If only the Effective Date is populated, then if First Stop Pickup Date > Effective Date, the commodity is active.
- Is Active field is a formula checkbox field.
- The formula is based on System Date rather than First Stop Pickup Date.
- In the Enhanced Commodity Search results, the component determines whether the commodity is active based on First Stop Pickup Date rather than the system date. Inactive commodities may be shown in the search results (depending on filter values) but cannot be selected.
Large Global Catalogues
- If a catalogue includes more that 100 commodities, then the search results table initially renders the first 100 commodities in the catalogue.
- Scroll to the bottom of search results to autoload more rows.
- Applying filters clears the data loaded from scrolling.
- Because filters look at the entire universe, not just the rows that have been displayed.
- Sorting on columns clears the data loaded from scrolling.
- Because sorting looks at the entire universe, not just the rows that have been rendered.
Load Locking
The TMS supports “operations” load locking to prevent Customer Sales Reps and Carrier Sales Reps from interfering with each other in high-volume, collaborative environments.
Each load now indicates its lock status. Unlocked:
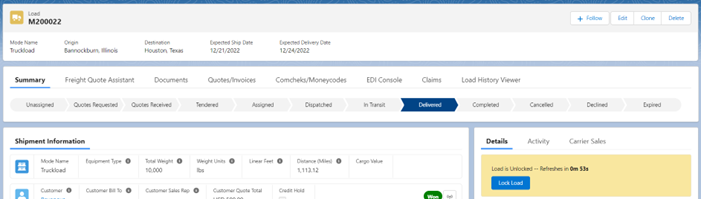
Locked by another user indicating who has the lock and for how long:
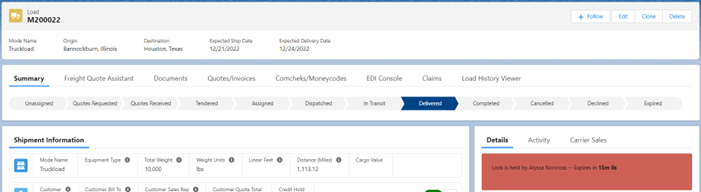
And Locked by you:
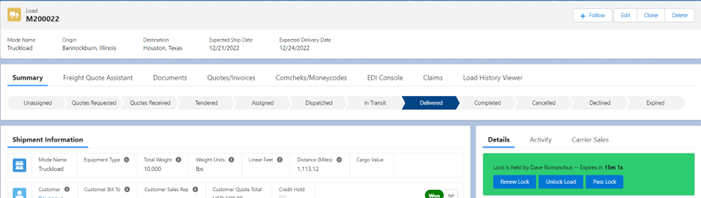
You may renew the lock before it expires, unlock the load, or pass the lock to another user:
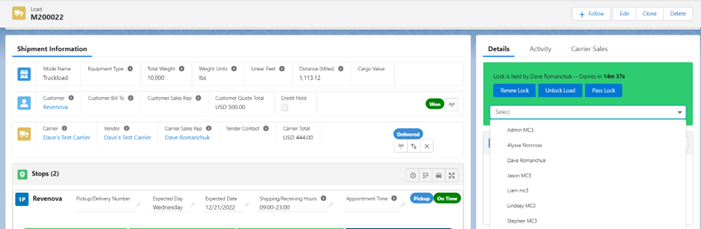
The following configuration parameters are available:
- Global Parameters
- Enable Operations Load Locking
- Load Locking Hold Time
- User Parameters
- Load Locking Max Count
- Load Locking Administrator
Load Locking Administrators can unlock any load. Other users can only unlock loads they hold the lock to and can only lock unlocked loads.
The Load Locking Max Count determines how many locks a user can hold simultaneously. This parameter is only checked for loads without a Carrier Service assigned. This allows for unlimited locks for updating stop status for in-transit loads.
The following operations can only be performed if the user holds the load lock or there is not lock on the load:
- Load Detail Page
- Tender button
- Remove Carrier button
- Update stop status via popup
- Link to stop records
- Freight Quote Assistant Page
- Accept a Carrier Quote
- Tender a Carrier Quote
- Assign a Carrier/Carrier Quote
- Truck-Load Match Page
- Tender a Carrier Quote
- Assign a Carrier/Carrier Quote
Attempting to perform a prohibited operation results in an error message:

Internal Load Board
If load locking is used, the Load Lock Manager tab gives an overall view of lock holders:
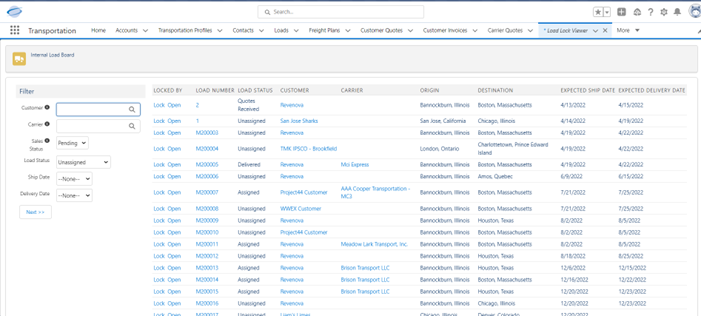
Both the filter fields and columns displayed are configurable via the Load TMS8 and TMS9 field sets.
The Load Lock Manager auto-refreshes every 30 seconds, or whenever filter criteria change.
Freight Plans
Freight Plans allow you to create complex, multi-carrier, multi-mode, and cross-dock load execution plans. Freight Plans allow for detailed tracking, status, and costing of complex moves, such as:
- Load consolidations
- Cross-border moves with carrier hand-offs at the border
- Hub-and-spoke pickups and deliveries with cross-dock legs in between
- Multi-carrier, Multi-mode loads
Freight Plans consist of an ordered list of:
- One customer load to be covered by the freight plan
- One or more carrier loads created to cover the customer load
Note that carrier loads can be shared across freight plans. For example, a five customer load consolidation would become five freight plans with one customer load and one (shared) carrier load in each freight plan.
Freight Plan Console
The Freight Plan Console (tab) is where all freight planning occurs:
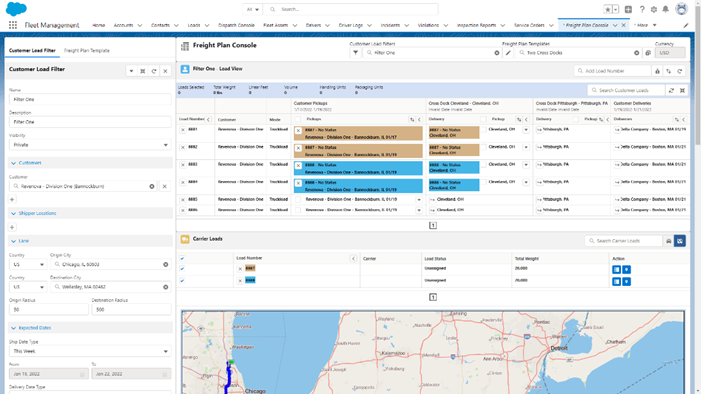
Access to the Freight Plan Console is provided by:
- Clicking on the Freight Plan Console tab
- Clicking on the Freight Plan button icon on the Load Detail widget
- Clicking the New button from the Freight Plan tab
- Clicking on an existing Freight Plan
- Selecting several loads and clicking on the Freight Plan list button
A typical freight planning session consists of the following steps:
- Retrieving all relevant customer loads that are to be freight planned.
- Adding cross dock stops, as needed.
- Combining customer loads into carrier loads.
Freight can be planned at the load or line item level. This allows for “load splitting” whereby one customer load’s line items are on different carrier loads.
Customer Load Filters
Customer Load Filters can be configured and saved, which automatically retrieve matching customer loads into the Freight Plan Console. These are useful for recurring freight scenarios where the same planning activity occurs each week.
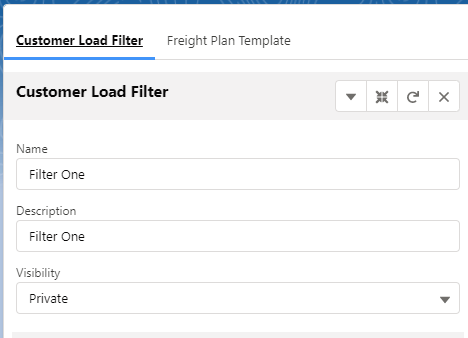
Freight Plan Templates
Freight Plan Templates can also be configured and saved, which provide a default topology for the freight plan. For example, a freight plan template may define the number and location of cross docks to be added. The Auto Load Creation Settings allow the appropriate carrier loads to be auto-created based on the template settings.
A Customer Load Filter can be saved with a corresponding Freight Plan Template.
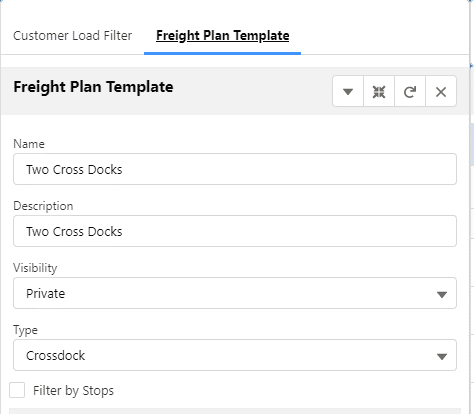
Both Customer Load Filters and Freight Plan Templates are stored in the Freight Plan Console Configuration table.
Carrier Stop Detail Component
This component should be placed on the load page layout and have a filter so it is only visible for customer loads in a freight plan:
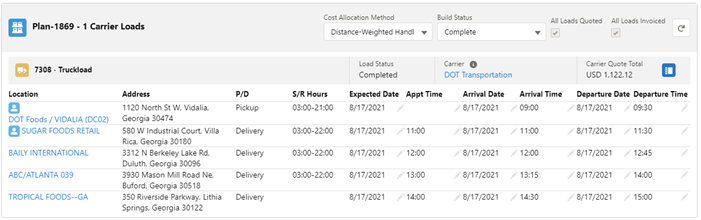
Freight Plan Console Configuration
The following configuration settings are available for the freight plan console:
- Load TMS24 Field Set: Used to display additional fields in the Auto Load Creation Settings section of the Freight Plan Console.
- Load TMS25 Field Set: Used to display additional columns in the customer load list of the Freight Plan Console in the absence of a filter.
- Load TMS26 Field Set: Used to display additional columns in the carrier load list of the Freight Plan Console in the absence of a filter.
- Load TMS27 Field Set: Used to display additional fields when creating carrier loads in the Freight Plan Console.
- Line Item TMS5 Field Set: Used on Freight Plan Console customer line item list for 'flex' fields.
- Customer Load Filters also define which fields are displayed in the customer and carrier load lists.
Freight Plan Cost Allocation
Cost Allocation choices are:
- Weight: Based on the weight of each line item as a percentage of the total for that carrier leg.
- Linear Feet: Based on the linear footage of each line item as a percentage of the total for that carrier leg.
- Handling Unit Count: Based on pro-rata handling unit count of each customer load in the plan.
- Packaging Unit Count: Based on pro-rata packaging unit count of each customer load in the plan.
- Distance-Weighted Handling Unit Count: Costs are first allocated to legs pro-rata based on leg mileage, then pro-rata within a leg based on handling unit count.
- Distance-Weighted Packaging Unit Count: Costs are first allocated to legs pro-rata based on leg mileage, then pro-rata within a leg based on packaging unit count.
This is applied on a carrier load leg-specific basis. Those carrier legs that contain multiple customer loads use the allocation method selected. Those carrier legs dedicated to a single customer load have all the costs allocated to that customer load.
Note that the load financial rollup fields DO NOT incorporate this cost allocation. It is available on the Freight Plan Load table in the Quote Cost Allocation and Invoice Cost Allocation fields (for the customer loads)
Click on the Financial Summary icon in the Freight Plan Console to see the revenue and allocated costs for all customer loads in the console:

Freight Plan Data “Sync”
Changes to a line item in a freight plan automatically propagate to “sibling” line items. The fields that propagate are defined in the Line Item TMS3 field set.
Changes to a carrier load stop in a freight plan automatically propagate to “sibling” customer load stops. The fields that propagate are defined in the Stop TMS11 field set.
Load Board Support
Load Postings
TMS supports posting of loads directly and seamlessly to the leading Load Boards. Currently-supported load boards include:
- DAT
- LoadBoard Network
- TransCore
- Trucker Tools
- Truckstop
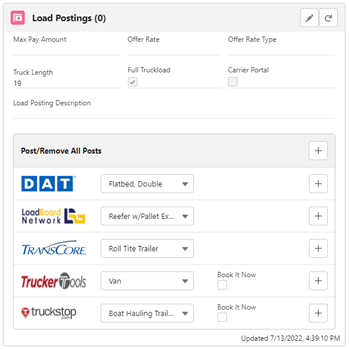
The Load Postings Widget currently supports the following features:
- Posting a load to a single Load Board using the button in the Load Board’s row.
- Posting a load to all available Load Boards using the Post/Remove All button.
- Refreshing all of the load’s postings with the current info on the widget using the Refresh button.
- Removing a posting from a single Load Board using the button in the Load Board’s row if posted to.
- Removing all of the load’s postings using the Post/Remove All button if all of the Load Boards are posted to.
The following fields from the load will be included in the postings (if populated):
- Offer Rate
- Offer Rate Type
- Load Posting Description
The following information will also be included in the posting (if populated):
- Truck Length (initially determined by the load’s Equipment Type Length)
- Full Truckload (initially checked if the load’s Mode is a non-LTL Mode)
- Load Board Posting Equipment (determined by the load’s Equipment Type Posting Defaults)
The remaining fields are not included in the posting:
- Max Payment Amount (strictly informational)
- Carrier Portal (load will be available in Carrier Self-Service Portal if checked)
All the above fields can be edited directly in the widget using the Edit button.
A continuous batch process performs the following functions:
- Deletes stale Truck Postings (Load and Truck Posting Management Job)
- Posts auto-post loads (Load and Truck Posting Management Job)
- Deletes Load Postings for covered loads (Queued Transaction Job)
- Refreshes active Load Postings periodically (Load and Truck Posting Management Job)
- Purges and Recreates active Load Postings each morning (Load and Truck Posting Management Job)
Populate the Posting City and Posting State/Province fields on the account record if you want to use “aliases” for the load board postings. This works when a small town is near a large metro area that is better known. Truckstop does not support posting aliases.
If you want all loads for a particular customer to auto-post, check the Auto-Post Loads field on the Transportation Profile record.
Book It Now
In addition to standard load postings, the TMS supports Book It Now functionality for Trucker Tools and Truckstop. When Book It Now is checked the load posting will be able to be booked by an approved carrier (on the load board) which creates a carrier quote for the load in the TMS based off the load’s Offer Rate. For Truckstop, carriers dropping Book It Now postings in Truckstop will also be automatically removed from the load if the LOADDROPPED event is enabled on Truckstop.
Book It Now postings have stricter requirements as outlined below:
- Appointment times or shipping/receiving hours are required on each stop. (Truckstop)
- Accounts and full addresses are required for each stop. (Truckstop)
- An Offer Rate is required. (Trucker Tools and Truckstop)
- A Terms and Conditions needs to be manually created once in Truckstop during setup. (Truckstop)
- USD currency must be enabled. (Trucker Tools)
To approve a carrier on the load boards for Book It Now:
- A valid MC/DOT Number pair is required.
- Set the Allow Booking from Load Postings field to include the specific load board on the carrier’s transportation profile.
- Have the Load and Truck Posting Management job running.
- When the Upload Complete field on the carrier’s transportation profile contains the specific load board the carrier was successfully authorized.
For carrier quotes created via Book It Now:
- Book It Source will be set to specific load board.
- Book It will be checked.
- The Carrier Total will be based on the posting’s Offer Rate automatically converted to a flat rate.
- The Carrier Service will be selected based on the load’s Mode.
For Truckstop, if the LOADDROPPED event is enabled and a carrier drops a Book It Now load in Truckstop, the following will occur:
- For loads not completed or delivered, the Book It Now carrier quote Removal Reason will be set to Carrier Cancelled and the Removal Reason will be populated with a message provided by Truckstop.
- If the carrier quote is Accepted, the carrier quote will be unaccepted.
- If the carrier quote is the tendered quote on the load, the carrier will be removed from the load and email based carrier services will receive an email.
Some additional features with Book It Now:
- The Mask Load Board Booking Requests field on the customer’s transportation profile if set to true will mask the stop location names. (Truckstop only)
- Setting the Allow Booking from Load Postings to include specific load boards on the customer’s transportation profile will check Book It Now for postings created from a list view or auto-postings and check Book It Now by default on the Load Posting widget.
- Note that for Book It Now postings Truckstop will automatically delete load postings in Truckstop that have appointment times or shipping/receiving hours that have passed.
Truck Postings
TMS supports geolocation-based retrieval of truck postings from DAT, TransCore, Internet Truckstop, and Trucker Tools. Users can also enter one-time or repeating internal truck postings, and search on these also.
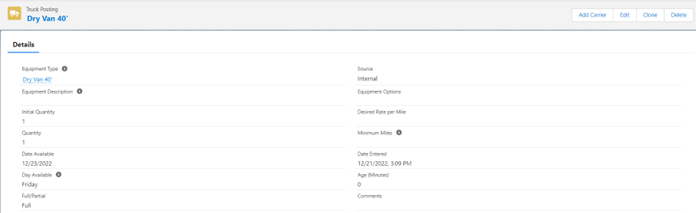
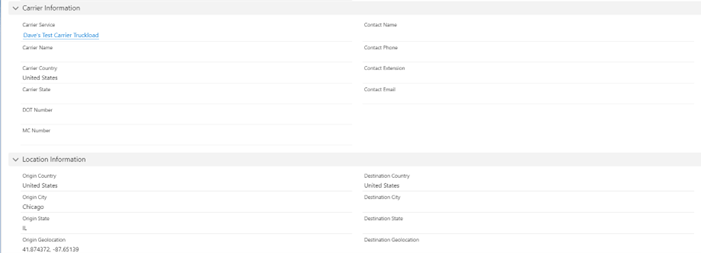
Click the Add Carrier button to quickly set up a new carrier from the posting.
Truck-Load Match
You can match (multiple) trucks to loads by clicking on the Lane IQ tab from the App Launcher:
Trucks and Loads are geo-matched based on desired origin and/or destination (for a specified carrier service):
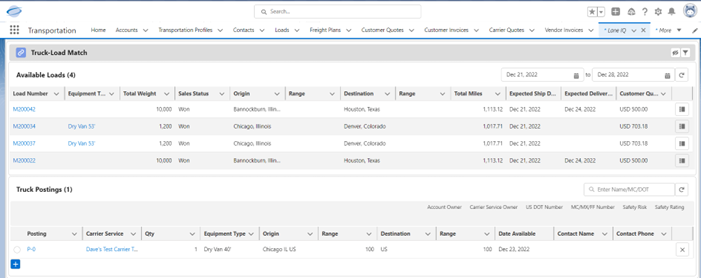
Additional matching criteria include:
- Posting Date Available must be within two days of Load Ship Date.
- Load Weight must not exceed Posting Equipment Maximum Weight.
- If assigned, Load Equipment Type Category must equal Posting Equipment Type Category.
Load Tracking
Load tracking allows the TMS to receive tracking updates from the Load Tracking APIs (MacroPoint, FourKites, etc.) and to send tracking updates to the Load Tracking APIs (MacroPoint only).
You can initiate load tracking by clicking the antenna button on the carrier banner. Clicking the On and Off button will start and stop a tracking session. An active tracking session can also be updated by updating the respect Carrier Tracking Numbers and clicking Update Tracking.
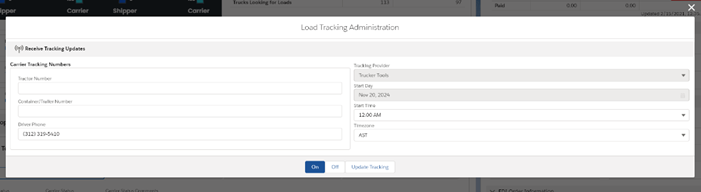
Be sure to populate the Tracking Customer Id for all Transportation Profiles for customers who require tracking updates from the TMS for their loads.
You can initiate sending tracking updates to the customer by clicking the antenna button on the customer banner. You will be required to select a tracking provider and provide the customer tracking number. Clicking the On and Off buttons will start and stop tracking.
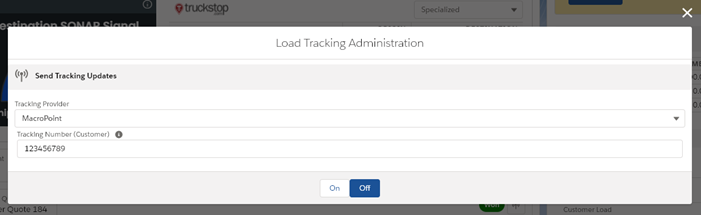
Outbound status to MacroPoint includes:
- Stop Appointment Time
- Stop Arrival
- Stop Departure
- Location Change
LTL Pricing Workbench
The LTL Pricing Workbench is available as part of the RFP functionality. The LTL Pricing Workbench includes a configuration setting and two main components:
- TMS Admin – Configuration: Pricing Workbench Batch Size setting. It defaults to 50. If API rate quotes are going to be used, 50 should be the highest setting. If locally Stored Rates are used, 200 can be used as the highest setting.
- Load Upload: use the predefined load template to create the loads for your RFP and upload them into the TMS.
- Pricing Workbench: allows you to specify filters and generate a .csv file with carrier quotes for the loads uploaded in step a.
Load Upload
- After creating the RFP record for a prospect or customer, the RFP record will have a button at the top right of the page called “Upload Loads”:
.png?sv=2026-02-06&spr=https&st=2026-07-04T23%3A38%3A45Z&se=2026-07-05T03%3A22%3A45Z&sr=c&sp=r&sig=rES11nFGXeAMxZFmN8b6eVx7wLYA2L%2F2seEkbaOBcO4%3D)
- After clicking on the “Upload Loads” button, the Upload Loads page will be displayed:
 Click on the Excel icon to download the template (as a .xlsx file). The .csv file you end up uploading must include all required fields with the proper values (Mode, State, Country, Weight Units, Handling Units, Dimension Units, NMFC Class and Accessorial Type/Name combinations).
 - Once the load template contains all the loads you want to load, click on the “Choose File” button, select the .csv file that contains the loads and click the Upload button:
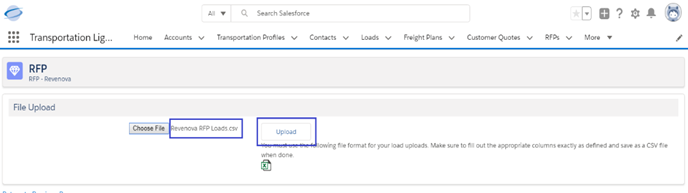
- A confirmation message will be shown on the page:
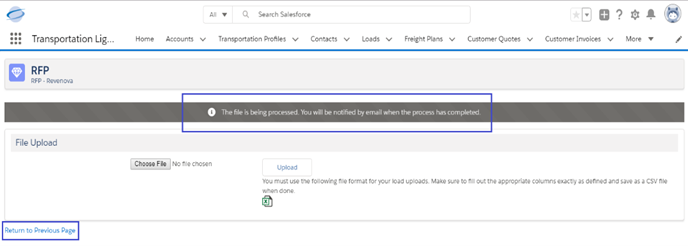
The loads will be created in the background and you will receive an email when the load is completed. Any errors in the load will be included in an attachment in the email. You can fix those loads and reload the file with the fixed loads.
Click on the “Return to Previous Page” link to go back to the RFP detail record.
Pricing Workbench
- From the RFP detail record, click on the “Pricing Workbench” button at the top right hand of the page:
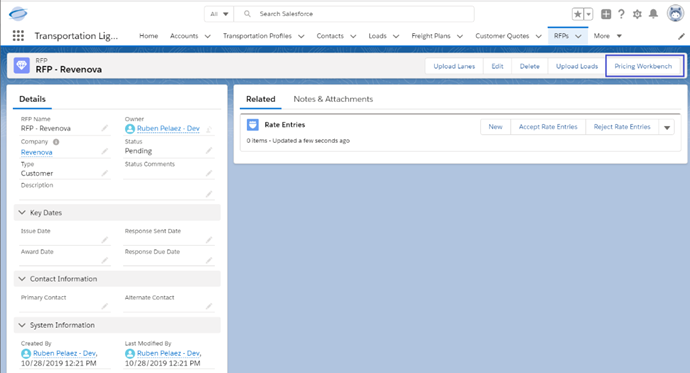
- The “Pricing Workbench” page will open and display several entry fields that you can use to filter the carrier quotes that you will receive:
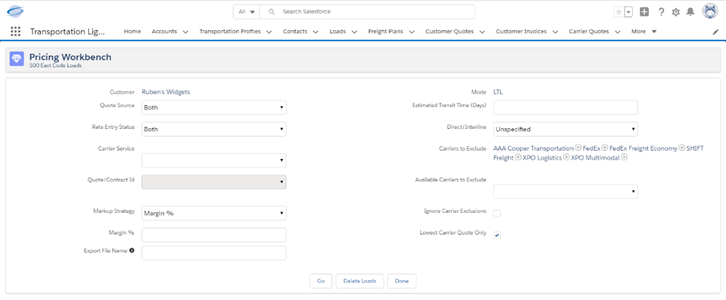
- Enter the appropriate filter choices and click on the “Go” button:

- The Pricing Workbench will start a batch job to get carrier quotes from the configured LTL carriers in in your TMS:
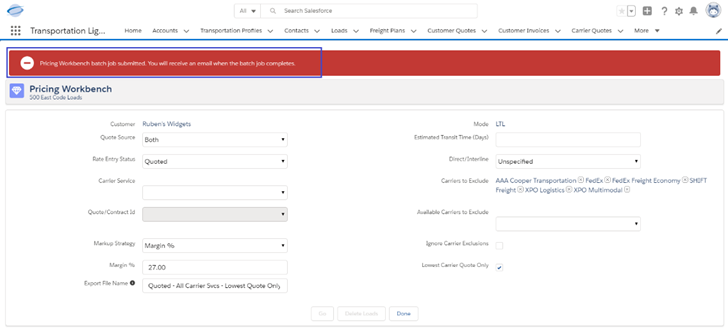
- When the process completes, the user who clicked on the Go button will receive an email message. An export file will exist in the Notes & Attachments subtab of the RFP detail record with the name you entered in the “Export File Name” field of the Pricing Workbench page:
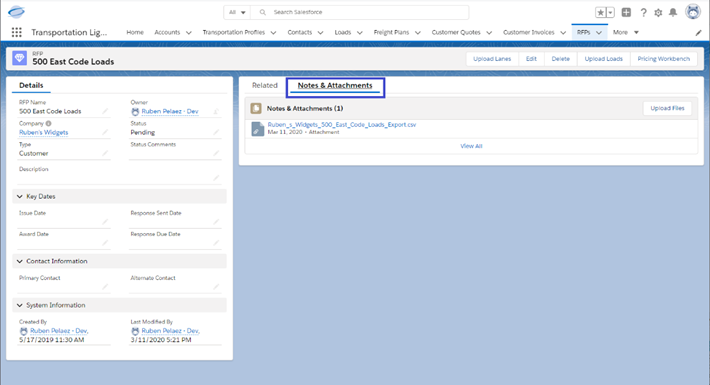
- The Pricing Workbench also allows you to change the necessary filters at the top of the page, click the Go button and get a new set of carrier quotes in a new .csv file.
- Once the user is done generating carrier quotes for an RFP, all the loads in the RFP can be deleted via the “Delete Loads” button:
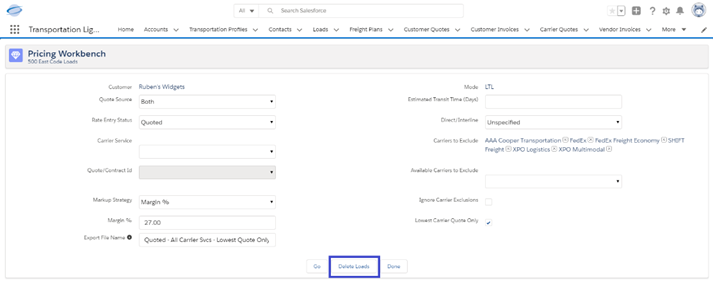
Carrier Engagement Automation
The ability for the TMS to auto-engage carriers based on dedicated carrier options on lanes (auto-tender via stored rates). The Carrier Engagement Automation batch process will be initiated upon configuration of the following:
- Carrier Rate Entry
- Auto-Tender checkbox set to True (on the Rate Entry)
- Customer or Global Transportation Profile
- Carrier Engagement Automationto include Auto-Tender
- Will set the Customer’s “Carrier Engagement Automation” field on the Load record
- Carrier Engagement Automationto include Auto-Tender
For a load to be processed by the Carrier Engagement Automation process, the Load record must meet the following conditions:
- Load Status set to Unassigned, Quotes Requested, Quotes Received, Tendered
- Carrier Engagement Automation to include Auto-Tender
- And one of the following two conditions:
- Sales Status set to Won, Carrier Load set to True and In Freight Plan set to False; OR
- Carrier Load set to True and In Freight Plan set to True
- And one of the following two conditions:
The cascade/sorting for the automatic tender process is as follows (organized in the following order in the Carrier Quotes list LWC):
- Auto-Tender is set to True > Customer TP
- Auto-Tender is set to True > Global TP
- Priority
- Carrier Total
- Created Date
Note: If the Auto-Tender option is not a selected picklist value in the Carrier Engagement Field on the load, the carrier quote list will be sorted by Carrier Total.
Configuration
From TMS Admin > Configuration, the following global settings section looks like this:

- Auto-Tender Frequency (min)
- Number of minutes to wait between tendering to carriers based on carrier quotes queued for the auto-tender process.
- Number of minutes allowing carriers to submit a reply/respond.
- Carrier Quote Tender Status will move to Expired if the Carrier does not respond in this number of minutes. API tenders will be Accepted right away or be moved to On Hold Tender Status if there is an error message from the API.
- Auto-Tender Max Pay Amount
- The maximum amount that a Carrier Quote can be auto tendered. This amount is checked if the Max Pay Amount on the load is null.
- If carrier quote exceeds this amount, the Carrier Quote will be placed On Hold and the Tender Hold Reason field will be set accordingly.
- Auto-Tender Max Pay Amount Currency
- The currency of the “Auto-Tender Max Pay Amount.”
- Skip Quotes in On Hold Tender Status
- If checked, quotes in the queue that are On Hold status are skipped, thus moving on to the next Carrier Quote in the queue.
- Auto-Tender Carrier Sales Rep Assignment
- If the load does not have a Carrier Sales Rep assigned, this determines which user will be assigned as the Carrier Sales Rep on a load when the load is auto-tendered.
- Picklist: Carrier Account Owner, Carrier Service Owner
Note: the Carrier Service Owner field is a new field in 7.4. Clients must populate this field in order to take advantage of this feature.
Carrier Service
- The Quote Method on the Carrier Service record must be set to Stored Rate or API.
- The auto-tender will be sent to the Tender Contact on the Carrier Service record.
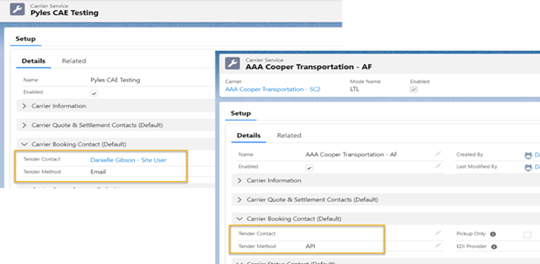
Carrier Rate Entry Setup
- Create the Carrier Rate Entry from either the Customer or Global Transportation Profile.
- The Auto-Tender checkbox must be set to participate in the auto-engagement process.
- The Priority picklist field can be set based upon your carrier-lane preferences.
Customer or Global Transportation Profile
- From the Customer or Global Transportation Profile, the Carrier Engagement Automation field must include Auto-Tender to be involved in the process.
- Carrier Engagement Automation
- If set, values will be set within the Load record > Carrier Engagement Automation field upon Load creation.
- Multi-picklist: Auto-Tender, Auto-Post
- Carrier Engagement Automation

Process
- Once a new Load is created and the following fields are set accordingly as previously described, the batch job will process each load.
- The Carrier Quote list can be created under two different scenarios:
- The user goes to the FQA before the Carrier Engagement Automation batch job picks up the load:
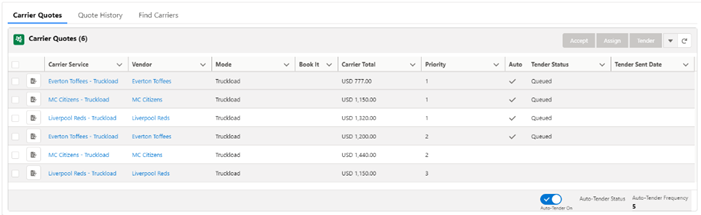
In this case, all the carrier quotes set to Auto-Tender will have a Tender Status of "Queued." The Carrier Engagement Automation batch job will pick up the load on its next run and auto-tender the first carrier quote in the list.
- The Carrier Engagement Automation batch job picks up the load before the user goes to the FQA:
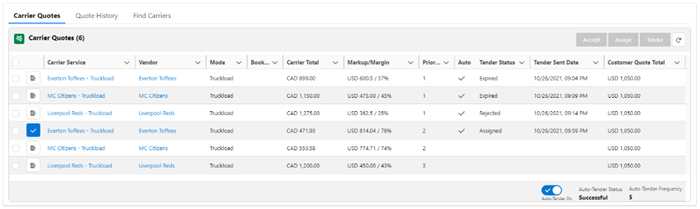
In this case, the batch job tendered the first four Carrier Quotes in the list. The carriers did not respond to the 1st carrier quote and the batch job expired it on its next run; it then tendered the 2nd carrier quote and it expired again on the next run. The 3rd tender was rejected by the carrier so the batch job tendered the 4th carrier quote; the 4th carrier quote was accepted by the carrier and shows as assigned to the load.
3. Once the list is created, the user can select one or more (or all) carrier quotes on the list (orange box) and click on the button menu (green box) next to the Refresh button to either add or remove carrier quotes to/from auto-tender list:
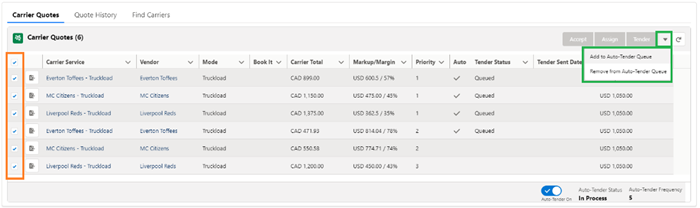
In this case, the batch job will tender the first Carrier Quote in the queue next time it runs.
4. The automatic load tender will be sent to the Tender Contact for the first Carrier in the Carrier Quotes list:
- If the icon is visible in the Auto (Tender) column of a Carrier Quote record, the Carrier Quote is set to be involved in the Carrier Engagement Automation process. The Accept, Assign, and Tender buttons will NOT be functional for these types of carrier quotes as they are managed by the batch job:
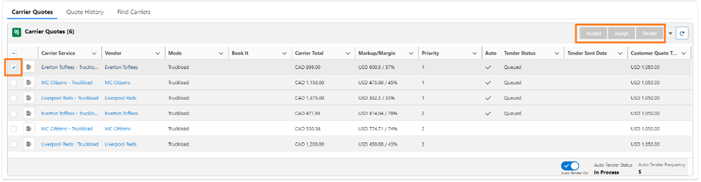
5. Other widget notes:
- The order of the Auto-Tender Carrier Quotes will follow the sort/cascade as detailed above.
- Clicking on the icon on the first column will open the Carrier Quote details in a new tab. The Accepted Carrier Quote will show in a green icon and the rest of the carrier quotes will show the blue icon.
- The bottom part of the LWC will show whether the load is in Auto-Tender mode. When the load is in Auto-Tender mode, the Auto-Tender Status and Auto-Tender Frequency are rendered as shown above.
6. If the Carrier Accepts the Load Tender, the Carrier will be Assigned to the Load and the Carrier Engagement Automation process will end for that load.
- If the Carrier Declines the Load Tender, the Carrier on the next Carrier Quote will receive the next automatic load tender.
- The Auto-Tender Status field on the Load record will be set as follows:
- In Process when the Carrier Quote is being processed in the Queue; or,
- Successful when the Carrier Quote Tender Status has been set to Assigned; or,
- Unsuccessful when all the Carrier Quotes in the queue have been processed and no quote has been accepted.
- For API tenders, an automatic response will be received.
- The tender will be automatically Accepted; or,
- The Tender Status will be set to On Hold and the Tender Hold Reason will be populated accordingly.
7. The Carrier Quote fields will be set accordingly:
- Tender Status
- Queued when the Carrier Quote is being processed.
- Sent when the Carrier Quote has been sent to the Carrier Service Tender Contact. The Tender Sent Date field will be set accordingly.
- Assigned when the Load has been assigned to the Carrier.
- Rejected if the Carrier declines the Load Tender.
- Expired when the carrier has not responded within the set number of minutes.
- On Hold when there is an issue tendering the load. Possible reasons: the load’s Max Pay Amount, trying to tender a load with ship or delivery dates in the past, or any specific errors returned by the API integration.
- Tender Expiration Date will be set according to the number of minutes entered in TMS Admin > Configuration > Auto-Tender Frequency (min) and the Tender Sent Date/Time.
- Rate Entry Source (if added to the field set) will be populated with either a Customer Transportation Profile or the Global Transportation Profile that is associated with the Rate Entry.
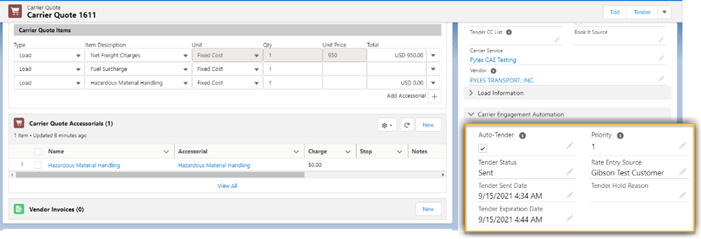
Customer Self-Service Portal
The Customer Self-Service Portal allows TMS Customers’ customers to perform the following self-service functions with the components listed below:
- The Quote Wizard LWC which allows creating, quoting, and tendering of LTL API Loads (using cost-plus pricing) and creation of non-LTL loads (for later follow-up by a TMS user).
- The Load Options LWC which handles viewing documents (BOL, PODs, and Insurance Certificate), emailing documents, and cloning loads.
- The Pending Loads LWC which allows users to see and access their pending load.
- The Load Tracking Log LWC which allows users to see detailed load status at a stop-level of detail.
- The CustomerMyInvoices Visualforce page for viewing invoices and entering dispute information.
Portal Text Configuration
From TMS Admin🡪Configuration, configure the text areas of the customer portal:
- Mode Selection Page Header: text displayed above the Quote Wizard mode selection page.
- Load Entry Page Footer: text displayed below the Quote Wizard mode selection and load entry pages.
- Load Entry Only Message: text displayed on the Quote Wizard quote selection page when no non-LTL stored rates are found.
- Quote List Page Footer: text displayed below the Quote Wizard quote selection page.
- No Carrier Quotes Message: text displayed on the Quote Wizard quote selection page when no LTL quotes are found.
- Credit Hold Message: text displayed on the Quote Wizard when credit is exceeded.
- Pre-Tender Page Footer: text displayed below the Quote Wizard tender page.
- Post-Tender Page Footer: obselete
- Tender Failed Alert Email: email recipient of any tender related error or insurance authorization error in the Quote Wizard.
- Cargo Insurance Overview: text displayed when the “Learn More” link on the Quote Wizard load entry page is clicked.
- Cargo Insurance Excluded Commodities: text displayed when the the “View Excluded Commodities” link on the Quote Wizard load entry page is clicked and text displayed on the Quote Wizard tender page.
- Cargo Insurance Opt Out: text displayed when the Show Cargo Insurance Options is unchecked on the Quote Wizard load entry page.
- Cargo Insurance Authorization: text displayed on the Quote Wizard tender page.
- Review Before Tender Message: text displayed on the Quote Wizard when a user requiring Review Before Tender tenders a load.
- Additional Success Text-Faster Transit: text displayed after the standard success message that is rednered when a portal user posts a request for faster transit. Most often, an admin will provide contact information (email, phone) for follow up on the request.
Portal TMS/User Setup
- Set up the portal page footers and other text from TMS Admin🡪Configuration.
- Each community user must have a contact record (first) and a community user record created. Note that users can never be deleted, only deactivated.
- Each portal user must have a TMS license assigned.
- You must select an LTL API aggregator (Blue Grace, Worldwide Express, or Project44) to use for the LTL quoting process.
- You must set up routing guide entries to automatically retrieve quotes from the LTL API you have selected.
- For each customer’s Transportation Profile, set up Carrier Markup records to define your customer-/carrier-specific cost-plus pricing. Alternatively, you can set up global pricing using the global Transportation Profile.
- The portal may require access to the following Visualforce pages:
- BillOfLading
- CustomerMyInvoices
- CustomerInvoice
- LoadClone
- Assign the TMSCustomer Community with Login permission set to community users.
- You must make loads private to external customer portal users and create a sharing rule for each customer so they only have access to their loads. Verify that no customer has access to any other customers’ loads!
- Make sure you do not “break” the Customer/Carrier Email Loop and API community access when you perform the above step.
- Provide your customer community URL to each customer user. Upon user creation, a login email can be sent automatically.
- The max page width of the portal may need to be increased to support the new LWC components. This can be adjusted in the Experience builder under Theme🡪Theme Settings.
Quote Wizard
For the Quote Wizard, LTL and non-LTL follow the same flow:
- Configure load
- Retrieve a list of quotes:
- For LTL loads a list of marked-up carrier quotes from stored rate and API carriers.
- For non-LTL loads a single customer quote from a stored rate.
- Select one quote from the list
- Complete the load configuration.
- Tender the load.
For the LTL load scenario, the load is in Tendered or Assigned status with an accepted Customer Quote and accepted Carrier Quote. For the non-LTL load scenario, the load is in Unassigned status with an accepted Customer Quote.
LTL API-quoted loads can be tendered in one of two ways:
- Via an API
- Via email
Initial Setup
To initially configure the Quote Wizard, a new Standard Page must be created in the portal. The Name/URL of page can be anything, but the API Name must be “QuoteWizard”:
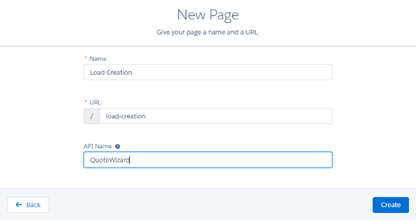
From the Custom Components drag the Quote Wizard onto thepage. A new tab should be added to the Navigation Menu for the page as well.
See the Portal Text Configuration section above as well for initial setup.
Mode Selection Page
On the mode selection page users will be able to select a mode for new loads.
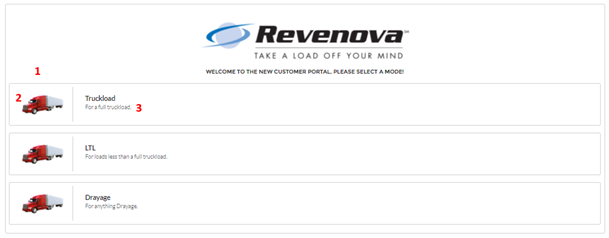
For configuration:
- Mode’s that have Customer Portal Selection checked will be available for selection.
- A custom image can be used for each mode by:
- Uploading an image into a publicly accessible document directory.
- Populating the mode Customer Portal Icon field with the Salesforce 18-character ID of the image.
- Note the image is designed for the following dimensions: width: 109 px, height: 50 px.
- The mode’s description can be set by populating the mode’s Customer Portal Description field.
Load Entry Page
On the load entry page users will be able to enter load, stop, and line item details and either get quotes or save the load. Additionally, if an insurance API is enabled, users will be able to select Show Cargo Insurance Options to see insurance options on their quotes.
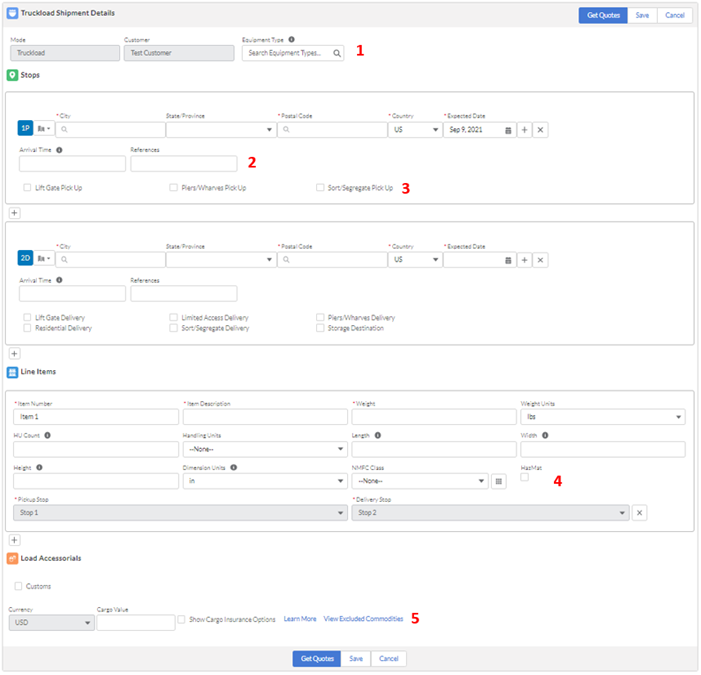
For configuration:
- Excluding Mode and Customer, additional fields can be added to this section using Load field set TMS10 (mode specific field sets supported).
- Additional stop fields can be added to the stop sections using Stop field set TMS4 (mode specific field sets supported).
- From TMS Admin🡪Accessorials, load and stop accessorials can be enabled for the portal by checking the Customer Portal Selection field.
- Additional line item fields can be added to the line item sections using Line Item field set TMS6 (mode specific field sets supported).
- The Cargo Insurance Option picklist field on the customer’s transportation profile:
- If blank or “Hide,” Show Cargo Insurance Options will not be visible along with the two links.
- If “Opt In,” Show Cargo Insurance Options will be checked by default.
- If “Opt Out,” Show Cargo Insurance Options will be unchecked by default.
Quote Selection Page
On the Quote Selection page users will be able to select an LTL or non-LTL quote, refresh quotes, return to the Load Entry page, and/or filter LTL quotes. Additionally, if API cargo insurance was requested, the user will be able to include or exclude the insurance while seeing the price difference.
LTL load:

Non-LTL load:

For configuration:
- A custom image can be used for each carrier service by:
- Uploading an image into a publicly accessible document directory.
- Populating the carrier service Logo Document Id field with the Salesforce 18-character ID of the image.
- Note the image is designed for the following dimensions: width: 109 px, height: 50 px.
- The carrier service Service Notes fields can be used to add additional information about the carrier service.
- Additional carrier quotes fields can be added using carrier quote field set TMS6 (mode specific field sets supported).
- A reseller markup can be utilized by populating the Reseller Markup Group field with a carrier markup group on the customer’s transportation profile or global transportation profile (see Carrier Markup Groups).
- The LTL Quote Refresh field can be populated on the customer’s transportation profile which will prevent selection of LTL quotes if the timeframe has passed.
- When selecting an LTL quote the Customer Portal Tender Options picklist field on the user object will:
- If blank or “Any Quotes”, allow the user to select any quote with no other input.
- If “Any Quote With Reason”, allow the user to select any quote, but require a reason* if the quote is not the lowest cost.
- If “Lowest Quote Only”, only allow the user to select the quote of the lowest cost.
- For LTL loads, a portal customer can click the Request Faster Transit button if the transit times on the quotes provided are not fast enough. The dialog that opens allows the user to enter a date, a time and comments. Internal users need to handle these special requests. The portal users inputs are saved to the Load record. Workflows, triggers, or special list views may be set up to facilitate management of these Faster Transit Requests.
*reasons for selecting a quote are managed by the Selection Reason field on the carrier quote which is where the information is also stored.
There is an additional user picklist field Customer Portal Quote Visibility which can be used to limit LTL quote visibility for a user:
- If “Lowest Quote Only”, the user will only be able to see the lowest cost quotes.
- If “Fastest Transit Only”, the user will only be able to see quotes with the lowest transit times.
- If blank or “All Quotes”, the user will see all quotes.
Load Tender Page
On the Load Tender page users will be able finalize stop details (locations and contacts), enter additional load details, enter additional load references, perform the final authorization for API insurance, and tender the load. Users can additionally navigate back to the Load Entry page or choose a different quote. Line items, accessorials, and the selected quote will be displayed on the page for review.

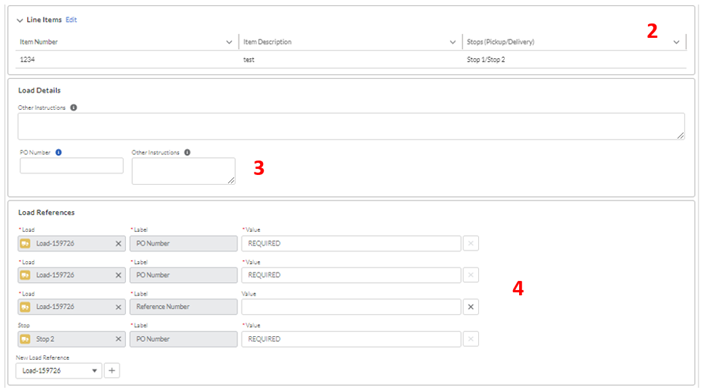
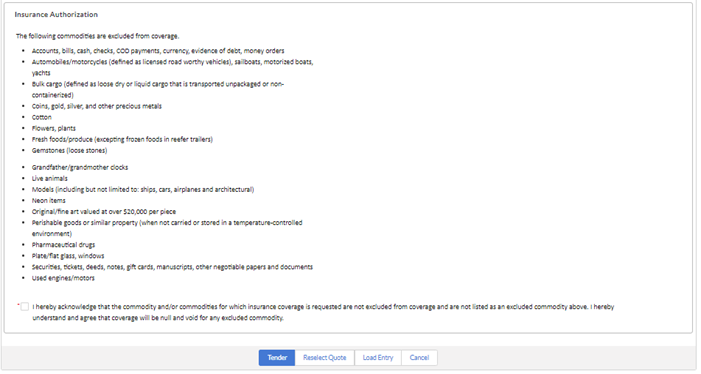
For configuration:
- Additional stop fields can be added using Stop field set TMS10 (mode specific field sets supported).
- Additional line item fields can be added using Line Item field set TMS4.
- Additional load fields can be added using Load field set TMS7 (mode specific field sets supported).
- See Load Entry References section for setting up dynamic load references.
Tender Failures
If the tender fails for some reason, the customer is NOT made aware of this fact. The behavior of the portal is the same whether the tender succeeds or fails – as it is assumed that the failure of a valid quote’s tender operation is a technical “glitch” that can be resolved.
The Load remains in Quotes Received status, and an alert email is sent to the designated address:
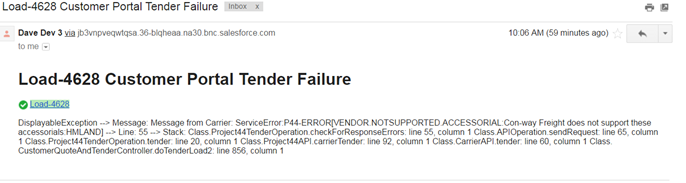
The same behavior is mimicked for API insurance authorization. If the API insurance authorization fails, the customer will not see the error and an alert email is sent to the designated address.
Pending Loads
The Pending Loads component allows users to see their pending loads and can be used on any page. Load details can be accessed using the link or the Quote Wizard can be navigated to using the action column. Additional load fields can be added to the table using Load field set TMS22. Loads must meet the following conditions to be included:
- The customer matches the user’s contact Account Id field.
- The Sales Status is pending.
- The Load Status is unassigned, quotes requested, or quotes received.
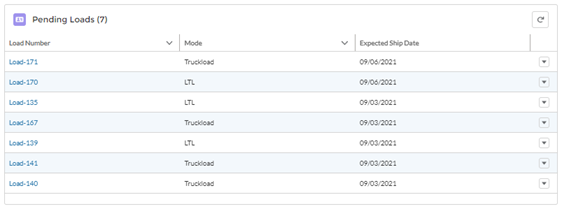
Load Options
The Load Options component allows users to view/send load documentation, clone loads, and access the Quote Wizard with the load.
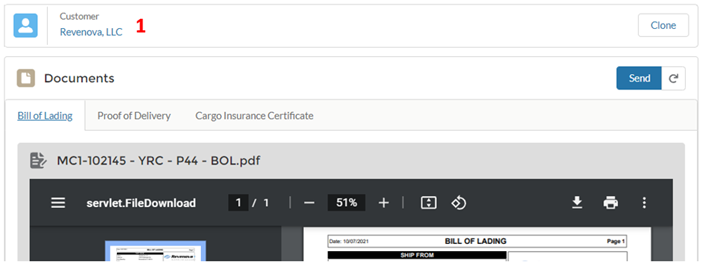
For configuration:
- Additional load fields can be added using Load field set TMS23.
For the document tabs:
- The Bill of Lading tab retrieves one non-carrier, non-signed BOL.
- The Proof of Delivery tab retrieves all applicable PODs (see Customer-Specific Invoice Attachments section).
- The Cargo Insurance Certificate tab retrieves one insurance certificate (only Falvey certificates supported).
All documents available in the tabs are available for sending via email.
The component can only be used on the Load Detail page and must be configured as below:
Load Entry References
Dynamic load entry references can be created for customer and shipper/consignee transportation profiles which in turn can be populated by customer portal users in the Quote Wizard. Load Entry References can be created by using the Load Entry References related list under customer and shipper/consignee transportation profiles. For each reference:
- The Type field dictates when the reference is applicable and will appear in the portal:
- “Customer” if the account is the customer on the load.
- “Pickup” if the account is the location on a pickup stop.
- “Delivery” if the account the location on a delivery stop.
- The Label field represents the type of reference (values can be added to this picklist)
- The Required field determines if the reference needs to be filled out before a user can tender a load
Users in the portal will be able to populate values for the references, add additional references, and/or delete references as needed. Required references cannot be deleted and require a value before tendering a load.
When a user tenders a load, any references with values will be converted into Load References with the appropriate load/stop populated. The values map over as follows:
- Load Entry Reference Type field => Load Reference Type field.
- Load Entry Reference Label field => Load Reference Label field.
- User input value => Load Reference Value field.
API Insurance
If an API Insurance integration is enabled, customer portal users will be able to request and authorize additional insurance in the Quote Wizard. Currently only Falvey is supported.
When a user creates a load and checks the Show Cargo Insurance Options, the cargo value field becomes required before getting quotes or saving the load, the Cargo Insurance Offered field on the load will be checked, and (if getting quotes) the price of the insurance will be listed.
If a user opts for the insurance, an additional panel will be displayed on the Quote Wizard Tender Page with a check box that must be checked prior to tendering the load. Please note that some insurance APIs have restricted cargo which will not be covered; this is NOT enforced by Revenova. It is crucial that the Cargo Insurance Excluded Commodities and Cargo Insurance Authorization fields are configured properly so the users are aware of the restrictions.
Upon successfully tendering a load and authorizing insurance, the following will occur:
- The Insurance Policy Status field on the load will be set to Authorized.
- The Insurance Policy Status as of field on the load will be set to the current time.
- An accessorial with the price of the insurance will be added to the customer quote where the accessorial is determined by the Cargo Insurance Accessorial field under TMS Admin🡪Configuration.
- An insurance certificate will be generated on the load.
In the event of insurance authorization failure, an email with the error will be sent to the designated email and the Cargo Insurance Authorized field will still be checked. Please note that the insurance authorization can still go through even if the tendering to the carrier fails.
Customer Portal Queue
If the Review Before Tender field on a user’s record is checked, the tender buttons’ behavior on the Quote Wizard will be modified as follows:
- The load will not be tendered.
- The selected carrier quote will be accepted (LTL only).
- The Review Before Tender field on the load will be checked.
- The Review Before Tender Message will be displayed to the user instead of the normal message.
- If insurance was requested:
- The Insurance Policy Status field on the load will be set to Authorized.
- The Insurance Policy Status as of field on the load will be blank.
The user will no longer be able to access the load with the Quote Wizard and an internal user will be required to tender the load and authorize the insurance if applicable. Custom flows and triggers can be used based off the Review Before Tender field on the load to set notifications or queues.
Customer Portal Threshold Parameters
- Three threshold parameters are available in the Portal section of the Customer Transportation Profile record:
- Portal Quote HU Count Threshold
- Portal Quote Weight Threshold
- Weight Units
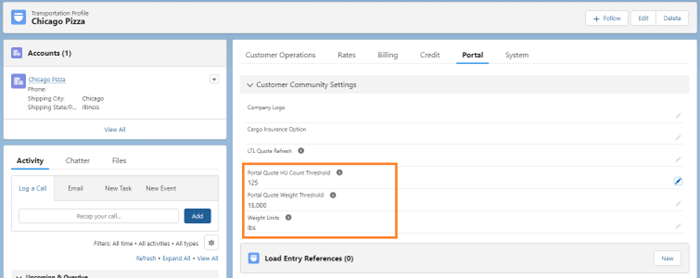
- When either one of the two threshold values is exceeded, the customer will not be able to tender the load from the customer portal. The carrier quote list page will be skipped, and the user will navigate to the Finalize Load Details page where they will see a message at the top of the page:
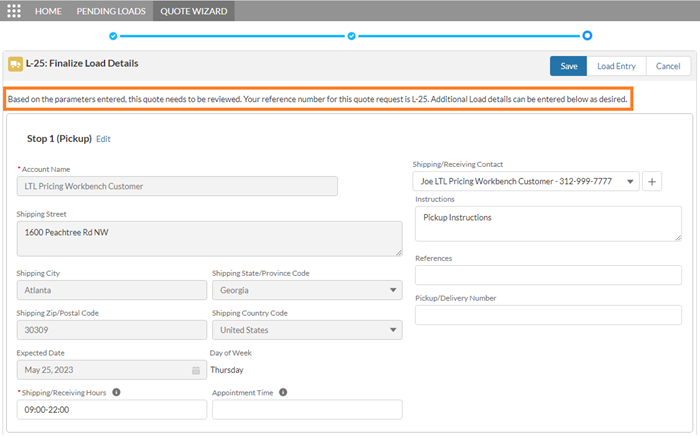
- The default threshold message can be customized in the Customer Portal Configuration section of the Configuration page:
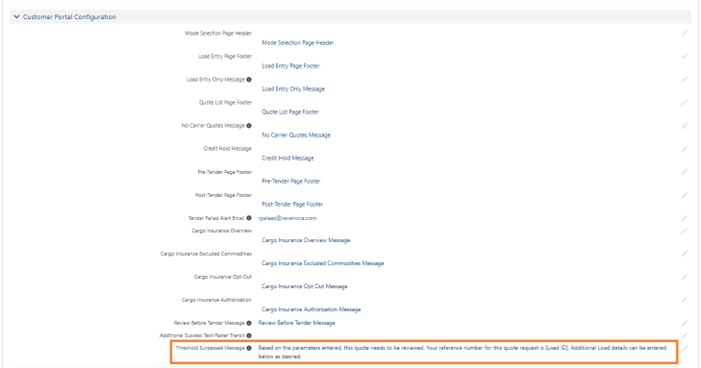
- An internal user will need to review and tender the load.
Carrier Self-Service Portal
The carrier self-service portal provides the following capabilities to participating carriers:
- View load board of available loads and submit quotes for these loads.
- Maintain a list of truck/equipment postings, match them to available loads, and submit quotes for these loads.
Portal Setup
- Set up a community for carriers using a Lightning template.
- Assign the TMSCarrier Community with Login permission set to community users.
- Expose the following Visualforce pages to users from links on the home page:
- CarrierLoadBoard
- CarrierTruckPosting
- Expose the following Visualforce pages to users as subtabs on a Load page layout:
- CarrierLoadTracking
- CarrierQuoteSettlement
- Note that the Carrier Portal field needs to be checked for a load to be visible on the CarrierLoadBoard or CarrierTruckPosting pages.
Container Tracking
Containers can be associated with loads and also tracked via the Project44 Unified Tracking API.
Container Tracking Setup
- Two tables – Container and Container Console Configuration – support container tracking. Provide CRUD access to these tables as appropriate, and add the Container Console tab access as appropriate.
- There is also a Containers tab for bulk actions on container records.
- Add every port that might be a port of load or port of discharge as an account with TMS Type of Seaport. Make sure to enter the Timezone and UN Location Code for each port.
- If there are any missing time zones add them to the Timezones picklst value set. Use the IANA time zone codes only.
- Note that accounts of type Seaport refer to the generic seaport in question. Accounts of type Seaport Terminal refer to actual locations within the port that dray drivers will be directed to.
- Add the Containers related list to the Load page with a mode-based visibility filter.
- Add to the page and check the Show Containers on Load Creation checkbox for each Mode record that requires container data entry during load creation.
- Populate the following Container Field Sets as appropriate:
- TMS1 – Default Container fields entered during load creation.
- TMS2 – Default Container fields that appear on documents.
- You can create mode-specific versions of these field sets. Name them by concatenating the mode name to the field set name. For example, “TMS1_Truckload.”
- The Load Map component includes a “Show Containers” icon button and breadcrumb map when a load has containers associated with it.
- From TMS Admin🡪Credentials enter credentials for the Project44 Tracking API (Unified Tracking API).
- Note that the webhook URL for Unified Tracking is automatically provided in the code. You also need to alert P44 to the webhook as they have to provision it (for some reason) on their side.
- Container date, time, and status updates are provided via the API “push” mechanism.
- Note that the following PDF documents support an optional Containers section:
- Customer Rate and Load Confirmation
- Carrier RFQ
- Carrier Rate and Load Confirmation
- Driver Load Confirmation
- To start tracking a container:
- A valid Container Number or Booking Number, and SCAC must be provided.
- Change the Tracking field to On and save the record.
- The Queued Transaction Job will initiate the tracking session with Project44.
- The Container Tracking Provider and Tracking Number fields will be populated if the tracking session is properly initiated.
- Container status updates arrive via the “push” API mechanism.
- Note that container tracking is independent of load tracking. For example, you may track (via Project44) the container from Port of Hong Kong to Port of Long Beach, and then track the (dray) load from Port of Long beach to the Consignee using Macropoint.
- Change the Tracking field to Off to terminate tracking on a container.
Load Status Field Transitions
The Load Status field value can change automatically as a load moves through its lifecycle, as follows:
- New load: Unassigned
- Load with outstanding carrier RFQ(s): Quotes Requested
- Load with carrier quote(s): Quotes Received
- Load tendered to carrier: Tendered
- Load with tender accepted by the carrier: Assigned
- Load with tender declined by the carrier: Declined
- Load with First Stop Carrier ETA Date populated: Dispatched
- Load with First Stop Arrival (or) Departure Date populated: In Transit
- Load with Last Stop Arrival (or) Departure Date populated: Delivered
Of course, this field can be set manually by the user if process automation is not used for a process step or steps.
Tender Hold
The carrier quote Tender Hold and Tender Hold Reason fields allow for the injection of custom carrier tender/assign prevention. If the Tender Hold field is checked a load cannot be tendered or assigned to the carrier on the quote.
Rebate Programs
Rebate programs can be set up under TMS Admin🡪Rebate Programs and enabled with the Customer Rebates Enabled field under TMS Admin🡪Configuration. The Rebate Program Name, Description, Type, and Rebate Recipient (Account lookup) can be specified for a program and is used for informational purposes. Under each rebate program there can be one to many rebate program entries which determine the calculation of the rebate based on the Rebate Percent. Additionally, a Mode can be specified for a rebate program entry to make the entry mode specific (based on the load’s mode); if no Mode is specified the entry is applicable to all modes. Mode specific entries will take priority over non-mode specific entries.
A rebate program can be linked to a customer using the Rebate Program field on the customer’s transportation profile. Customers that are linked to a rebate program will have a rebate calculated for them when their customer quote is won and a matching entry is found.
Rebate information is stored on the customer quote using the following fields:
- Rebate Amount – calculated based on the matching entry Rebate Percent times the quote pre-tax total.
- Rebate Program Entry – lookup to the matching entry that was used to calculate the Rebate Amount.
- Rebate Program Invoice – lookup that can be used to capture the vendor invoice that paid out the rebate.
Fuel Card Management
The Fuel Card object is used to store and manage EFS fuel cards within the TMS. In addition to storing the fuel card information, cash advances and transactions are also stored for the fuel cards.
The names of fuel cards are automatically set using the Driver field and Alternate Card Number field if populated. This can be disabled by checking Disable Fuel Card Auto-Naming under TMS Admin🡪Configuration.
To properly link a fuel card to EFS the Alternate Card Number field must be populated with the Driver Id of the fuel card as found in EFS. Additionally, EFS credentials must have Fuel Cards checked under TMS Admin🡪Credentials.
Table Definitions
- Fuel Card – The fuel cards
- Fuel Card Advance – Funds issued to a fuel card from the TMS
- Fuel Card Transaction – Transactions for a fuel card
- Fuel Card Transaction Line Item – Line items for a fuel card transaction
Fuel Card Banner
The Fuel Card Banner is the primary component for performing actions on a fuel card and is located on the fuel card page layout.

From the banner the following actions can be performed:
- Activate, Deactivate, or Place a Hold on the fuel card:
- The buttons will vary based on the Status field of the fuel card.
- If a card is deactivated it cannot be reactivated from the TMS.
- A new pin can be set for a fuel card using the Reset Pin button:
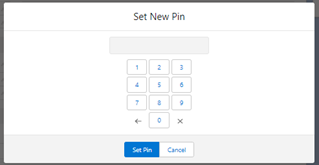
- The fuel card info can be retrieved from EFS and updated in the TMS using the Get Card Info button.
- Funds can be issued to a fuel card using the Issue Funds button:
- A Fuel Card Advance record is created for the fuel card.
- A confirmation number is returned by EFS and stored in the advance.
- Funds will be issued in the org’s default currency which must match the EFS billing currency otherwise there will be a currency mismatch.
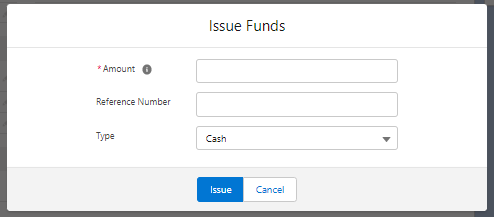
- If multiple applicable EFS credentials are present, a picklist will be available for setting the EFS account for the fuel card. The EFS account/credential is stored in the Credentials Record Id field on the fuel card.
Fuel Card Transactions Job
The Fuel Card Transactions Job is a batch job that retrieves fuel card transactions from EFS and associates them to fuel cards in the TMS. The job:
- Runs every three hours.
- Retrieves the last three hours of transactions.
- Creates fuel card transactions and line items.
- Update the Last Used Date and Last Transaction fields for applicable fuel cards.
- Runs multiple passes if multiple applicable EFS credentials present.
The job can be scheduled or manually ran from the Job Monitor component. If manually running the job:
- A start and end time must be specified.
- The timeframe cannot exceed six days.
- The job will not reschedule itself.
- An existing job cannot be in process.
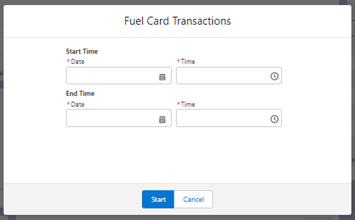
Data Model
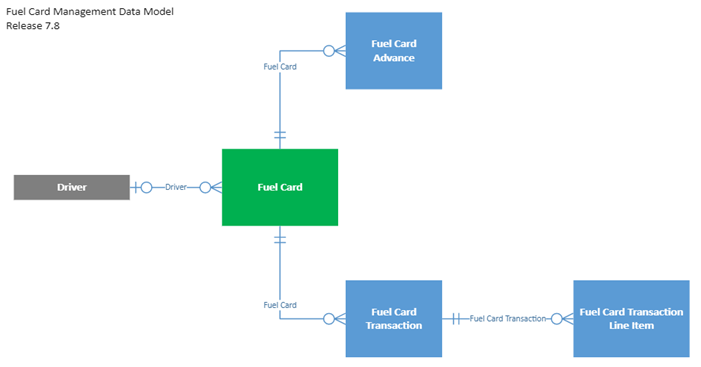
File Export Definitions
You can create a .csv file export definition via the File Export Definitions tab. This feature is available to generate Customer Invoice Export files in a .csv format.
The Customer Invoice Export File is made up of load, Stop, Line Items and Customer Invoice records. You will need to work with your project manager to create the File Export Definition once you know what you want your .csv file to include.
PerformanceIQ
PerformanceIQ is a home page component for monitoring org limits and TMS batch jobs:
.png?sv=2026-02-06&spr=https&st=2026-07-04T23%3A38%3A45Z&se=2026-07-05T03%3A22%3A45Z&sr=c&sp=r&sig=rES11nFGXeAMxZFmN8b6eVx7wLYA2L%2F2seEkbaOBcO4%3D)
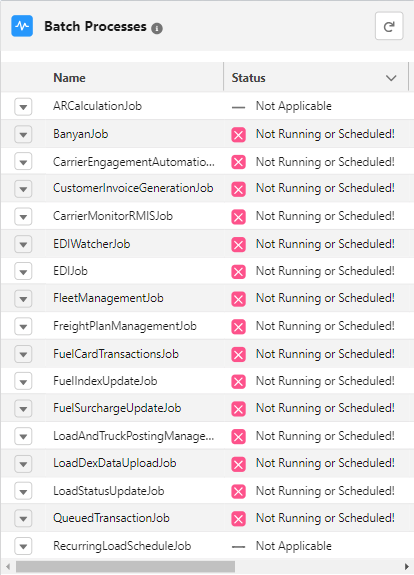
Using the settings button of the component the following can be done:
- A notification email can be set.
- Org limits and batch jobs can be selected for display.
- Org limits and batch jobs can be selected for monitoring.
- Notification threshold percentages can be set for org limits.

Monitored org limits and batch jobs will be checked several times a day and an alert email will be sent to the notification email if there are any problems. The alert email can capture the following:
- Org limits that have exceeded their notification threshold percent.
- Batch jobs that are not running.
- Batch jobs that are past their expected start time (10+ minutes).
- Batch jobs that have been running for an extend length (24+ hours).
Blue Yonder
The Blue Yonder integration allows Blue Yonder customers to create, rate, and tender loads in the TMS. Creation and tendering of loads are initiated by Blue Yonder and handled by a Connected App and REST based classes within the TMS. Returning of rates to Blue Yonder is handled by an outbound API call from the TMS to Blue Yonder.
Connected App Setup
To setup a Connected App follow the steps below:
- Create a new user where:
- First Name: “Blue”
- Last Name: “Yonder”
- Email: Set to the system admin’s email
- Username: Change if necessary
- User License: “Salesforce”
- Profile: “Standard User”
- Add the TMS Blue Yonder API permission set to the created user.
- Under Setup🡪OAuth and OpenID Connect Settings enable Allow Authorization Code and Credentials Flows.
- Under Setup🡪App Manager click New Connected App.
- Enter the following information and click Save:
- Connected App Name: “Blue Yonder”
- Contact Email: System admin’s email
- Enabled OAuth Setting: Checked
- Callback URL: “https://login.salesforce.com/”
- Selected OAuth Scopes: Add “Manage user data via APIs (api)”
- Enable Client Credentials Flow: Checked
- Navigate to Setup🡪App Manager and in the Blue Yonder app’s row, click the chevron and go to View.
- Go to Trusted IP Range for OAuth Web Server Flow click new and add the following IP ranges:
- Start/end 20.122.40.48
- Start/end 52.177.14.131
- Start/end 52.247.78.106
- Click Manager Consumer Details to access the Consumer Key and Consumer Secret which will need to be provided to Blue Yonder.
- Click Manage at the top of the page.
- Click Edit Policies on the next page.
- Under Client Credentials Flow Set Run As to the Blue Yonder user that was created.
- The following endpoints will need to be provided to Blue Yonder. Note that “{domain}” can be found under Setup🡪My Domain Settings🡪Current My Domain URL.
- OAuth authorization endpoint: https://{domain}/services/oauth2/token
- Quote request endpoint: https://{domain}/services/apexrest/rtms/blueyonderloadservice
- Tender request endpoint: https://{domain}/services/apexrest/rtms/blueyondertenderservice
Additional Configuration
The following should be configured as well before utilizing Blue Yonder:
- Customer Blue Yonder Ids should be populated on the Blue Yonder Id field on the customers’ transportation profiles. This will link the Blue Yonder customer to the account in the TMS, otherwise an error will be thrown.
- The Blue Yonder Code and Blue Yonder Mode should be set for each equipment type in the TMS. The Blue Yonder Code will link the Blue Yonder equipment type code to the equipment type in the TMS and the Blue Yonder Mode will set the corresponding mode on the load.
- An API accessorial with the API Provider as Blue Yonder should be created for each accessorial Blue Yonder can provide. If Blue Yonder includes an accessorial and an API accessorial is not found, the system default with be used.
- If customer tendering is done through EDI instead of through Blue Yonder:
- The EDI Tenders should be checked under the Blue Yonder credentials.
- EDI locations should be created for the relevant Blue Yonder customers.
Flow
The diagram outlines the flow of a Blue Yonder load in the TMS:
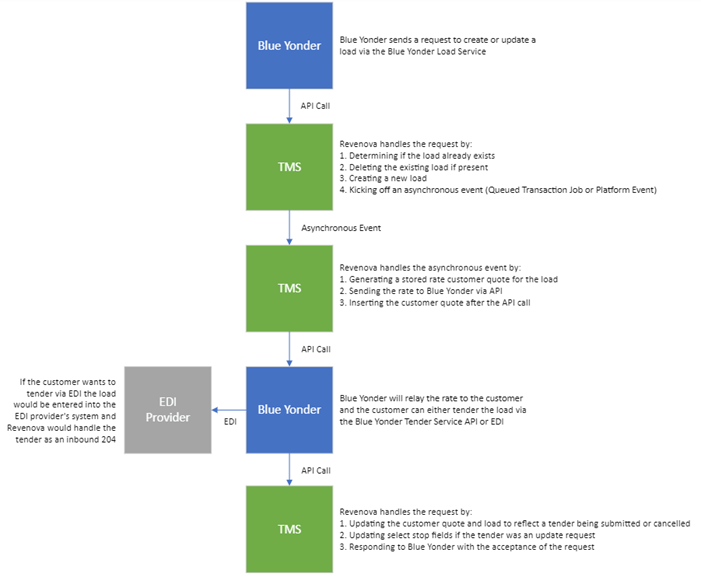
Field Set Summary
Field sets are used to provide flexibility in what fields are present in certain pages. The following table summarizes field set usage in TMS:
| Table | Name | Purpose | R* | M* |
|---|---|---|---|---|
Account | TMS1 | Additional new customer fields during new load entry. | Y | N |
Account | TMS2 | Additional new shipper/consignee fields during new load entry. | Y | N |
Account | TMS3 | Used in consolidated invoice header section. | N | N |
Account | TMS4 | Used for customer/location lookup to define "name" search fields. | Y | N |
Account | TMS5 | Customer/Location search results additional fields. | Y | N |
Carrier Quote | TMS1 | Currently unused. | N | N |
Carrier Quote | TMS2 | Used for adding fields to the carrier RFQ response page | Y | N |
Carrier Quote | TMS3 | Used for carrier quote entry/display on the Freight Quote Assistant LWC and page. | N | Y |
Carrier Quote | TMS4 | Used to support a flexible carrier quote list on the Freight Quote Assistant | N | Y |
Carrier Quote | TMS5 | Used for adding additional fields to the freight quote assistant Carrier Quotes subtab and the Carrier Quote List LWC | N | Y |
Carrier Quote | TMS6 | Used for adding additional fields to the customer portal quote list in the Quote Wizard. | N | Y |
Carrier Quote | TMS7 | Used for adding additional fields to the Carrier Banner LWC. | N | Y |
Carrier Quote | TMS8 | Used for adding additional columns to customer view list on the Carrier Quote List LWC. | N | Y |
Carrier Service | “FQA” | User-created field set for showing additional search result fields when searching for carrier services in the Freight Quote Assistant. | N | N |
Carrier Service | TMS1 | Used to add search fields when searching for carrier services in the Freight Quote Assistant. | N | N |
Commodity | TMS1 | Used for commodity catalogue lookup for internal and customer users | N | N |
Contact | TMS1 | Additional new customer contact fields displayed during new load or customer quote entry. | Y | Y |
Contact | TMS2 | Additional new shipper/consignee fields during load/stop entry. | Y | Y |
Contact | TMS3 | Additional new contacts fields displayed on the Send Email LWC. | Y | N |
Container | TMS1 | Used to enter container information during new load creation | N | N |
Container | TMS2 | Defines container fields that appear on PDF documents | N | N |
Customer Invoice | TMS1 | Used to define columns in the customer invoice batch header page. | N | N |
Customer Quote | TMS1 | Used in Freight Quote Assistant page and LWC when entering Customer Quote information. | Y | Y |
Customer Quote | TMS2 | Used to support rerate/rebill. | N | Y |
Customer Quote | TMS3 | Used for adding additional fields to the Customer Banner LWC. | N | Y |
Driver | TMS1 | Used to add filter parameters to Dispatch Console driver filter. | N | N |
Line Item | TMS1 | Default entry/display fields on Load Detail Widget. | Y | Y |
Line Item | TMS2 | Currently unused. | N | N |
Line Item | TMS3 | Used to synchronize changes to a line item in a freight plan with other “sibling” line items. | N | N |
Line Item | TMS4 | Used to add fields to the line item table on the Quote Wizard tender page. | N | N |
Line Item | TMS5 | Used on Freight Plan Console customer line item list for 'flex' fields. | N | N |
Line Item | TMS6 | Default entry/display fields on the Quote Wizard. | Y | Y |
Line Item | TMS7 | Default entry/display for quick load entry. | N | Y |
Load | TMS1 | Used during entry of a new Load by LWC. | Y | Y |
Load | TMS2 | CURRENTLY UNUSED | N | N |
Load | TMS3 | Used by Load Dynamic Widget. | N | Y |
Load | TMS4 | Used by load clone operation to copy custom fields to the cloned load. | N | Y |
Load | TMS5 | Used to add fields to the Load Detail stop status popup. | N | Y |
Load | TMS6 | Used during Load Clone operation to display fields that can be changed on clones. | N | Y |
Load | TMS7 | Used to add fields to the bottom of the Quote Wizard tender page. | Y | Y |
Load | TMS8 | Used to define columns to display on Internal Load Board. | N | N |
Load | TMS9 | Used to define filter fields for Internal Load Board. | N | N |
Load | TMS10 | Used during entry of a new Load by Quote Wizard. | Y | Y |
Load | TMS11 | Used to support rerate/rebill. | N | Y |
Load | TMS12 | Used on Carrier Quote LWC for four-column header section. | N | N |
Load | TMS13 | Used on Carrier Quote LWC for one-column header section. | N | N |
Load | TMS14 | Used to define load columns on customer invoice batch header page. | N | N |
Load | TMS15 | Used to define which custom fields are blanked out during Remove Carrier operation. | N | N |
Load | TMS16 | Used for adding additional fields to the Carrier Banner LWC. | N | Y |
Load | TMS17 | Used for adding additional fields to the Customer Banner LWC. | N | Y |
Load | TMS18 | Used for adding additional fields to the Load Banner LWC. | N | Y |
Load | TMS19 | Used to pass references to HubTran. | N | N |
Load | TMS20 | Used to add filter parameters to Dispatch Console load filter. | N | N |
Load | TMS21 | Used to add fields to display in the Carrier Remit To Admin LWC | N | N |
Load | TMS22 | Used for adding additional fields to the Pending Loads LWC. | N | N |
Load | TMS23 | Used for adding additional fields to the Load Options LWC banner. | N | N |
Load | TMS24 | Used to display additional fields in the Auto Load Creation Settings section of the Freight Plan Console Template panel. | N | Y |
Load | TMS25 | Used to display additional columns in the customer load list of the Freight Plan Console in the absence of a filter. | N | N |
Load | TMS26 | Used to display additional columns in the carrier load list of the Freight Plan Console in the absence of a filter. | N | N |
Load | TMS27 | Used to display additional fields when creating carrier loads in the Freight Plan Console. | N | N |
Load | TMS28 | Used to display additional filter fields in the Truck Load Match tool | Y | N |
Load | TMS29 | Used to display additional display fields in the Truck Load Match tool | N | N |
Load | TMS30 | Used on Carrier Tender Accept/Decline LWC for four-column header section. | N | N |
Load | TMS31 | Used on Carrier Tender Accept/Decline LWC for one-column header section. | N | N |
Load | TMS32 | Used on Carrier Tender Accept/Decline LWC for additional load input fields. | Y | N |
Stop | TMS1 | Used in Load creation LWC for new stop entry. | Y | Y |
Stop | TMS2 | Used to pass references to HubTran. | N | N |
Stop | TMS3 | Used to define the stop header fields displayed | N | Y |
Stop | TMS4 | Used in the Quote Wizard for new stop entry. | Y | Y |
Stop | TMS5 | Used to support rerate/rebill. | N | Y |
Stop | TMS6 | Used by load clone operation to copy custom fields to the cloned stops. | N | N |
Stop | TMS7 | Used for additional stop field capture in status popup on load detail page and LWC. | Y | Y |
Stop | TMS8 | Used during Load Clone operation to display fields that can be changed on clones. | N | N |
Stop | TMS9 | Used when creating carrier loads using the single freight plan page. Defines which additional fields are copied from the customer load(s) to the carrier load(s). |
| N |
Stop | TMS10 | Used to allow entry of stop fields on the tender page of the customer portal in the Quote Wizard. | N | Y |
Stop | TMS11 | Used to synchronize changes to a carrier load stop in a freight plan with sibling customer load stops. | N | N |
Stop | TMS12 | Used for stop data entry/viewing on the Stop Detail LWC widget. | Y | Y |
Transportation Profile | TMS1 | Optional fields for online carrier application. | Y | N |
Transportation Profile | TMS2 | Optional fields on header of Truck-Load Match page. | N | N |
Truck Posting | TMS1 | Used to configure the new record entry page. | N | N |
Vendor Invoice | TMS1 | Used to add fields to display in the Carrier Remit To Admin LWC | N | N |
R* -- Can set the Required attribute of fields in this field set.
M* -- Can be overridden by Mode specific field sets (e.g. “TMS1 Truckload”)
Multi-Currency Considerations
TMS can be used in both single- and multi-currency environments. When manually creating a record, the user is responsible for selecting the appropriate currency.
In multi-currency environments, the following currency code assignments occur for TMS auto-created records:
| New Record Type | Scenario | Currency Source |
|---|---|---|
Account | Online Carrier Application | Default |
Account | New Load Customer/Shipper/Consignee | Default |
Account | Customer Portal New Load Customer/Shipper/Consignee | Default |
Fuel Index History | EIA API Integration | Parent Index |
Load | New Load Widget | Default Load Currency Setting |
Load | Load Clone | Cloned Load |
Load | Customer Portal | Default Load Currency Setting |
Load | Carrier Load for Freight Plan | Default Load Currency Setting |
Load Accessorial | Accessorial addition | Parent Load |
Line Item | New Load Creation/Modification | Parent Load |
Freight Plan | Freight Plan Creation | First Customer Load Added |
Freight Plan Load | Freight Plan Creation/Modification | Parent Load |
Customer Quote | DB Stored Rate Quote Auto-Creation | Rate Entry |
Customer Quote | Quote auto-creation on Customer Portal | Customer Account |
Customer Quote Accessorial | Quote auto-creation on Customer Portal | Parent Quote |
Customer Quote Tax | Tax Calculation | Parent Quote |
Customer Invoice | Invoice auto-creation | Customer Quote |
Customer Invoice Accessorial | Invoice auto-creation | Parent Invoice |
Customer Invoice Tax | Tax Calculation | Parent Invoice |
Carrier Quote | DB Stored Rate Quote Auto-Creation | Rate Entry |
Carrier Quote | Email Loop RFQ | Carrier Entered |
Carrier Quote | New quote record in Freight Quote Assistant | Carrier (Service) |
Carrier Quote Accessorial | Quote auto-creation or accessorial add | Parent Quote |
Rate Entry | Stored Rate creation for Customer Transportation Profile | Transportation Profile |
Stop | New Load Creation/Modification | Parent Load |
Transportation Profile | Batch Transportation Profile Creation | “Parent” Account |
Vendor Invoice | Auto-creation based on Carrier Quote | Carrier Quote |
Vendor Invoice Accessorial | Auto-creation based on Carrier Quote | Parent Invoice |
The Load table financial fields, which represent currency rollups from child quote, invoice, and payment records, are automatically converted to the load record’s currency based on the exchange rate in force at the load’s expected ship date:
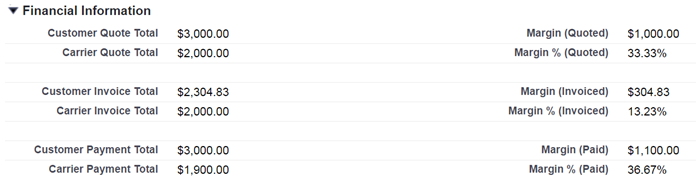
Geolocation Support
The TMS supports geolocation services via the following:
- Utilizing the platform geolocation support for account shipping addresses which auto-populate the ShippingLatitude and ShippingLongitude account fields.
- Make sure to turn on this feature from Setup🡪Data Management🡪Data Integration Rules.
- Populating the Stop table Geolocation field when a load is created with no-account stops.
- Utilizing account and stop geolocations when searching load/quote history on the Freight Quote Assistant.
- Populating Miles Away and Kilometers Away on stops for an in-transit load.
- Populating stop and driver locations on route maps.
- Geolocation-based truck posting search.
- Geolocation-based delivering load search.
State and Country Picklist Support
The TMS supports Salesforce environment with or without State and Country Picklists enabled. State and Country Picklists provide an error-proof mechanism for entering world-wide address information. Please see the Salesforce online help for more information on this capability.
This capability extends only to “native” Salesforce lead, account, and contact address fields. You may also add arbitrary state/province and country picklist values directly to the following TMS fields, as desired:
| Table | Field | Purpose |
|---|---|---|
Carrier Liability Limit | Country | Defines country where limit applies. |
Customs Broker | Origin Country | Define load origin countries handled by customs broker. |
Customs Broker | Destination Country | Define load destination countries handled by customs broker. |
Lane | Origin Country | Lane definition origin country. |
Lane | Origin State/Province | Lane definition origin state/province. |
Lane | Destination Country | Lane definition destination country. |
Lane | Destination State/Province | Lane definition destination state/province. |
Sales Tax | Origin Country | Origin country for taxation purposes. |
Sales Tax | Origin State/Province | Origin state/province for taxation purposes. |
Sales Tax | Destination Country | Destination country for taxation purposes. |
Sales Tax | Destination State/Province | Destination state/province for taxation purposes. |
Stop | State/Province | No-account stop location information. |
Stop | Country | No-account stop location information. |
Zone | State/Province | Zone definition location information. |
Zone | Country | Zone definition location information. |
There are also two global picklists that should be added to as above:
- Countries
- States
Accounting Seed Integration Support
The TMS provides a seamless integration with the Accounting Seed product, which is also a fully-native Salesforce platform product.
Functions and Features
TMS Accounting Admin Tab
The TMS Accounting Admin tab is used for one-time configuration activities:
- Defining default GL Codes, Products, and other global settings.
- Auto-linking Accessorial records to Products.
- Auto-linking Sales Tax records to Products.
Note that Accounting Seed utilizes the standard Salesforce Product table to map transactions to the appropriate general ledger accounts.
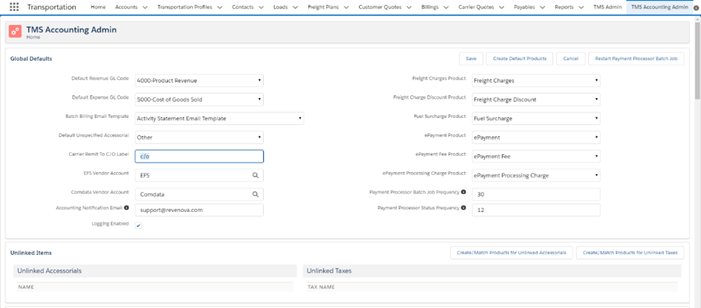
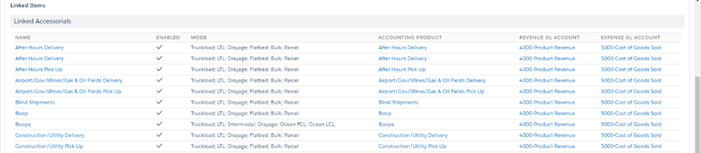
Auto-Creation of Invoices
The native TMS accounting process flow is as follows:
- Customer Quote 🡪 Customer Invoice
- Carrier Quote 🡪 Vendor Invoice
The Accounting Seed-based process flow is as follows:
- Customer Quote 🡪 Billing
- Carrier Quote 🡪 Payable
Note that the TMS invoice and payment tables are completely bypassed if Accounting Seed is employed.
Billings and Payables can be auto-created based on the triggering events set up from TMS Admin🡪Configuration:

You can also create a Billing from a Customer Quote related list by selecting the Customer Quote and clicking the Create Billing button:

You can also create a Payable from a Carrier Quote related list by selecting the Carrier Quote and clicking on the Create Payable button:

Credit Memo Auto-Application
When a load-specific Payable is posted, any outstanding Credit Memos for that load will be automatically applied to the Payable.
TMS Tax Calculation
If desired, the TMS can calculate sales taxes for Billings associated with – for example – a Canadian load:

Invoice Adjustment
Clicking the Adjust button on a Payable allows the user to simultaneously add adjustments to the customer and vendor invoices to deal with, for example, a detention charge.


Single Billing EDI Send
An EDI 210 invoice transaction can be initiated from the Billing page layout:
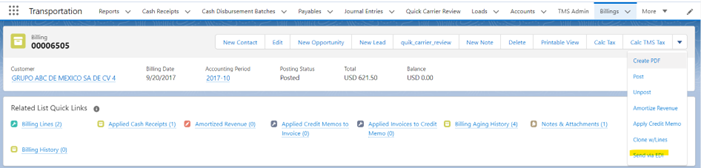
Batch Invoice Presentment
The user can select any number of Billing records and then click on the Send Invoices, which will send the invoices to the customer using their preferred billing method:
- EDI
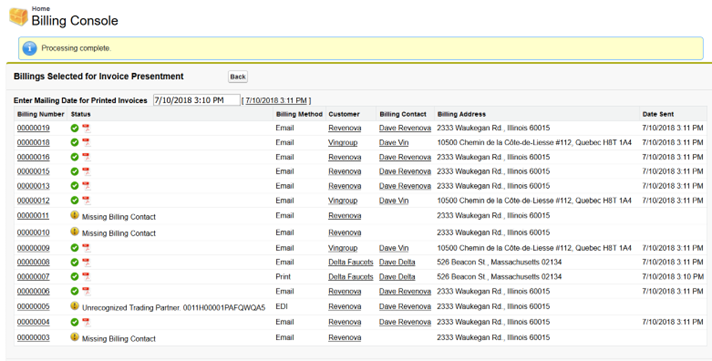
Dispute Management
Dispute fields on the Billing and Payable tables allow for the management of invoice-related disputes:
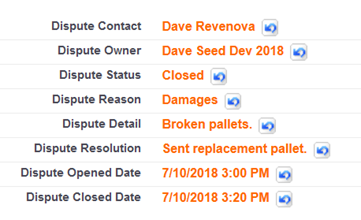
Batch Post/Unpost
The off-the-shelf batch post/unpost buttons provided by Accounting Seed do not always scale under heavy customization. Use the Batch Post and Batch Unpost list view buttons on the Billing and Payables objects to employ more scalable versions of these processes.
Batch Post and Pay
The off-the-shelf pay batch button provided by Accounting Seed does not always scale under heavy customization and requires posted payables to run. Use the Post and Pay list view button on the Payable object to pay approved and/or posted payables with a scalable process.
ePayment Support
ePayments can be made to vendors using a direct Comchek and EFS integrations:
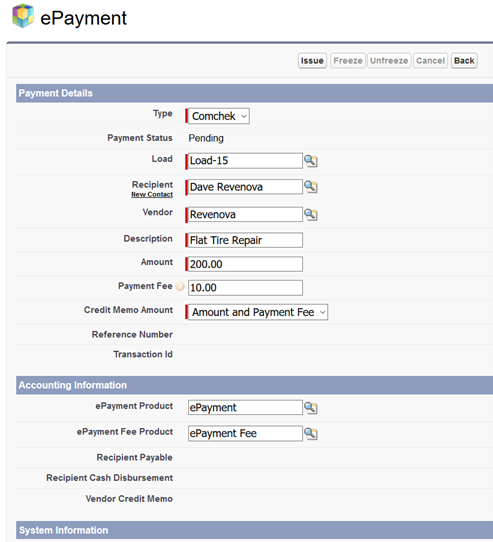
Supported functions include:
- Issuing a Comchek/MoneyCode to a recipient
- Freezing a Comchek
- Unfreezing a Comchek
- Cancelling a Comchek/MoneyCode
Accounting transactions are automatically created when a Comchek/Moneycode is issued (and deleted if it is cancelled):
- A Payable to the ePayment issuer.
- A Credit Memo to the vendor.
The Payment Fee is automatically calculated based on the Advance Payment Fee table entries.
Comprehensive A/R Calculation
A/R calculations for purposes of Credit Limits can include unapplied cash received from the customer:
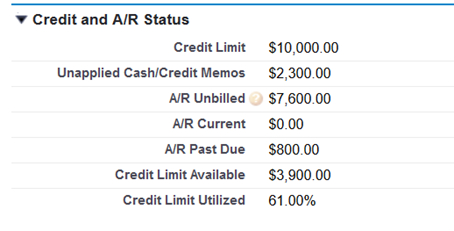
Carrier Quick Pay Support
Carriers can be enrolled in and participate in Quick Pay programs via the integration with TriumphPay. Quick Pay information is located on the payable and consists of these 10 fields:

A continuous batch process submits posted TriumphPay payables to the TriumphPay web portal where carriers can take payment. The Payment Processor Status button on the payable detail page and list view also allows retrieval of status information for a given payable. The batch process also retrieves status on a periodic basis.
The Submit to Payment Processor List and Detail buttons allows ad hoc submission of payables to the payment processor.
Note that none of the financial fields above have their final values until the Vendor Paid Date is populated.
These two fields on the TMS Accounting Admin page control the frequency of the batch process:

The CarrierSend account page widget allows the user to send carrier information to TriumphPay so they can be set up for subsequent invoices:
Integration Notes
- All Accessorial records must be associated with a Product via the Accounting Product field.
- All Sales Tax records must be associated with a Product via the Accounting Product field.
- Make sure that “Transportation” is a picklist choice for the Product Family field on the Product table.
ACH/NACHA Support
The product includes a sample NACHA File Definition that is used as the starting point and customized according to your bank’s NACHA file specification.
The process for configuring the TMS to generate a NACHA file is the following:
- Set up the payer (e.g., Revenova customer) and vendor (carriers and factoring companies) account records.
- For vendors and factor companies: set the Default Payment Method field to “ACH (NACHA File).” This will then set the “Payment Method” field on the payable record to “ACH (NACHA File)” when a payable is created for those vendors.
- Set up the Bank Account record for the Payer, the vendors who are getting paid directly, and the factoring companies.
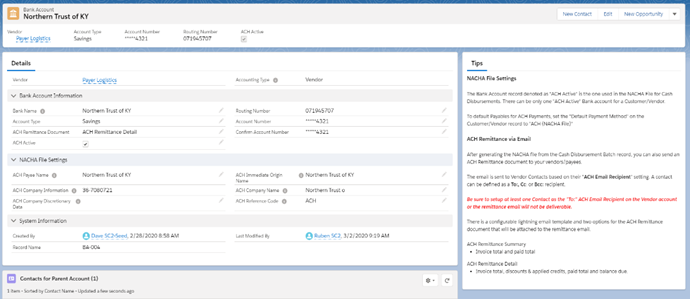
- Payer bank account record:
- Complete the “Bank Account Information” section. The “ACH Remittance Document" does not apply to this bank account record.
- Only the ACH Payee Name and ACH Company Information fields are needed in the “NACHA File Settings” section.
- Vendor/Factoring company bank account record:
- Complete the “Bank Account Information” section.
- Only the ACH Payee Name, ACH Immediate Origin Name, and ACH Company Name fields are needed in the “NACHA File Settings” section.
- The “ACH Active” field must be set to true (checked) for one bank account for the payer, each vendor that gets paid directly, and for each factoring company.
- The ACH Remittance Document (Detail, Summary, or Itemized) can be configured here to override the application-level setting in the TMS Accounting Admin page.
Note: vendors who get paid through a factoring company don’t need a bank account record setup.
- Payer bank account record:
- Set up the contacts for each vendor and factoring company.
- Set the “ACH Email Recipient” field to one of the following values: “To:”, “Cc:”, or “Bcc:.”
- Multiple contacts can be set up to receive the ACH email notification for each vendor or factoring company.
- Configure the NACHA section in the TMS Accounting Admin tab:
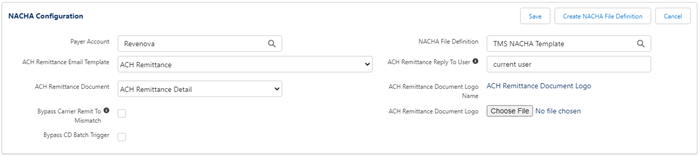
- Payer Account: set up per Step 1 above.
- ACH Remittance Email Template: an ACH Remittance email template is included in the package; a custom email template can be created and then configured here.
- ACH Remittance Document: global setting for what type of ACH Remittance document to send to the vendor. Three documents are included in the package: Detail, Itemized and Summary versions.
- Bypass Carrier Remit To Mismatch: when checked, the process will still create the NACHA file when Carrier Remit To on the Transportation Profile record of the carrier is different from the Alternate Payee of the Payable and corresponding Cash Disbursement.
- ACH Remittance Reply to User: set up who receives replies from the vendors and factoring companies that receive the ACH Remittance email. This can be the user who sends the ACH Remittance (current user) or a valid email address (e.g., an AP email address).
- Upload your company logo to include in the ACH Remittance Document.
- Payables: when a payable is created by the TMS, either through a load reaching the “Carrier Invoice Creation Trigger” configuration value or by setting the Settlement Status of a Carrier Quote to “Approved,” the “Payment Method” on the Payable field is set to the “Default Payment Method” of the vendor (account) record as previously noted.
Note: for the payable to be included in a NACHA file the “Payment Method” method field must set to “ACH (NACHA File).” - One or more list views will be created in your Payables tab based on your needs:
- NACHA – Ready for Approval
- NACHA – Ready for Posting
- NACHA - Ready to Pay
- When ready to pay payables via ACH/NACHA, go through the list views above:
- NACHA – Ready for Approval: the list will display the “ACH (NACHA File)” payables that need to be approved before posting and paying them:
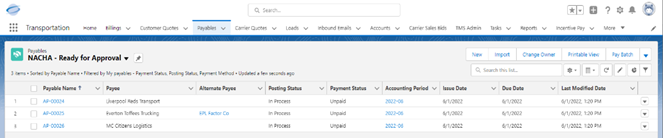
- Set the Posting Status to Approved:
 After clicking Save, the Posting Status is set to Approved:
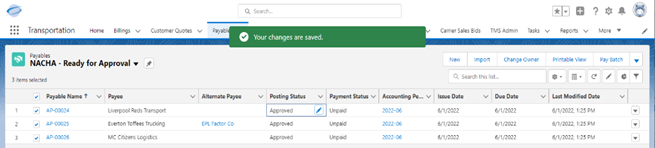
- Change the list view to “NACHA – Ready for Posting.”
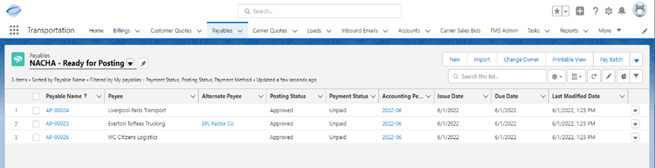
- Select the payables that are ready to be posted and paid from the list and click “Post and Pay” button:
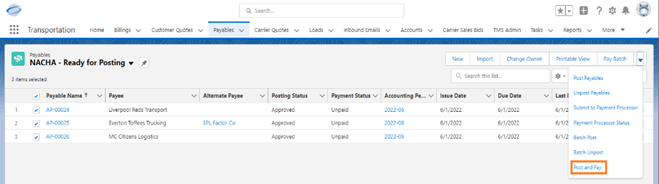
- The Pay Vendors page is displayed:
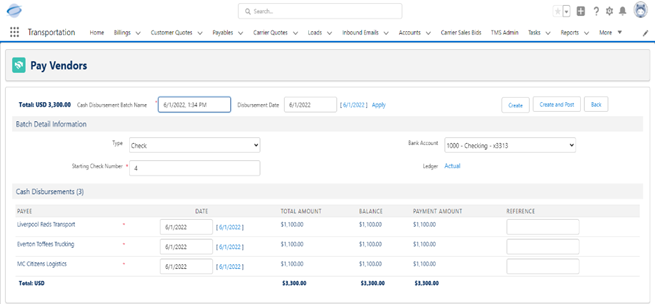
- Check with your bank as to whether you can upload ACH/NACHA files for payment on the same day. If you need to change the payment date, change the “Disbursement Date” to a future date:
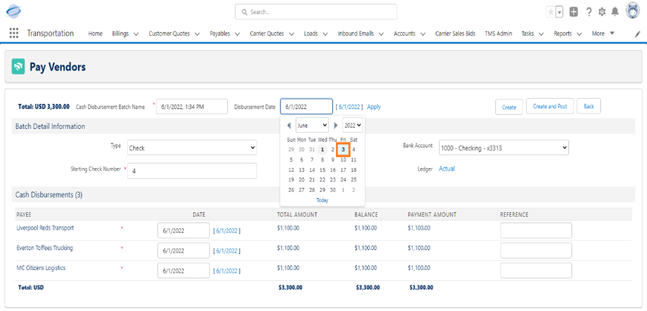
- Click the Apply link to change the Date on all Cash Disbursements on the list to that date:
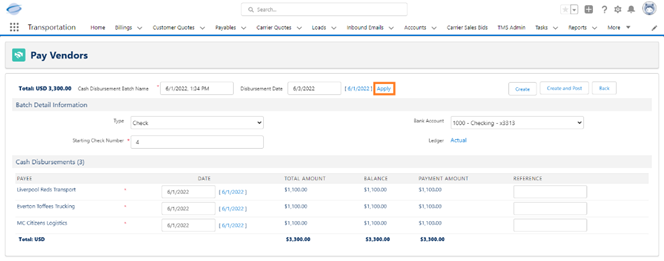
- Change the Type field to “Electronic” and click the “Create and Post” button to post and pay the payables:
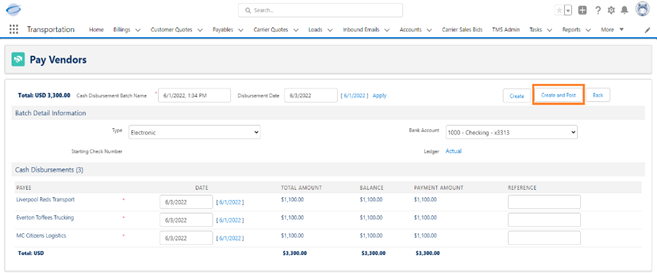
- The Pay Vendors page will show the status of the process of locking and posting the payables, creating and posting the cash disbursements, and unlocking the payables:
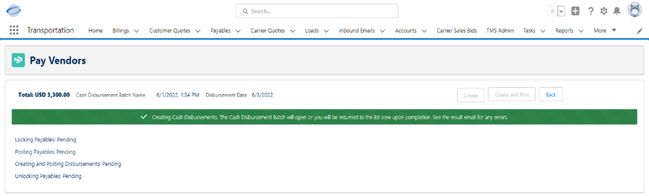
- NACHA – Ready for Approval: the list will display the “ACH (NACHA File)” payables that need to be approved before posting and paying them:
- The Cash Disbursement Batch record along with the Cash Disbursement records are created. The “Batch Type” needs to be set to “ACH (NACHA File)” to be able to generate the NACHA file:
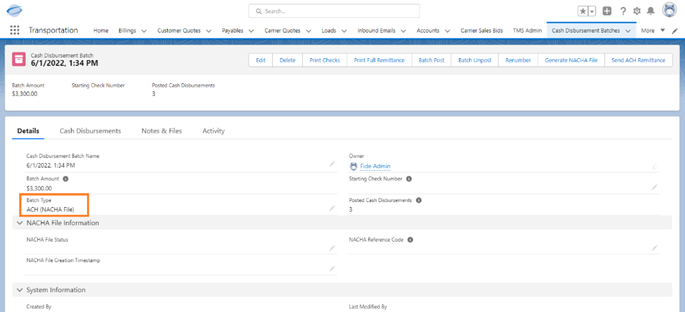
- Click on the “Generate NACHA File” button:
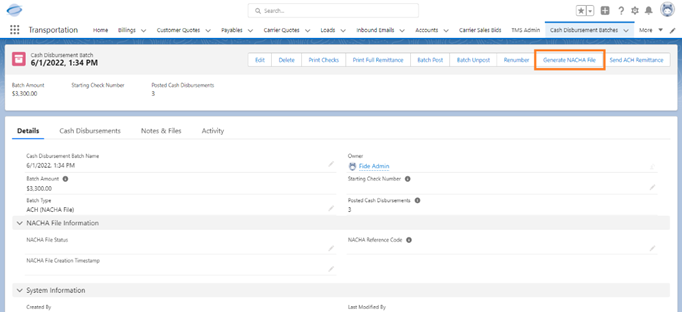
- The process that performs all the necessary validations and generates the ACH/NACHA file runs:
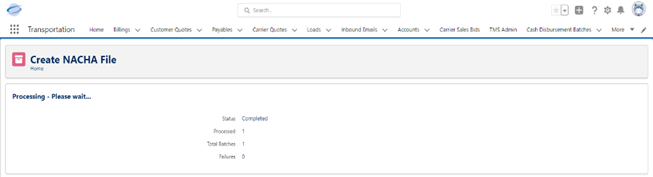
- When the process completes and the file is generated, the following message displays:
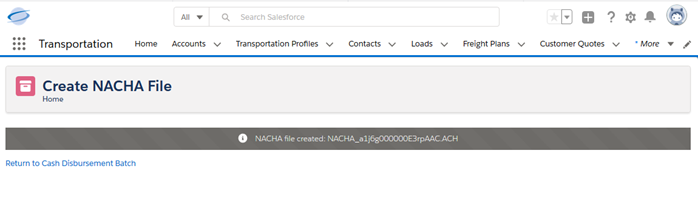
- The “NACHA File Status,” “NACHA Reference Code,” and “NACHA File Creation Timestamp” fields on the Cash Disbursement Batch are updated accordingly:
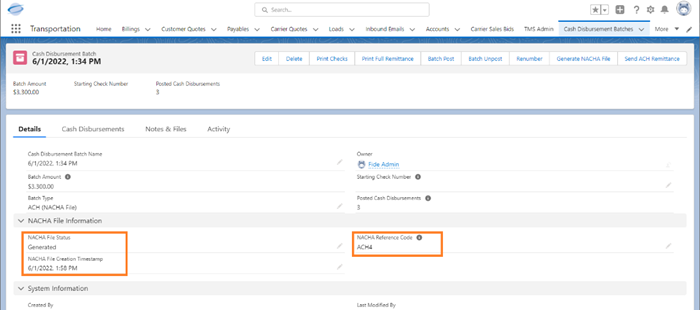
- The user will also receive an email confirmation for the generation of the NACHA file and the successful update of the “ACH Payment Info” and “Included in NACHA File” checkbox for all cash disbursements in the cash disbursement batch:
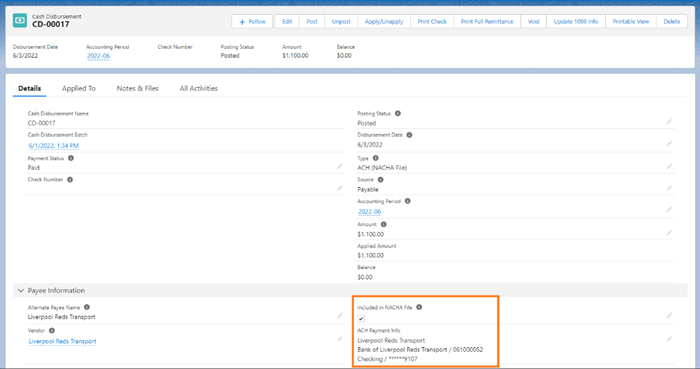
- Click on the NACHA file in the Notes & Files subtab and download it:
 Once uploaded to your bank's portal, set the “NACHA File Status” field of the Cash Disbursement Batch record to “Uploaded” and save the record:
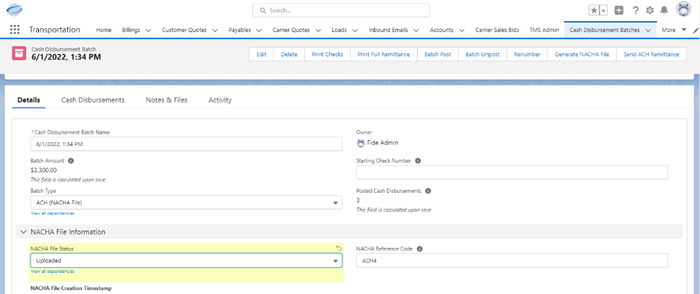
- Click on the “Send ACH Remittance” button on the Cash Disbursement Batch detail record:
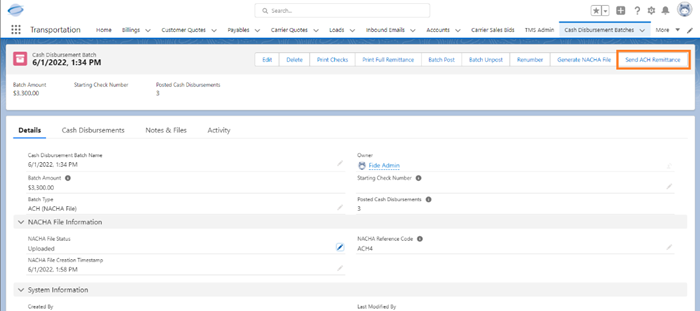
- If all validations pass, a batch job is submitted. The batch job sends an email to each vendor and an email to all factoring companies that will receive a payment via the ACH/NACHA file:
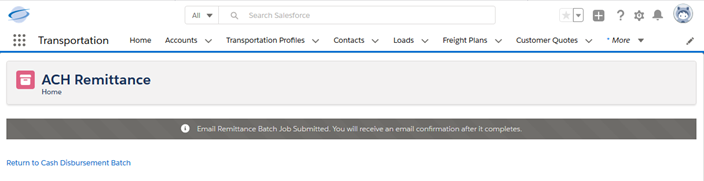
- Upon completion of the batch job, the “NACHA File Status” is set to Remitted:
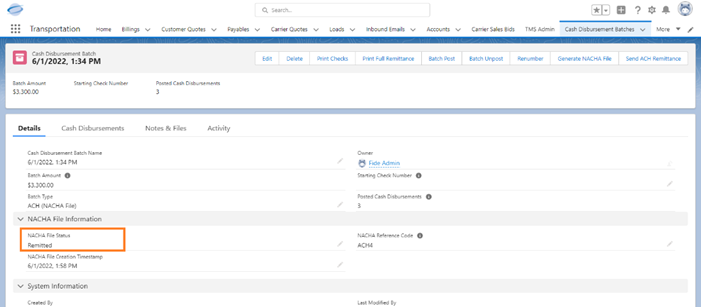
- Each Cash Disbursement will have an attachment created with the appropriate ACH Remittance Document for the vendor or factoring company (Detail, Itemized, or Summary):
- The ACH Remittance Detail document looks like this:
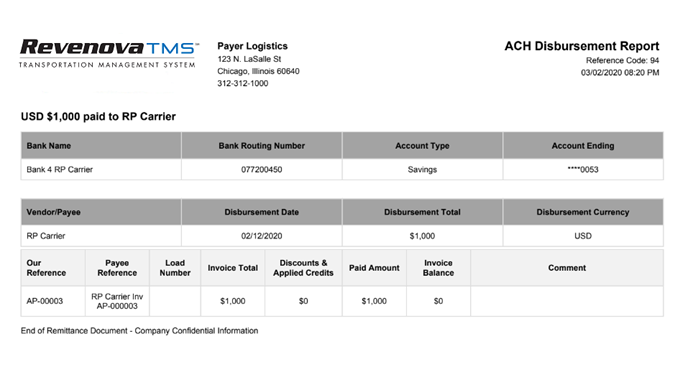
- The ACH Remittance Itemized document looks like this:
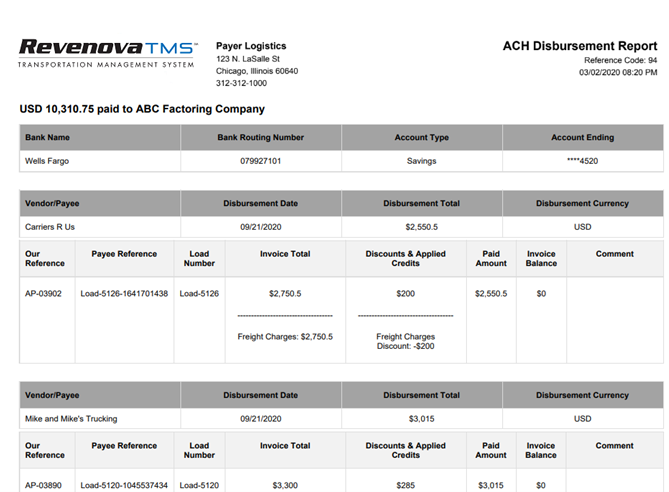
- The ACH Remittance Summary document looks like this:
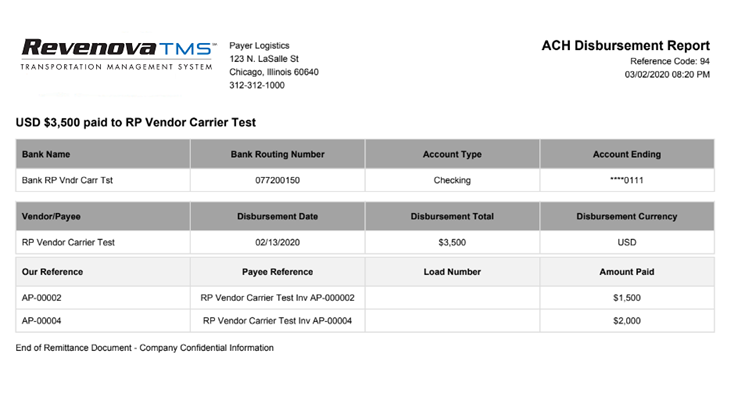
Fleet Management Module
The Fleet Management Module (FM) allows for the management of Drivers and Fleet Assets. FM allows TMS customers to conduct both their brokerage and “asset” business in one seamless application.
Table Definitions
- Fleet Asset – Tractors, Trucks, Trailers, and Chassis
- Driver – Drivers and Co-Drivers
- Driver Log– Driver HOS Log header records
- Driver Log Entry – Duty-Status detail for each driver log
- Incident– Traffic or personnel related incident
- Vehicle Involved – Vehicle involved in incident
- Person Involved – Person involved in incident
- Load Involved – Load involved in incident
- Violation – Traffic or other event resulting in a ticket/violation
- Service Order– Maintenance or Repair Order for Fleet Asset
- Service Order Item – Line item for Service Order
- Service Order Template– Maintenance or Repair Order Template for Fleet Asset
- Service Order Template Item – Line item for Service Order Template
- Service Item Master – Preconfigured Service Order line item
- Inspection Report– Driver or Inspector inspection report
- Checklist Item – Line item for Inspection Report
- Inspection Report Template– Driver or Inspector inspection report template
- Inspection Report Template Item – Line item for Inspection Report Template
- Fleet Assignment – Marriage of Load, Driver, and Fleet Asset
- Dispatch Console Filter – Load and Driver Filter definitions for the Dispatch Console
- Account ELD – Location synchronization table with Samsara
- Fleet Calendar Entry – Company, Fleet Asset, and Driver calendar entries.
Additional Fields
The following fields from should be added to existing layouts/profiles to support FM:
- Account Table
- Timezone
- Load Table
- Fleet
- Team
- Relay
- Driver Assignment Status
- Stop Table
- Last Route Update
- Customer Invoice Document
- Synonyms
Data Model
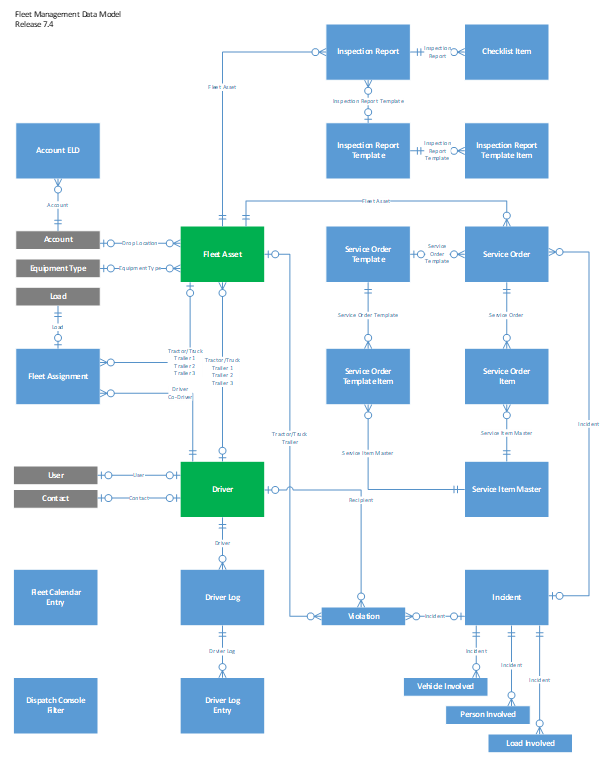
Samsara ELD Integration
FM requires the use of Samsara ELD tracking. FM integrates to both the ELD device attached to the Fleet Asset and the Driver’s phone via the Samsara Driver Phone Application.
The bi-directional integration is accomplished via three mechanisms:
- The Fleet Management Job invokes API calls on the Samsara API.
- Samsara pushes event packets to the application via the TMS Listener and Samsara Event Processor.
- The Load LWC widget can send text messages to the driver via the Samsara phone application.
Fleet Management Job
The heart of the FM is the Fleet Management Job, which runs continuously every 15 minutes. It is a 15-pass batch process that performs the following functions. Entries in red only run once per day (after midnight):
- PASS 1: SetTimezone for all shipping locations (1000 max per pass).
- PASS 2: SyncFleet Assets with Samsara Vehicles- VIN or ELD ID provide shared unique keys.
- If Fleet Asset does not exist, create it
- If Fleet Asset Name or License out of sync, update Samsara.
- If Fleet Asset ELD ID not populated, update it.
- PASS 3: Get and Save latest Vehicle statistics.
- PASS 4: SyncDrivers - [CDL # + License State] or ELD ID provide shared unique keys.
- Couple TMS and Samsara Driver records in start() method.
- For ELD ID synced Drivers, update Samsara if needed.
- For License synced Drivers, update the TMS with ELD ID, and update Samsara.
- For TMS-only Drivers create Driver on Samsara.
- For Samsara-only Drivers create Driver on TMS.
- PASS 5: Get and Save latest Driver HOS Clocks.
- PASS 6: Get and Save Driver Log Summaries for each day of grace period.
- PASS 7: Get and Save Driver Log Entries for each day of grace period.
- PASS 8: Delete any obsolete Driver Log Entries not upserted in Pass 7.
- PASS 9: Sync shipper/consignee locations used by recent loads.
- PASS 10: Get updates for all "active" routes and update stops and fleet assignments.
- PASS 11: Upsert/Delete new/changed/deleted routes and update Fleet Assignment distances.
- PASS 12: Get all driver documents since last run.
- PASS 13: Get all driver messages since last run.
- PASS 14: Update Load current location from Fleet Asset geo updates.
- PASS 15: Update Driverfields on relay Loads if "Started" Fleet Assignment has changed.
There is a one-time download (“Pass 0”) of ELD locations that are transformed into Account ELD records initiated via the ELD Location Download button on the TMS Configuration page.
Job Notes
- You may run the Fleet Management Job even if you are not managing a fleet to populate the Timezone field on account records. If Fleet Management is not enabled, the job will run as a one-pass process which populates the Timezone field.
- You may run one pass only of the Fleet Management Job by setting the Fleet Management Pass Counter configuration setting. DO NOT set this field unless you are debugging.
- Timezone field population on the account record occurs for 1000 records per batch run, so it may take several hours for all accounts to be populated.
- If the Timezone field for an account cannot be calculated, the field is set to Unknown. You must correctly populate the Timezone manually for all these records.
- If an account cannot be updated with the Timezone field due to custom code or validations, this pass of the batch process is disabled and the Timezone Update Disabled flag is set on TMS Admin🡪Configuration. You must correct the error that is preventing the update of account records, and then uncheck this field.
- Samsara Vehicles are paired with Fleet Asset records via the ELD ID field. This match is initially established by matching the VIN field.
- Samsara Drivers are paired with Driver records via the ELD ID field. This match is initially established by matching the [CDL # + CDL State/Province] fields.
- Driver Logs are not retrieved for the current day as the data is constantly changing.
- Samsara Locations/Addresses are paired with one or more Account records via the Account ELD record created for every Fleet shipping location.
- Samsara driver Routes are paired with Fleet Assignment records via the ELD Route ID field.
- If a driver uploads a document and the current load for that driver cannot be determined, the document is staged in the Inbound Email table (similar to other carrier documents).
- Make sure that drivers submit all documents from the phone application from the route the document pertains to. Otherwise it cannot be associated with the load.
- If a driver sends a text message and the current load for that driver cannot be determined, the message is dropped.
- The Fleet Carrier Transportation Profile mileage API settings are used when calculating Fleet Asset distance fields. Make sure they are visible and set properly.
Samsara Event Processor
The Samsara Event Processor receives “push” packets from Samsara corresponding to the following events (if enabled):
- Battery Low
- Battery Voltage Below
- Dashcam Disconnected
- Device Disconnect
- Device Has Vehicle Fault
- Device Location Inside Geofence
- Device Location Outside Geofence
- Device Movement
- Device Speed Above
- Device Speed Above Speed Limit
- Device Unplugged
- Dispatch Route ETA Threshold
- Door Activated
- Driver Document Submitted
- Engine Idle
- Harsh Event
- Hos Violation
- Humidity Above
- Humidity Below
- Reefer Has New Alarm
- Reefer Temperature Above Set Point
- Reefer Temperature Below Set Point
- Safe Dvir With Defects
- Scheduled Maintenance Date
- Scheduled Maintenance Engine Hours
- Scheduled Maintenance Odometer
- Temperature Above
- Temperature Below
- Unsafe Driver
- Vehicle Fuel Level Below
These alerts are displayed in the current stop’s Carrier Status Comments field and the load’s Load Status Comments field.
Dispatch Console
The Dispatch Console is the key user interface for the FMM.
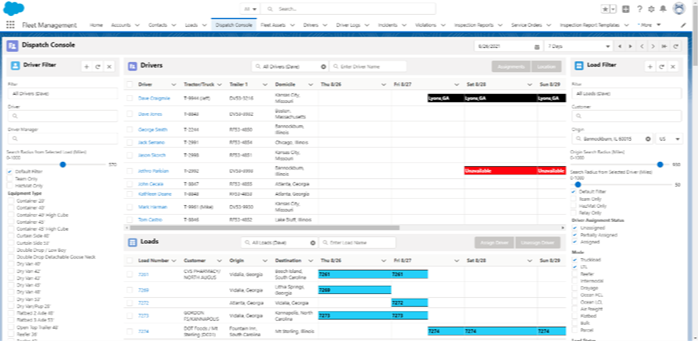
Dispatchers perform the following functions here:
- Create and save Driver Filters for quick access to driver groups they are responsible for.
- Create and save Load Filters for quick access to loads they are responsible for.
- View Driver HOS data and past assignments.
- View Driver current location.
- View Drivers and Loads on a map.
- Assign drivers, co-drivers, and fleet assets to loads.
- Unassign drivers from loads.
Miscellaneous Notes
- Only loads with a Fleet field value of “true” are displayed in the Dispatch Console.
- The Customer Invoice Document object Synonyms field is used to capture documents from drivers via the Samsara phone application. Existing users of Samsara may use document names that are different from our definitions. Populate this field if this is the case.
Installation Instructions
- Expose the new Fleet Management application (grouping of tabs) to appropriate users or create your own Fleet management tab grouping as needed.
- Provide access to the Dispatch Console tab as needed.
- Install Samsara ELD devices in all Fleet Asset tractors/trucks.
- Install Samsara Driver Phone Application on all driver smart phones.
- From the Samsara Management Application:
- Add all driver documents using the names defined in the Customer Invoice Documents object.
- Add the following required field to all driver document types:
- Is Proof of Delivery (“Yes” or “No”)
- Configure your web hook for push alerts.
- Configure your push alert types and thresholds.
- From Settings🡪Fleet🡪Driver App review setup parameters.
- From Settings🡪Fleet🡪Dispatch review setup parameters.
- Create the Fleet Management default carrier that all/many Fleet loads and drivers will be associated with.
- Create stored rates for the default carrier for all Fleet lanes.
- Set the Fleet Loads Only field correctly for all stored rates.
- From TMS Admin🡪Configuration set the Fleet Management configuration parameters appropriately.
- Enter Samsara credentials from TMS Admin🡪Credentials.
- Provide CRUD access to the new tabs, tables, and fields described above.
- Add the Account ELD related list to shipper/consignee account page layout(s).
- Add the Fleet Assignment related list to fleet-related load page layout(s).
- If a current Samsara customers, from TMS Admin🡪Configuration click on the ELD Location Download button to sync all current ELD locations with accounts (via the creation of Account ELD records). Wait for the process to complete and then spot-check Account ELD records with Samsara locations.
- If you pre-load Driver records, make sure the CDL # and CDL State/Province fields are correct (and the same as on Samsara if an existing Samsara customer).
- If you pre-load Fleet Asset records make sure the VIN field is correct (and the same as on Samsara if an existing Samsara customer).
- Start the Fleet Management Job.
- After letting the job run for [total shipping location account records/1000 * 15 minutes], manually populate the Timezone field on all accounts where the value is Unknown.
- If you change the geofence of a Samsara location from Circle to Polygon using the Samsara application, first change the Geofence Type field to Polygon on the related Account ELD record(s). Polygon geofence accounts are NOT updated from TMS🡪Samsara as the creation of the polygon on Samsara changes the underlying latitude/longitude data for the address.
Revenova Web Service User Setup
Perform the following steps to set up customer-specific API users for the Revenova Web Service.
- Clone the Partner Community security profile and name the new security profile (for example) “GLT Community API User.”
- Add the security profile to the Member profiles for the current partner community.
- All Administrative and General User permissions checkboxes should be unchecked except for:
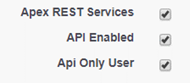
- For each API User:
- Temporarily uncheck the API Only User checkbox on the security profile.
- Create/Community Enable the Account, Contact, and User records using the profile above, setting the email to yourself.
- Respond to the portal welcome email and change/note the password.
- Re-Check the API Only User checkbox on the security profile.
- Add a TMS license to the new user.
- Update any sharing rules, validations, role assignments, etc. needed to establish the user’s access rights.
- These are typically identical to the settings for the Partner Community non-API users.
- Obtain and add the IP address ranges of the calling process to the security profile IP whitelist.
- Send the developer who is invoking the API the credentials and key org information, for example:
ID: xxxx@glt.com
PW: xxxxx11223344
ORG ID: 00D1I000000ndNs
Login URL: https://login.salesforce.com/services/Soap/c/42.0
Services URL: https://na73.salesforce.com/
External Access to Functionality via the Revenova API
Developers can access key Revenova TMS functionality from outside the package using the global RevenovaAPI class.
A working knowledge of the Revenova data model is the only prerequisite to using this API. All API classes can be understood by referring the table definitions for the custom objects below.
The RevenovaAPI provides the following capabilities:
- Create, update, and delete loads with associated child records.
- Get route mileage for any number of trip stop locations.
- Update mileage information to a load.
- Get stored/negotiated rate customer quotes for a load.
- Get stored/negotiated rate carrier quotes for a load.
- Calculate NMFC class for a line item.
The key objects/tables involved in using the API are illustrated below:
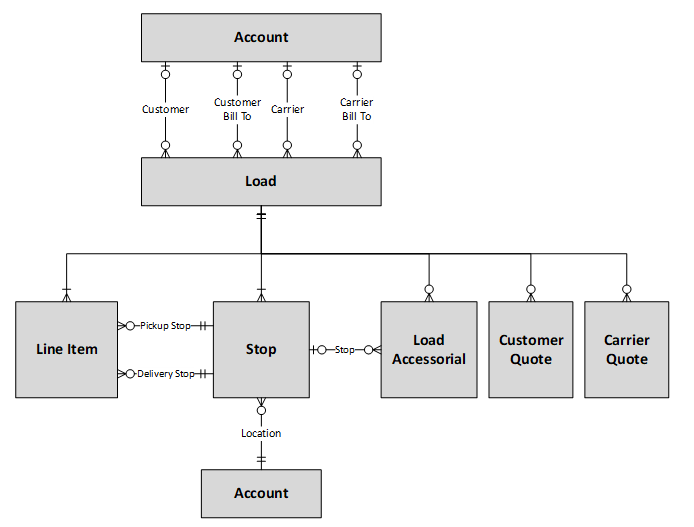
API Interface
View the API globally accessible interface from Setup🡪Develop🡪Apex Classes🡪RevenovaAPI. The API consists of one global API class (RevenovaAPI) and six global inner classes that “wrap” the associated database records.
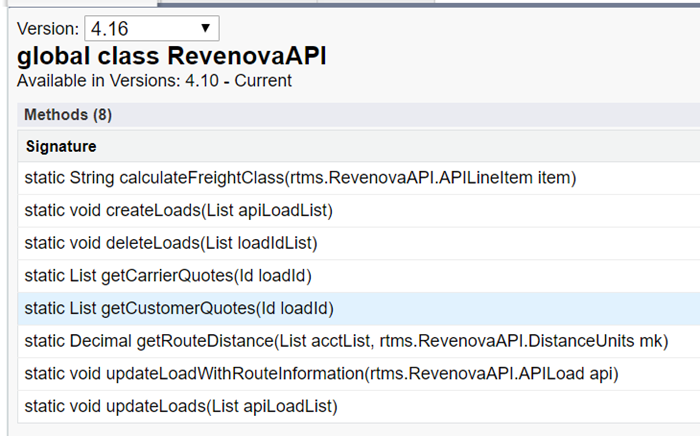
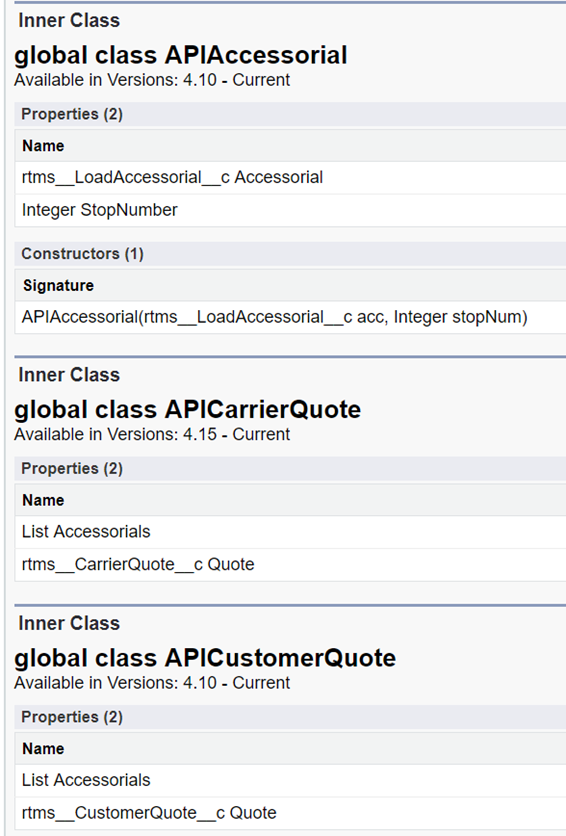
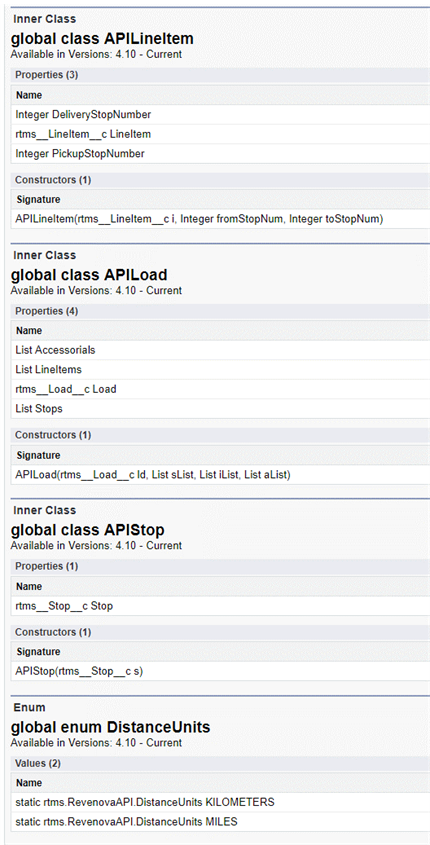
Example Code
Refer to the sample code below to understand how to invoke API functions. All samples are:
Where you see constants below refer to the field definition on the table to get valid values.
/**
* Copyright 2017 Revenova, LLC. All rights reserved.
*/
public with sharing class RevenovaAPITester {
public static void createAndUpdateLoad() {
// stage accounts needed
Account customerAccount = [select Id from Account where rtms__TMS_Type__c includes (:'Customer') limit 1];
List<Account> stopAccounts = [select Id from Account where rtms__TMS_Type__c includes (:'Shipper/Consignee')
limit 2];
List<rtms__Accessorial__c> accList = [select Id from rtms__Accessorial__c limit 2];
// construct load and child records
rtms__Load__c load1 = new rtms__Load__c(rtms__Order_Date__c = Date.today(),
rtms__Load_Status__c = 'Unassigned',
rtms__Sales_Status__c = 'Pending',
rtms__Total_Weight__c = 0,
rtms__Weight_Units__c = 'lbs',
rtms__Customer__c = customerAccount.Id);
rtms__Stop__c stop1 = new rtms__Stop__c(Name = 'Stop 1',
rtms__Number__c = 1,
rtms__Location2__c = stopAccounts[0].Id,
rtms__Expected_Date__c = Date.today(),
rtms__Is_Pickup__c = true,
rtms__Is_Dropoff__c = false);
rtms__Stop__c stop2 = new rtms__Stop__c(Name = 'Stop 2',
rtms__Number__c = 2,
rtms__Location2__c = stopAccounts[1].Id,
rtms__Expected_Date__c = Date.today().addDays(2),
rtms__Is_Pickup__c = false,
rtms__Is_Dropoff__c = true);
rtms__LineItem__c item1 = new rtms__LineItem__c(Name = 'Item 1',
rtms__Item_Description__c = 'Item 1 Desc',
rtms__NMFC_Class__c = '50',
rtms__Weight__c = 1000,
rtms__Weight_Units__c = 'lbs',
rtms__Handling_Unit_Count__c = 50,
rtms__Handling_Units__c = 'Pallets',
rtms__Packaging_Unit_Count__c = 10,
rtms__Packaging_Units__c = 'Cartons',
rtms__Length__c = 48,
rtms__Width__c = 40,
rtms__Height__c = 48,
rtms__Dimension_Units__c = 'in');
rtms__LineItem__c item2 = new rtms__LineItem__c(Name = 'Item 2',
rtms__Item_Description__c = 'Item 2 Desc',
rtms__NMFC_Class__c = '50',
rtms__Weight__c = 1000,
rtms__Weight_Units__c = 'lbs',
rtms__Handling_Unit_Count__c = 50,
rtms__Handling_Units__c = 'Pallets',
rtms__Packaging_Unit_Count__c = 10,
rtms__Packaging_Units__c = 'Cartons',
rtms__Length__c = 48,
rtms__Width__c = 40,
rtms__Height__c = 48,
rtms__Dimension_Units__c = 'in');
rtms__LoadAccessorial__c acc1 = new rtms__LoadAccessorial__c(Name = accList[0].Name,
rtms__Accessorial__c = accList[0].Id,
rtms__Provider__c = 'Carrier');
rtms__LoadAccessorial__c acc2 = new rtms__LoadAccessorial__c(Name = accList[1].Name,
rtms__Accessorial__c = accList[1].Id,
rtms__Provider__c = 'Carrier');
// create and save load with two stops, two line items, and two accessorials
rtms.RevenovaAPI.APILoad apiLoad1 = new rtms.RevenovaAPI.APILoad(Load1,
new List<rtms.RevenovaAPI.APIStop> {
new rtms.RevenovaAPI.APIStop(stop1),
new rtms.RevenovaAPI.APIStop(stop2)
},
new List<rtms.RevenovaAPI.APILineItem> {
new rtms.RevenovaAPI.APILineItem(item1, 1, 2),
new rtms.RevenovaAPI.APILineItem(item2, 1, 2)
},
new List<rtms.RevenovaAPI.APIAccessorial> {
new rtms.RevenovaAPI.APIAccessorial(acc1, 1),
new rtms.RevenovaAPI.APIAccessorial(acc2, 2)
});
// create
rtms.RevenovaAPI.createLoads(new List<rtms.RevenovaAPI.APILoad> {apiLoad1});
// update
item1.rtms__Weight__c = 2000;
rtms.RevenovaAPI.updateLoads(new List<rtms.RevenovaAPI.APILoad> {apiLoad1});
}
public static void deleteLoad(Id LoadId) {
rtms.RevenovaAPI.deleteLoads(new List<Id>{loadId});
}
public static List<rtms.RevenovaAPI.APICustomerQuote> getCustomerQuotes(Id loadId) {
return rtms.RevenovaAPI.getCustomerQuotes(loadId);
}
public static List<rtms.RevenovaAPI.APICarrierQuote> getCarrierQuotes(Id loadId) {
return rtms.RevenovaAPI.getCarrierQuotes(loadId);
}
public static Decimal getRouteDistance(List<Account> aList) {
return rtms.RevenovaAPI.getRouteDistance(aList, rtms.RevenovaAPI.DistanceUnits.MILES);
}
public static String calculateFreightClass(APILineItem item) {
return rtms.RevenovaAPI.calculateFreightClass(item);
}
/**----------------------------------------------------------------
EXAMPLE INVOCATIONS OF THIS TEST CLASS
RevenovaAPITester.createAndUpdateLoad();
RevenovaAPITester.deleteLoad('a0io0000005eYR6');
RevenovaAPITester.getCustomerQuotes('a0io0000005eYPJ');
RevenovaAPITester.getCarrierQuotes('a0io0000005eYPJ');
System.debug('DISTANCE:' + RevenovaAPITester.getRouteDistance(
[select Id, ShippingStreet, ShippingCity, ShippingState, ShippingPostalCode, ShippingCountry
from account where shippingstreet != null limit 3]));
*/
}